
Comfy Labs – Complete User Manual
Parts ©2026 Chipp Walters, Altuit, Inc.
Getting Started with Comfy-Labs
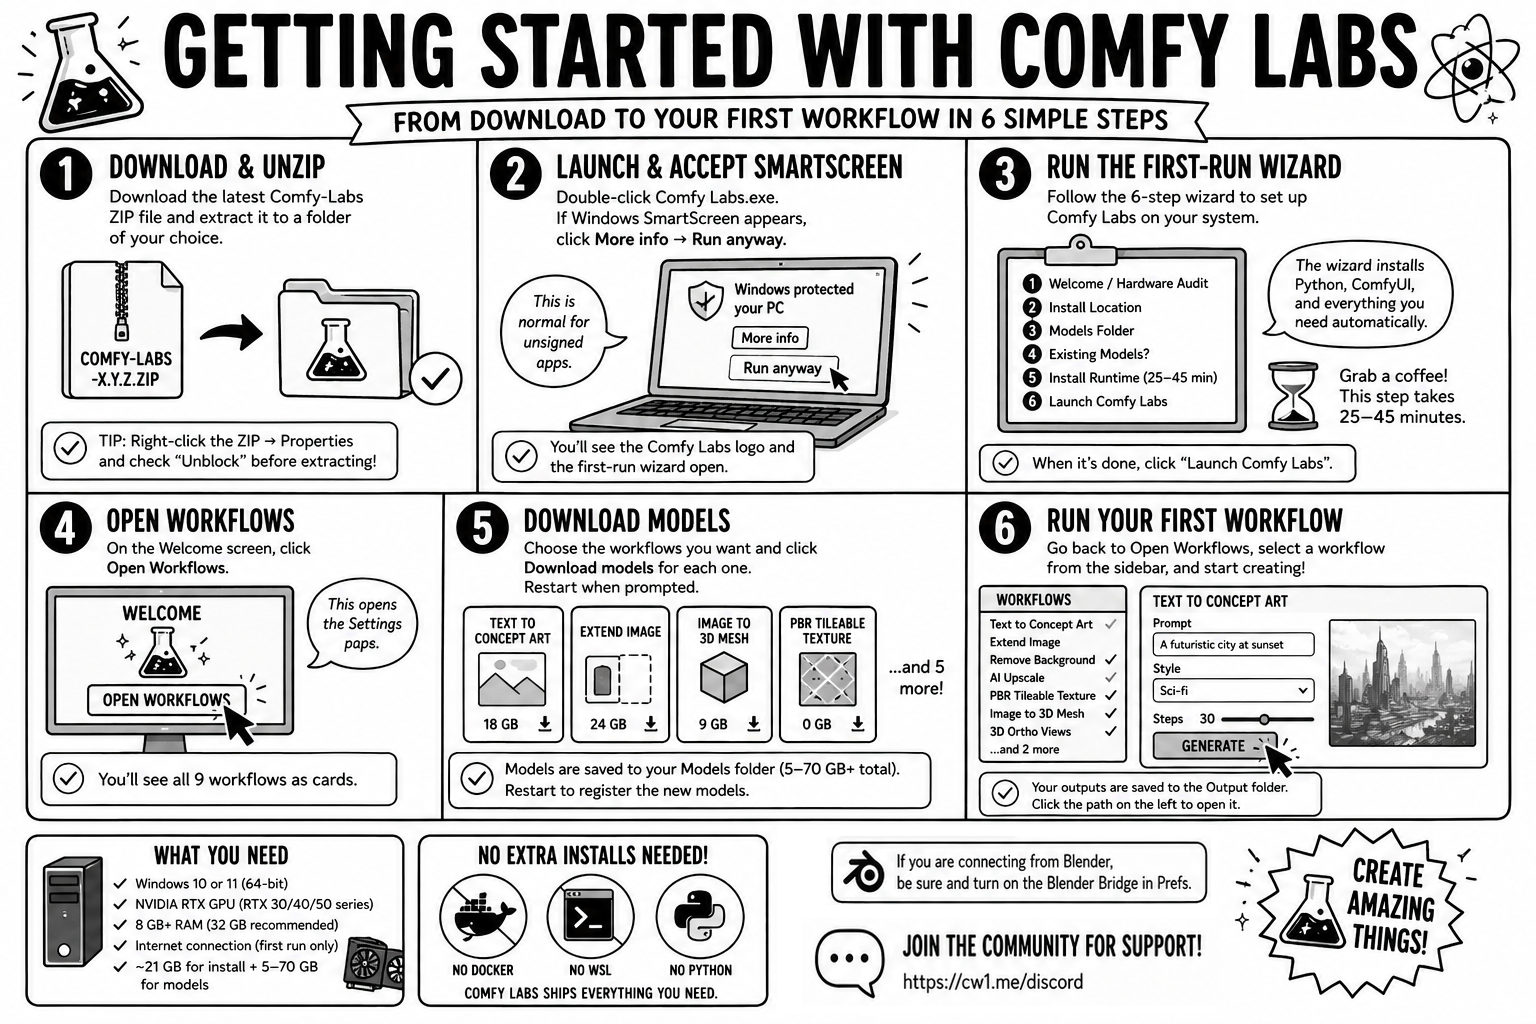
Comfy Labs is a native Windows desktop app that runs nine AI-powered creative workflows on your own NVIDIA GPU – image generation, outpainting, background removal, AI upscaling, PBR texturing, 3D mesh generation, concept art, ortho-view rendering. No cloud, no monthly fees, no accounts. Everything runs locally.
This section walks you from “I just downloaded the ZIP” to “my first workflow is running” in about 30–60 minutes (most of which is unattended download time).
What you need before you start
- Windows 10 or 11 (64-bit).
- An NVIDIA RTX GPU (RTX 30-, 40-, or 50-series). Comfy Labs does not support AMD or Intel Arc GPUs – the AI runtime requires CUDA.
- A current NVIDIA driver (any GeForce driver from late 2024 or newer; the wizard tells you the version it sees).
- An internet connection for first-run setup. After install, every workflow runs offline.
-
Disk space:
-
Install drive (you pick during setup): ~21 GB for the Python runtime + ComfyUI + custom nodes. A drive other than C: is recommended, but C: is allowed if you have 25+ GB free there. (The Electron app itself, plus
config.jsonandapp.log, sit under 10 MB regardless.) - Models drive (you pick during setup): another 5–70 GB on top, depending on which workflows you choose. Concept Magic alone needs ~18 GB; Image to 3D Mesh adds ~9 GB; Extend Image adds ~24 GB.
-
Install drive (you pick during setup): ~21 GB for the Python runtime + ComfyUI + custom nodes. A drive other than C: is recommended, but C: is allowed if you have 25+ GB free there. (The Electron app itself, plus
- System RAM: 8 GB minimum, 32 GB recommended.
No Docker, no WSL, no Python install, no Git install required. Comfy Labs ships its own Python 3.12 runtime and a bundled MinGit binary. You just unzip the app and double-click.
Step 1 – Download and unzip
-
Get the latest
Comfy-Labs-X.Y.Z.zipfrom the Comfy Labs distribution page. - Right-click the ZIP -> Properties -> check “Unblock” -> OK, then Extract All to a folder of your choice (Desktop, Documents, anywhere). The “Unblock” step prevents Windows SmartScreen from refusing to launch the app.
-
Open the extracted folder. You’ll see
Comfy Labs.exeand aresources/folder next to it. Do not moveComfy Labs.exeout of its folder – it needs the siblingresources/tree to start.
Tip: Right-click
Comfy Labs.exe-> Pin to taskbar (or Pin to Start) for one-click access later. You can also right-click the .exe and choose Send to -> Desktop (create shortcut) if you prefer a desktop icon.
Step 2 – Launch and accept SmartScreen
Double-click Comfy Labs.exe. The first launch may show a Microsoft Defender SmartScreen warning (“Windows protected your PC”) because the build is not yet code-signed.
- Click More info, then Run anyway. Comfy Labs is unsigned during the closed beta – this is expected. (Future releases will be EV-signed and the warning will go away.)
A small window opens showing the Comfy Labs logo and the first-run wizard.
Step 3 – Run the first-run wizard
The wizard is six short steps. Each step is described in detail below in First-Run Setup Wizard, but the speedrun is:
| Step | What you do | Time |
|---|---|---|
| 1. Welcome / hardware audit | Verify the GPU, VRAM, RAM, and disk numbers shown all show green. | 5 sec |
| 2. Install location | Pick a drive with 25+ GB free. A non-system drive is recommended, but C: is allowed. The wizard auto-creates a Comfy-Labs subfolder. |
10 sec |
| 3. Models folder | Accept the default (<install>/models) or pick an external/secondary drive for headroom. |
10 sec |
| 4. Existing models? | If you already have a ComfyUI install with models on this PC, point the wizard at its models/ folder to skip re-downloading them. Otherwise click Skip. |
10 sec |
| 5. Install runtime | Click Start install. Comfy Labs downloads and installs ~3 GB of Python + PyTorch + CUDA + ComfyUI + 26 pinned custom nodes. 25–45 minutes on a typical connection. | unattended |
| 6. Launch | Click Launch Comfy Labs. The wizard dismisses and the main window appears. | 1 sec |
It is safe to walk away during step 5. The progress log streams every command. If anything fails, the wizard surfaces the actual error (no silent fallback) and gives you a Stop install button to clean up the partial install before retrying.
Step 4 – Pick and download your first workflows
After the runtime install finishes, the main window shows the Welcome screen with a single big button: Open Workflows. Click it.
The app opens the Settings page (a Streamlit page hosted inside the app window). Here you’ll see all 9 workflows as cards, each with:
- Name + thumbnail + short description
- VRAM badge (greyed out if your GPU is below the workflow’s minimum)
- Download size badge
- A status badge: Ready / Models missing / Unavailable (GPU)
- An action button: Install / Download models / Manage
Pick the workflows you want and click Download models on each. You don’t need all 9 – start with one or two. Each workflow downloads its model weights into your models folder; sizes range from 0 GB (PBR Tileable, all CPU) to 24 GB (Extend Image).
When the model download finishes, the page shows a Restart now / Later dialog – click Restart now so the workflow’s model paths register cleanly with ComfyUI.
Step 5 – Run your first workflow
After the restart:
- Click Open Workflows again from the welcome screen.
- The sidebar inside the Streamlit pane lists every installed workflow. Workflows whose models aren’t downloaded yet show as (needs models) and are disabled – click them to be sent back to Settings.
- Click a workflow name (e.g. Text to Image) and follow the on-screen instructions in the workflow’s UI.
-
Generated outputs are saved to
<install>/output/<workflow>/by default. Click the Output path on the left side of the status bar at the bottom to open the output folder in Windows Explorer.
You’re up. The rest of this manual is reference – you’ll come back to specific sections when you need them.
System Requirements
| Component | Minimum | Recommended |
|---|---|---|
| OS | Windows 10 (64-bit) | Windows 11 |
| GPU | NVIDIA RTX 30/40/50-series (sm_86 / sm_89 / sm_120) | RTX 50-series for full Image-to-3D-Mesh support |
| VRAM | 4 GB (Remove Background only); 12 GB for most workflows; 16 GB for Extend Image and Image to 3D Mesh | 16+ GB |
| System RAM | 8 GB | 32 GB |
| Disk – system (C:) drive | ~10 MB free (config + log only) | (same) |
| Disk – install drive | ~25 GB free | 50+ GB free |
| Disk – models drive | ~10 GB free per workflow you install | 100+ GB on an SSD |
| NVIDIA driver | Recent driver supporting CUDA 12.8 (late-2024 or newer) | Latest GeForce driver |
| CPU | Any modern x86_64 (workflows are GPU-bound) | (same) |
Per-workflow VRAM requirements – see the Workflows Quick Reference table below for the VRAM number tied to each workflow. The lowest-cost workflow (Make PBR Tileable Textures) needs 0 GB GPU VRAM since it’s pure CPU/PIL processing; the heaviest (Extend Image and Image to 3D Mesh) want 16 GB.
Notes:
-
If GPU detection fails or
nvidia-smiis missing, update your driver from nvidia.com/drivers. - Lower-VRAM cards (e.g. 10 GB RTX 3080) can run most workflows but may spill into Windows shared GPU memory, which is much slower than dedicated VRAM. See Troubleshooting for tuning timeouts.
- The disk numbers above are the minimum-after-install. Comfy Labs’s runtime is ~21 GB on the install drive; model weights live separately on whichever drive you point at in step 3 of the wizard.
- Comfy Labs is “fully local” – no telemetry, no required accounts, no phone-home. Once installed, it works offline. The only network call after install is the optional update check (which can be triggered manually).
First-Run Setup Wizard
The wizard runs automatically the first time you launch Comfy Labs.exe. It also re-runs in Reconfigure mode if your saved configuration becomes invalid (drive unmounted, install folder deleted, etc.) – in that case a yellow banner explains what needs fixing.
Step 1 – Welcome and hardware audit
The wizard inspects your machine using nvidia-smi and Windows system info, then displays:
- GPU name and compute capability (e.g. NVIDIA GeForce RTX 4090, sm_89)
- VRAM (must be at least 4 GB)
- System RAM (must be at least 8 GB)
- Free disk on your largest drive with 25+ GB free (the wizard prefers a non-C: drive when one qualifies, but C: is allowed)
- OS version and driver version (informational)
Each row shows green if it passes the floor and red if it doesn’t. You cannot advance past this step if the audit fails the floor. If your GPU isn’t detected, install or update the NVIDIA driver and relaunch.
Step 2 – Install location
Comfy Labs needs to install ~21 GB of Python runtime, ComfyUI source, and 26 pinned custom nodes. You pick where it goes.
- The wizard suggests the largest non-C: NTFS drive with at least 25 GB free, when one qualifies. A drive other than C: is recommended (the install is heavy and most users have more headroom on a secondary drive), but C: works if you have 25+ GB free there. Single-drive setups are fully supported.
- You can browse to any folder on any drive. The validator only checks for a valid drive-letter path with enough free space; the v0.2.19-and-earlier hard block on C: is gone.
-
Whatever folder you pick, the wizard appends
\Comfy-Labsautomatically (unless your folder is already namedComfy-Labs). This makes uninstall safe-by-construction: aRemove-Item -Recurse <install>\Comfy-Labscan never wipe out unrelated files in the parent folder.
The display below the path field shows the actual final install path so you can confirm before clicking Next.
Step 3 – Models folder
Model weights are heavy (Concept Magic alone is ~18 GB; Extend Image ~24 GB; Image to 3D Mesh ~9 GB). They live in a separate folder so you can put them on an external drive or a different internal drive from the runtime.
-
Default:
<install>/models/ - Recommended: an external SSD or a non-system drive with 100+ GB headroom if you plan to install most workflows.
- You can change this later in Preferences (and the next launch will use the new location).
Step 4 – Already have ComfyUI models?
If you already run ComfyUI on this PC – standalone, ComfyUI-Easy-Install, or any other distribution – the wizard can scan its models/ folder and link any matching files (by filename + size) into your Comfy Labs models folder. This can save tens of GB.
-
Browse to your existing ComfyUI models folder (e.g.
D:\ComfyUI-Easy-Install\ComfyUI\models), or - Click I don’t have any – skip this step to download everything fresh.
Linking uses Windows hardlinks (cross-volume falls back to file copy automatically). Hardlinks don’t require admin rights or Developer Mode. The original files in your ComfyUI install are not modified, and uninstalling Comfy Labs will not delete them – a .comfy_labs_manifest.json records which files were linked from where.
Step 5 – Install the Python runtime
Click Start install. Behind the scenes the wizard runs python-bootstrap/bootstrap.py, which:
-
Extracts the bundled Python 3.12 runtime (
extract-python) – ~5 seconds. The portable ZIP carries a relocatable CPython 3.12.13 build fromastral-sh/python-build-standalone(~46 MB packed). It is unpacked into<install>/python-runtime/and never touches PATH or the system Python. -
Extracts the bundled MinGit (~40 MB packed) into
<install>/git-runtime/so the clone steps below work even on machines without git on PATH. -
Detects the GPU (
detect-gpu) – runs nvidia-smi, parses compute capability and VRAM. -
Creates a Python venv (
create-venv) at<install>/runtime/, built on top of the bundled interpreter. -
Installs PyTorch + CUDA 12.8 (
install-pytorch) – ~2 GB. -
Installs FlashAttention (
install-flashattn) – prebuilt wheel from the catalog mirror. If a matching wheel for your Python ABI is not yet hosted, this step is treated as a non-fatal skip; workflows still run, just without FA’s speedup. -
Clones ComfyUI (
clone-comfyui) at the pinned commit, using the bundled git binary. -
Installs ComfyUI’s own dependencies (
install-comfyui-deps). -
Installs 26 pinned custom nodes (
install-custom-nodes) – the same set the workflows depend on. If one node fails to build (broken sdist, missing C compiler, etc.), it is skipped with a clear reason and the rest of the nodes install normally; the failure is summarized in the final report. -
Installs the Comfy Labs Streamlit app deps (
install-app-deps). -
Pins ML libraries (
install-pinned-ml-deps) – diffusers, peft, huggingface_hub, transformers at the exact versions the 9 workflows require.
Each step shows in the live log pane; line color signals progress / skip / error. Total time on a typical connection: 25–45 minutes. Most of it is pip install downloading and unpacking wheels.
If a step takes a long time without printing anything (large quiet wheel downloads can sit silent for many minutes), the wizard emits a once-per-minute “still working (silent …)” heartbeat so you can tell the install is alive. Heartbeats never kill the install; the Stop install button is the only thing that kills a running bootstrap.
Two safety mechanisms:
- Stop install – the Back button becomes a red Stop install while bootstrap is running. Click it to kill the python/pip/git process tree and remove the partial install.
-
Skip if already installed – if you re-run the wizard (Reconfigure mode) and the venv at
<install>/runtime/pyvenv.cfgalready exists, this step is auto-marked done and you can click Next immediately. Saves 25–45 minutes when only paths needed fixing.
Pip wheel cache: every wheel pip downloads during install-pytorch, install-app-deps, etc. is also written to %LOCALAPPDATA%\Comfy Labs\pip-cache\. If you ever have to retry the install (e.g. after a network drop), pip pulls from the local cache and the same step finishes in seconds instead of redownloading 3-4 GB. The cache is never wiped automatically; see Preferences for the manual wipe button and the Uninstall checklist for the standalone uninstaller’s matching item.
Step 6 – Launch Comfy Labs
When the install succeeds, click Launch Comfy Labs. The wizard saves your choices to %APPDATA%\Comfy Labs\config.json and dismisses, dropping you into the Welcome screen.
The next time you launch Comfy Labs.exe, the wizard does not re-run – you go straight to the Welcome screen.
The App Interface
After the wizard finishes, every launch of Comfy Labs lands on the Welcome screen inside a single Electron window. The window has three persistent regions:
- Toolbar (top) – Updates, Support Log, Start/Stop ComfyUI, Output, Prefs, Help.
- Main area (center) – Welcome screen, or the Streamlit-hosted workflow UI when you click Open Workflows.
- Status bar (bottom) – output folder shortcut, three subprocess status dots, workflow-update badge (when updates are available), View Log, version.
Welcome screen
The welcome screen is what you see when you launch the app and any time you click Home in the toolbar.
- Comfy Labs logo and version badge.
- Open Workflows – big blue button. Disabled until Streamlit’s status dot turns green (~3–5 seconds after launch). Hovering the disabled button shows the reason. Click swaps the label to Opening Workflows… with a spinner while the BrowserView is attaching, so a slow attach doesn’t read as “did my click register?”; rapid double-clicks are guarded so only one open is ever in-flight.
- Uninstall Comfy Labs – outlined red button at the bottom (see Uninstall).
Toolbar (top)
| Button | What it does |
|---|---|
| Home | Visible only when you’re in Streamlit mode. Returns to the Welcome screen. |
| Updates | Checks https://www.widgetgadget.com/cw1/Comfy-Labs/version.json for a newer release. If a new version is available, an Update banner appears below the toolbar with Release notes and Download links. Auto-runs 30 seconds after launch in addition to the manual check. |
| Support Log | Bundles app.log, subprocess state, app info, and the installed-workflows manifest into a comfy-labs-report-<timestamp>.zip saved to your Desktop. No model files, no user images, no upload endpoint. Email the ZIP to whoever is helping you. |
| Start ComfyUI / Stop ComfyUI | Single toggle button. Shows Start ComfyUI (play icon) when the backend is stopped or crashed, Stop ComfyUI (square icon) when running, and a spinner while starting. Stop prompts for confirmation (frees VRAM, cancels in-flight generations); Start fires immediately. Replaces the older “Restart ComfyUI” button (v0.2.18). |
| Output | Opens the output folder in Windows Explorer. Same target as the Output label on the status bar. |
| Troubleshoot | Stethoscope icon. Opens the Troubleshoot Paths Streamlit page directly – the model-folder diagnostic that shows you which installed workflows can run, which have missing files, and which files are on disk but in a non-canonical location. See Workflow management pages for the full layout. |
| Prefs | Opens the Preferences dialog (output folder, output retention, Concept Magic bridge toggle). |
| Help | Opens the About modal with version info and a User Manual button that opens this document in your browser. |
Status bar (bottom)
| Region | What it does |
|---|---|
Output: <path> |
Click to open the output folder in Explorer. Shows (not configured) until the wizard finishes. |
| Streamlit dot | Streamlit on port 8501. Gray = stopped, yellow pulse = starting, green = running, red = crashed. Hover for the last error. |
| cm_bridge dot | Concept Magic FastAPI bridge on port 8000. Off by default – enable in Preferences if you use the Concept Magic Blender add-on. |
| ComfyUI dot | ComfyUI on port 8188. Lazy-spawned: stays gray until the first workflow run or Concept Magic request. |
| Workflow update badge | Appears when the catalog reports a newer version of an installed workflow, or a brand-new workflow not yet on disk. Reads “N workflow update(s) available”, “N new workflow(s) available”, or “N updates + M new available”. Click to jump to the Settings page where you can install or update them. The badge is hidden when nothing is pending. Updates are detected by semver-comparing each workflow’s version: field in the mirror’s catalog.json against your locally installed manifest’s version: field (v0.2.53+); the catalog is fetched once at launch (with a 5-minute soft TTL across navigation). Both the badge and the Settings page’s “Updates Available (N)” tab read the same signal so the two counts always agree. |
| View Log | Opens the in-app Log Viewer with auto-refresh. Shift+click to toggle Chrome DevTools (developer use). |
| vX.Y.Z | App version. |
Subprocess crash pane
If any of the three subprocesses dies unexpectedly, a native crash pane overlays the window with:
- The subprocess name (Streamlit / Concept Magic bridge / ComfyUI)
- Captured stderr verbatim
- Exit code
- Copy details – one-click copy to clipboard
- Send Error Report – bundles a ZIP to your Desktop (same as Support Log, but auto-tagged with the crash context)
- Restart – relaunches just that subprocess
- Dismiss – hides the pane (the subprocess stays down until you click Restart)
The crash pane is rendered by Electron itself, so it works even when Streamlit is the dead process.
Log Viewer
Click View Log in the status bar. The viewer shows app.log – a single file that contains:
-
Electron main-process logs (
[INFO] [App] ...,[ERROR] [Updater] ...) - React renderer logs (forwarded via IPC)
-
All three subprocesses’ stdout and stderr, line-by-line, prefixed with
[PY-streamlit],[PY-cmBridge],[PY-comfyui](errors get an extraERRtag)
Buttons: Refresh, Copy (to clipboard), Delete log, Close. Auto-refresh streams every second by default.
The log file lives at %APPDATA%\Comfy Labs\app.log.
Preferences
Open with the Prefs toolbar button.
-
Output folder – where generated images, PBR maps, 3D meshes, and ZIPs are written. Per-workflow subfolders are created automatically (
<output>/text-to-image/,<output>/image-to-image/, etc.). Defaults to<install>/output/. Browse to change. -
Output retention – how long to keep generated files before sweeping them to the Recycle Bin (recoverable):
- Never – keep everything forever
- 24 hours (default) – matches the Streamlit-side cleanup
- 7 days
- 30 days
The sweep runs at every app launch and once every 24 hours for long-running sessions. Files go to the Recycle Bin, not deleted outright – you can recover anything for as long as Windows keeps the recycle bin entries.
-
Enable Concept Magic bridge – checkbox, default OFF. When checked, Comfy Labs spawns the FastAPI bridge on port 8000 so the Concept Magic Blender add-on can drive ComfyUI. When unchecked, the bridge stays unspawned (zero CPU, zero VRAM). Toggling here spawns or stops the bridge live – no restart needed.
-
Pip wheel cache – shows the current cache size and a Wipe wheel cache now (~X GB) button. The cache lives at
%LOCALAPPDATA%\Comfy Labs\pip-cache\and stores downloaded Python wheels (PyTorch, transformers, etc.) so a re-install or partial-install retry doesn’t have to redownload the same ~4 GB. The cache is never wiped automatically – click the button when you want the space back. The button is disabled when the cache is already empty, and reports the freed bytes inline after a successful wipe. The cache is intentionally separate from the user’s global%LOCALAPPDATA%\pip\Cache\, so wiping it here cannot touch wheels owned by other Python installs on the machine. You can also remove this cache from the standalone uninstaller (item 7 in the Uninstall checklist).
Click Save to apply. The settings are written to %APPDATA%\Comfy Labs\config.json. The Pip wheel cache wipe runs immediately when clicked – it does not wait for Save.
Update banner
When the app detects a newer version on the update server, a thin blue banner appears below the toolbar:
Comfy Labs vX.Y.Z is available (you have vA.B.C) [Release notes] [Download] [×]
- Release notes opens the release notes URL in your default browser.
-
Download opens the ZIP download URL in your default browser. Comfy Labs is portable – unzip the new version into a new folder next to the old one and launch its
Comfy Labs.exe. Your config (in%APPDATA%) carries over automatically because it lives outside the app folder. Full procedure inUPGRADING_COMFY-LABS.md. - × dismisses the banner for this session.
The check runs automatically 30 seconds after launch, and on demand when you click Updates in the toolbar. Comfy Labs will never download or install an update without your action – “Download” just opens the URL in your browser.
For the deeper end-to-end view of how the channel works (mirror layout, semver compare, what version.json looks like), see the Updates reference section below.
Workflow management pages (Streamlit sidebar)
Once you click Open Workflows, the main area hosts Streamlit. The Streamlit sidebar has three top-level pages:
- Workflows – the per-workflow generation pages (Text to Image, Extend Image, etc.). This is what you see by default.
- Settings – workflow inventory: install / update / uninstall each workflow, plus optional model-pack installs.
- Troubleshoot – model-folder diagnostic: see what’s blocking your install, fix mis-registered files, download anything genuinely missing.
You can reach Settings and Troubleshoot directly without going through the Workflows sidebar:
- Click the workflow update badge in the status bar (when present) to jump straight to Settings.
- Click the Troubleshoot toolbar button (stethoscope icon) to jump straight to Troubleshoot.
Launch-time auto-route (v0.2.55+). When Comfy Labs starts up, it runs a quick install-state scan across every installed workflow. If any installed workflow has a required model file missing on disk, the app lands you on the Troubleshoot page automatically instead of the default Workflows page. This is the same scan the Troubleshoot page itself shows in its Blockers section – one source of truth for “is my install healthy?”. When everything’s green, you land on Workflows as normal.
Settings page
The Settings page lists every workflow Comfy Labs knows about, grouped into three tabs:
- All – every workflow in the catalog (installed + not).
- Installed – only the ones you’ve installed.
- Updates Available – only the ones whose mirror version is newer than your installed version.
Each row is a card showing the workflow name, description, hardware badges (VRAM / RAM / download size), and a status pill on the right:
| Pill | Meaning | Action button |
|---|---|---|
| :green[Ready] | Installed and all required model files are on disk. | Uninstall (removes plugin code, leaves models). |
| :orange[Models missing] | Installed but one or more required model files aren’t on disk. | Download models – fetches the missing files in one go with a progress bar. |
| :red[Unavailable – GPU] | Your GPU doesn’t meet the workflow’s minimum compute capability. | (None – workflow can’t run here.) |
| :grey[Not installed] | Not on disk yet. | Install – fetches the workflow’s plugin code (a few hundred KB) and downloads its required models. |
| :blue[Update available] | Mirror has a newer version than what you’ve installed. | Update – incremental, only the changed files (usually just manifest.yaml + ui.py). |
Optional model packs (v0.2.55+)
Below each installed workflow’s card, an expandable Optional model packs (N) section lets you pre-install alternate model variants without entering the workflow. For example, Text to Image ships with Z Image Turbo as the bundled default, but you can also use Flux 1, Flux 2, ERNIE, or the non-distilled Z Image base as variants – each is its own pack here.
Each pack row shows:
-
The pack name (e.g.
flux1_dev,z_image_base,ernie_turbo) - File count and total download size (e.g. “3 files, ~16.1 GB”)
- A status badge: :green[Installed] / :orange[Partial (n/N)] / :grey[Not installed]
- An Install button when the pack isn’t fully on disk
Clicking Install runs the same download flow as the in-workflow flow (described below) – just from outside the workflow, so you can stage downloads in advance.
You can also reach these alternate variants from inside the workflow itself: most workflow pages have a model picker (radio button at the top) where each variant is listed. Uninstalled variants are labeled (install required), and selecting one swaps the generation UI for an install affordance. Installing from the radio or from Settings’s expander writes the files to the same location – pick whichever fits your flow.
Troubleshoot page
The Troubleshoot page is your single-source-of-truth view of “is my Comfy Labs install healthy”. Click the Troubleshoot toolbar button (stethoscope icon) to reach it directly.
It walks your Models folder (the path the wizard set up), compares actual file locations against the canonical paths declared in each installed workflow’s manifest, and shows you what’s working, what’s mis-registered (file is on disk but in a different location than expected), and what’s genuinely missing from disk.
Page layout
1. Header
Shows your Models folder, the Registry file (<models>/.comfy_labs_manifest.json – where Comfy Labs records where each known model file actually lives on disk), and the Log file location. Each is a copy-pasteable absolute path.
2. Blockers (top of page; v0.2.55+)
The single source of truth for “this workflow can’t run yet”. Each red card lists one installed workflow that has at least one required model file missing on disk, with the specific filenames and expected paths.
When everything’s working, this section reads :green[All N installed workflows are ready.] – and the rest of the page is just maintenance tooling. This is the same signal the launch-time auto-route uses to decide whether to drop you here directly on startup.
3. Downloads folder panel (optional)
Comfy Labs lets you split two folder roles:
- Models folder – where Comfy Labs scans for pre-existing model files (your existing ComfyUI library, for example). Read-mostly.
- Downloads folder – where Comfy Labs writes new downloads. Write-mostly.
Most installs collapse both roles into the Models folder. Setting up a separate Downloads folder means uninstalling Comfy Labs can surgically remove just what it downloaded, leaving your pre-existing model files completely untouched. The panel detects whether you’re in collapsed-folder mode and offers an inline path picker if you want to split them. A restart prompt appears after you save (ComfyUI needs to re-read the model paths).
4. Metrics row
Six counters at a glance:
| Metric | What it counts |
|---|---|
| Total known | Every required model file across your installed workflows. |
| Registered | Files present on disk and recorded in the registry at the path the scan found them. |
| Fixable | Files present on disk but at a non-canonical location (e.g. a Mistral text encoder under text_encoders/ instead of clip/). Comfy Labs can record where they actually live so workflows find them – without moving anything. |
| Duplicates | Files present at more than one location. Informational only. |
| Stale | The registry says a file is at path X, but the file is gone and the scan can’t find one anywhere. |
| Missing | No registry entry, no scan match. The file genuinely isn’t on disk. |
The Total known count is scoped to installed workflows only (v0.2.55+) – workflows you haven’t installed don’t pollute this number, and optional model variants you’ve never picked don’t appear as “missing.” Earlier versions scanned the whole catalog, which inflated the count with phantom-missing entries.
5. Action buttons
Three buttons sit above the Problems list:
- Fix Paths Now (N) – updates the registry to record where Fixable + registry-update files actually live. No files are moved, copied, or hardlinked. This is usually all you need after pointing Comfy Labs at an existing ComfyUI models folder for the first time.
- Download N Missing (X GB) – downloads everything in the Missing list in one go. Progress bar + per-file status. Gated (manual-download) models open the workflow’s manual-download flow instead of auto-fetching.
- Re-scan – re-walks the models folder. Click this after you’ve manually moved a file, added a new model, or fixed something the scanner missed. Also reloads the backend modules so code edits apply without restarting the app.
6. Problems list
One card per non-OK model file, color-coded by status:
| Status | Meaning |
|---|---|
| :red[[MISSING] Not found on disk] | No registry entry and the scan found nothing. Needs download. |
| :yellow[[FIX] Found, not registered] | Scanner found a working location, no registry entry. Click Fix Paths. |
| :blue[[UPDATE] Registry points elsewhere] | Scanner found a better (non-cache) location. Click Fix Paths to update. |
| :grey[[STALE] Registered but file gone] | Registry says path X but X no longer exists. Restore the file or manually clean up. |
| :orange[[DUP] Multiple copies] | File present at >1 location. Shown alongside whatever the primary status is. |
Each card shows the filename, expected canonical location, source (HuggingFace repo, URL, etc.), and the actual on-disk location when known. All paths are absolute and copy-pasteable.
7. All known models (collapsed by default)
Full table, grouped by model type: Diffusion Models / CLIP & Text Encoders / VAE / LoRAs / ControlNet / Checkpoints / Repos (diffusers / HF) / Other. Toggle Show problems only to filter.
When you’d use the Troubleshoot page
- After the first-run wizard if you pointed Comfy Labs at an existing ComfyUI models folder – click Fix Paths Now to register where everything actually lives, then everything goes :green[Ready] without re-downloading anything.
- When a workflow says “Models missing” and you want to see whether the file is genuinely gone or just in an unexpected location.
- After manually moving files (e.g. cleaning up duplicates) – click Re-scan to refresh the registry.
- When the launch-time auto-route lands you here – something went missing since last launch (a file was deleted, a network drive disconnected). The Blockers section tells you exactly which file.
- Before reporting a workflow bug – check Troubleshoot first to rule out a missing-file misdiagnosis.
Workflows

Quick reference
Listed below in the order they appear in the Streamlit sidebar.
| Workflow | What it does | VRAM | Download size |
|---|---|---|---|
| Text to Image | Generate images from a text prompt with a choice of diffusion model (Z Image Turbo bundled; Flux 1 Dev, Flux 2 Dev, ERNIE Turbo as opt-in packs) | 12 GB | 20.7 GB max with every optional pack installed; ~6 GB with just Z Image Turbo |
| Image to Image | Re-imagine an uploaded image with a text prompt + denoise slider, same model choices as Text to Image (shared model files) | 12 GB | Shares model files with Text to Image |
| Image to Video | Turn a still image into a short video clip; pick LTX 2.3 (fast) or WAN 2.1 I2V (better motion). Optional RIFE 2x frame interpolation + SeedVR2 upscale to 720p / 1080p / 1440p / 4K | 16 GB | 70.8 GB max with every optional pack installed; nothing downloads until you pick a pack |
| Extend Image | Extend an image beyond its borders with AI-generated fill | 16 GB | 24.5 GB |
| Inpaint Image | Paint a brush mask over part of an image to fill or erase it. Two engines: Flux Fill Dev (creative replacement, prompt-guided) or LaMa (clean object removal). Shares Flux Fill weights with Extend Image | 16 GB | 24 GB (no extra download if Extend Image is installed) |
| Make PBR Tileable Textures | Convert any photo into a seamless tileable PBR texture set | 0 GB (CPU only) | 0 GB |
| Remove Background | Remove the background from any image | 4 GB | 0.5 GB |
| Image to 3D Mesh | Generate a textured 3D mesh (GLB) from a single image | 16 GB (RTX 50-series fully validated) | 9 GB |
| Concept Magic | Turn blockouts, sketches, or depth maps into photorealistic images | 12 GB | 18.5 GB |
| Concept Magic LoRA | Concept Magic with custom LoRA style support | 12 GB | 19.5 GB |
| Upscale Image | AI super-resolution via SeedVR2 | 12 GB | 3.9 GB |
| Create Ortho Views | Generate 4 orthographic views from a single image | 12 GB | 14.5 GB |
How workflows are installed and run
Workflows are catalog-driven and installed on demand. The app ships with the workflow code (manifests + Streamlit UI) bundled, but the model weights are not included in the .zip – they’re downloaded from the catalog mirror the first time you install each workflow. This keeps the app download small (~80 MB) while giving you fine control over which 5–70 GB of model weights actually land on disk.
The Settings page (the first thing you land on after first-run setup) is where you install, update, and manage workflows. The sidebar nav and per-workflow descriptions are built dynamically from the catalog, so brand-new workflows appear there as soon as they’re installed – no app update required. Workflows declare their own nav position via display_order and category in their manifest, so the order you see is author-curated, not alphabetical.
Each workflow card shows:
-
Hardware compatibility badge – greyed out + explanation if your GPU doesn’t meet the workflow’s
gpu_min_smorvram_gbminimums. - Status badge – Ready (code + models present), Models missing (code present, weights not downloaded yet), Unavailable (GPU).
- Action button – Install / Download models / Update / Uninstall / Manage.
- Download size for new install or update.
Updates are incremental. Each workflow’s manifest.yaml carries a files: block listing every shippable file with its sha256 + size. When you click Update, the client fetches the new manifest, diffs the hashes against what you already have on disk, and downloads only the differing or missing files. Editing one node in workflow.json upstream means you download that one file, not the whole workflow folder. Sha mismatches hard-fail the install (no silent fallback), so local corruption is detected and repaired on the next try.
LoRAs update without a workflow republish. A workflow’s lora_pack model entry binds to an index.json on the mirror, so adding or replacing a LoRA upstream is a pure content publish – the change reaches you the next time you click Update on the workflow, without any app or workflow version bump.
After install or update, Comfy Labs shows a restart-required dialog (“Workflow installed / updated – Restart now / Later”). The model paths register cleanly with ComfyUI on the next launch; Restart now is the right answer unless you have a reason to defer.
You can also Import Workflow from the Settings page top bar – accepts a .zip matching the manifest folder structure (manifest.yaml + ui.py + workflow.json) or a local folder with the same structure. Manual imports show an “unsigned source” warning every time, because importing runs arbitrary ui.py Python code.
Imported workflows install to %APPDATA%\Comfy Labs\workflows\<id>\ and survive .zip updates of the app itself.
General requirements
- GPU + VRAM: see the System Requirements section above and the per-workflow VRAM column in the Quick Reference table.
- ComfyUI: must be running for AI-powered features. Status shown in the status bar at the bottom of the app window. ComfyUI is lazy-spawned – the dot is gray until the first workflow run, then yellow (starting), then green.
- Supported image formats (all workflows): PNG, JPG, JPEG, WEBP.
Getting help inside a workflow
If a generation fails:
- Check the ComfyUI status dot in the status bar – gray means it’s stopped, red means it crashed.
- Click View Log in the status bar for error details.
- Refresh the workflow page (Ctrl+R inside the Streamlit area, or click Home -> Open Workflows).
- If a generation hangs, click Stop ComfyUI in the toolbar to free VRAM and cancel the run, then click Start ComfyUI to relaunch the backend.
- If the GPU is wedged (rare), reset the Windows display driver with Win+Ctrl+Shift+B.
Workflows timing out on a slow GPU
If any workflow fails with a ⏱ timeout message, see Troubleshooting for tuning COMFY_LABS_TIMEOUT_MULTIPLIER.
1. Extend Image
Extend any image beyond its borders using AI. Upload an image, choose how much to expand, and the AI generates seamless background extensions that match the original content.
1.1 Getting started
- Open Comfy Labs and click Open Workflows on the welcome screen.
- Click Extend Image in the sidebar.
- ComfyUI will lazy-spawn on the first generation; the status dot in the bottom status bar goes yellow (starting) then green (running).
1.2 Upload image
Upload any image you want to extend.
- Any size and aspect ratio
- The source image dimensions are shown below the preview
1.3 Expansion mode
Choose how the image should be expanded:
Percentage
Expand each side by a fixed percentage of the original dimensions.
- Options: 10%, 15%, 20%, 25%, 30%, 40%, 50%
- Default: 25%
- The output dimensions are shown below the slider
Aspect ratio
Expand the image to fit a target aspect ratio. The AI fills in whichever sides need padding.
- Options: 1:1 (Square), 16:9, 9:16, 4:3, 3:4, 3:2, 2:3
- If the image already matches the selected ratio, no expansion is needed
Manual (v0.2.44+)
Specify the exact number of pixels to add on each side independently. Use this when you need asymmetric expansion (e.g. extend only the top, or stretch wide on the right without changing the height).
- Four pixel inputs: Top, Right, Bottom, Left
- Range: 0–2048 per side, in 8-pixel steps
- Default: 256 on each side
- The output dimension caption updates live as you adjust the sliders
Manual mode is also the right choice when you want to iterate – extend by 256px on one side, then reuse the result as the new source and extend by another 256px. Flux Fill Dev (the underlying model) degrades when asked to invent a lot of pixels in one pass, so several small extensions usually beat one big extension.
1.4 Prompt options
Control what the AI generates in the extended area:
No prompt (default)
Works best for most images. The AI infers what to generate from the existing content.
Anti-hallucination
Prevents text, UI elements, labels, and watermark artifacts. Use this when extending viewport renders or screenshots.
Auto-describe
Uses AI to caption the image first, then uses that description to guide the extension.
- Click Generate description to auto-caption the image
- Edit the description in the text area if needed
- The description guides the AI’s fill – useful for complex scenes
Ctrl+Enter commits the description textarea to session state. Typing alone leaves your edit staged but uncommitted, so a fast-followed Outpaint click may run with the previous description. The caption under the textarea reminds you of this.
1.5 Advanced settings (v0.2.44+)
An Advanced expander below the prompt options exposes three knobs that previously required code edits. Defaults are sensible for most images – only touch these if you have a specific reason.
Guidance
How strongly the AI follows the prompt mode’s instructions (1.0–20.0).
- Default flips with the prompt mode: 10 for No prompt and Auto-describe, 5 for Anti-hallucination.
- Lower values give the AI more creative freedom; higher values keep it closer to the prompt’s intent.
- Editable in all three prompt modes – you no longer have to switch modes just to pick a different guidance value.
Steps
Number of denoising steps (15–40, default 20).
- More steps help with complex content (architecture, detailed textures, intricate fabric) where the previous fixed 20 sometimes left visible artifacts at the seam.
- Linear time cost – 40 steps takes twice as long as 20.
- 20 is the right starting point. Bump to 25-30 when the seam between source and outpainted area shows artifacts; rarely need to go past 30.
Edge feather
Width of the blend between the source image and the outpainted area (10–80 pixels, default 40).
- Smaller = sharper transition (good for hard-edged subjects or when the source already has a clean border).
- Larger = softer blend (good when the previous fixed 40 left visible seams or hard color transitions).
- Adjust this first when you see a visible seam, before touching Guidance or Steps.
1.6 Seed control
- Seed – controls randomness. Same seed = same result.
- Lock checkbox – keeps the seed fixed between runs. When unlocked, a new random seed is used each time.
1.7 Generate and download
- Click Outpaint to start generation.
- A spinner shows progress while the AI works.
- The result appears below with dimensions shown.
-
Three buttons appear under the result:
- Download PNG – save the outpainted image to your output folder.
- Use as new source (v0.2.45+) – promote the result to be the new source for another round of outpainting, without a download / re-upload cycle. Padding values, prompt mode, custom prompt, and all Advanced settings carry over; the seed regenerates unless Lock is checked. This is the supported pattern for large extensions – extend by 256px on one side, click Use as new source, extend by another 256px, repeat.
- Outpaint again – re-run on the current source with the current settings (typically used to roll a new seed).
To try a different result without iterating, adjust the seed (or leave it unlocked) and click Outpaint again.
1.8 Tips for best results
- No prompt works best for most images – the AI naturally extends the content.
- Use Anti-hallucination for viewport renders, UI screenshots, or images with text near the edges.
- 25% expansion is a good starting point – larger expansions give the AI more creative freedom but may diverge from the original.
- Aspect ratio mode is ideal when you need a specific format (e.g., converting a square image to 16:9 for a banner).
- Iterate, don’t over-extend. Flux Fill Dev degrades when asked to invent a lot of pixels in one pass. For large extensions, set Manual mode to 256px on the side you want to grow, generate, click Use as new source, and repeat until you reach the target size. A 1024px extension done as four 256px iterations almost always beats a single 1024px outpaint.
- Bump Steps to 25-30 when extending architectural or highly-textured content where the default 20 leaves seam artifacts.
- Lower Edge feather when the source has hard edges (UI screenshots, technical diagrams); raise it when the source has soft gradients or atmospheric lighting and the default 40 leaves a visible band.
1.9 Troubleshooting
Extended area doesn’t match the original style
Try a different seed. The AI generates different results each time. You can also try Auto-describe to give the AI more context about the image content.
Visible seam between original and extended area
- Raise Edge feather – try 50-60. This is the first knob to touch; widening the blend usually hides the seam.
- Raise Steps to 25-30. Helps when the seam shows artifacts (broken textures, weird patterns) rather than just a hard transition.
- Try a new seed. Some seeds land cleaner than others.
Output drifts too far from the source on a large extension
You asked for too much in one pass. Switch to Manual mode with 256px on the side you want to grow, generate, click Use as new source, and iterate. Iterative outpainting preserves the source’s character much better than a single large extension.
Generation fails
- Check the ComfyUI status dot in the status bar.
- Click View Log for error messages.
- Try a smaller expansion percentage, or drop Manual values down to 256px per side.
“Generation 1/N failed: …” appears instead of an image (v0.2.53+)
This is the error UX upgrade. Previous versions would spin silently for up to 10 minutes when ComfyUI rejected the prompt at queue-time (missing model file, bad node input, etc.). The spinner now exits as soon as ComfyUI responds, and the error message tells you which node was rejected and why. If you’re running multiple generations, the loop also breaks on the first failure – you don’t wait through N timeouts.
Common cases:
- “ComfyUI rejected workflow – node X (Y): …” – a node validation failed. The message names the node id, class type, and reason. Usually a missing model file – click the Troubleshoot toolbar button to see the full picture, or use Download models on the Extend Image card in Settings.
- “Upload to ComfyUI failed: …” – the file upload step couldn’t reach ComfyUI. Check the ComfyUI status dot in the status bar.
- “Generation N/M produced no output (see comfy-labs.log).” – ComfyUI accepted the prompt but no image came back. Open View Log and search for the Extend Image run timestamp.
2. Make PBR Tileable Textures
Create seamless, tileable PBR texture sets from any photo or text prompt. This workflow converts a single image into a complete material set: tileable diffuse, normal map, roughness map, and height map – ready to drop into Blender, Unreal, Unity, or any 3D application.
Requirements:
- ComfyUI must be running for AI-powered features: Generate from Prompt, Zoom Out 2x, and PBR map generation.
- The basic tiling algorithm (Moisan + TexTile) works without ComfyUI.
2.1 Step 1: Choose your source
At the top you’ll see two options:
Option A: Upload Image
Upload any texture photo – a phone photo of wood, a scan of fabric, a downloaded texture, etc.
- Any size and aspect ratio (will be cropped/resized as needed)
- Best results with flat, evenly-lit surfaces
Option B: Generate from Prompt
Create a texture from scratch using AI.
- Describe your texture – e.g., “weathered red brick wall”, “dark walnut wood planks”, “rough concrete with cracks”.
- Variations – generate 1 to 4 different versions (default: 1).
- Seed – controls randomness. Same seed = same result. Each variation auto-increments the seed by 1.
-
Click one of:
- Generate 1K – standard 1024x1024 output (faster).
- Generate 2K (for cropping) – 2048x2048 output, useful when you want to crop to the best region.
- Toggle “Show mirror preview” to see how each variation looks when tiled.
- Click Select on the variation you like best.
- Click Download on any variation to save it.
After selecting, you can click Back to generation to try different prompts or seeds.
2.2 Step 2: Pre-processing
Choose how to prepare the image before tiling:
None
Uses the image as-is. Best when your source is already well-framed and roughly square.
Crop
Interactively select a square region of the image.
- Drag the red handles to frame the area you want.
- The crop is locked to a 1:1 (square) aspect ratio.
- A warning appears if your crop is smaller than 512px (may produce low-quality results).
- Click Apply Crop to preview the result.
- Click Re-crop to adjust if needed.
Outpaint (Zoom Out 2x)
Expands the image by generating new texture around the borders. This gives the tiling algorithm more material to work with, reducing visible repetition in the final tile.
- If your image isn’t square, you’ll see a resized preview (center-cropped to 1024x1024). Click Continue to proceed.
- Click Zoom Out 2x – the AI mirror-pads your texture to double size, then re-generates it at the original resolution.
- Match original contrast slider (default: 100%) – the zoom-out process can reduce contrast. This slider transfers the color statistics from your original image to restore the look. Drag to 0% to see the raw result.
- Compare the Original (left) and Zoom Out 2x (right) side by side.
- Click Use This to proceed, or Regenerate for a different result.
2.3 Step 3: Make tileable
Configure the tiling process:
Output size
- 1024 – standard resolution, faster (~7 seconds).
- 2048 – high resolution, takes longer.
Remove lighting gradient (optional)
Enable this if your photo has uneven lighting. The slider controls intensity:
- 20 – gentle correction
- 60 – moderate (recommended starting point)
- 100 – most aggressive
Sharpen texture (optional)
Applies an unsharp mask to restore crispness. Useful after zoom-out or if the source is slightly soft.
Run
Click Make Tileable to process. A progress bar shows the current step and live TexTile score.
Results
- TexTile Score – measures how seamlessly the texture tiles (0 to 1). Professional textures score 0.85+.
- Tileable texture (left) – your final seamless texture.
- 3x3 tile preview (right) – shows 9 copies tiled together so you can visually check for seams or repetition.
- Download Tileable PNG and Download 3x3 Preview buttons.
2.4 Step 4: Generate PBR maps
Click Generate PBR Maps to create material maps from your tileable texture. This requires ComfyUI to be running.
| Map | What it does | Used for |
|---|---|---|
| Normal | Encodes surface direction for lighting | Adds perceived depth and detail without extra geometry |
| Roughness | Controls surface shininess | Rough = matte, Smooth = glossy |
| Height | Grayscale displacement | Parallax mapping or actual mesh displacement |
Each map has its own Download button.
2.5 Step 5: Adjust maps
Expand the Adjust Maps section to fine-tune any map (including the diffuse).
Each map has its own tab with these controls:
- Histogram – shows the current intensity distribution. Updates live.
- Input Levels – two-handle slider (black point / white point). Drag to stretch contrast.
- Gamma – < 1.0 darkens midtones; 1.0 = no change; > 1.0 brightens.
- Output Levels – remaps the output range. Useful for clamping (e.g., 0.1, 0.9).
- Hue Shift (Diffuse only) – rotate the color wheel 0–360 degrees.
- Saturation (Diffuse only) – 0% (grayscale) to 200% (oversaturated).
- Reset – restore a map to its original values.
2.6 Step 6: Download
Individual downloads
Every image displayed throughout the workflow has a Download button.
Download All (ZIP)
After generating PBR maps, a Download All (ZIP) button packages:
- Tileable diffuse texture
- 3x3 tile preview
- Normal map
- Roughness map
- Height map
If you adjusted any maps, the ZIP includes the adjusted versions.
2.7 Tips for best results
Choosing good source images
- Flat, top-down photos work best – avoid perspective or heavy shadows.
- Even lighting is critical – uneven lighting creates visible gradients when tiled. Use the “Remove lighting gradient” option if needed.
- Larger source = better quality – start with the highest resolution you have.
Reducing visible repetition
The tiling algorithm makes edges seamless, but distinctive features (knots in wood, unique cracks) will repeat visibly. To minimize this:
- Use Zoom Out 2x to give the algorithm more material with more variety.
- Generate at 2K and crop to select the most uniform region.
- Avoid sources with large unique features – textures with small, repeating patterns (fine grain, small tiles, pebbles) tile best.
Prompt tips for Generate from Prompt
- Be specific: “light oak wood planks, fine grain” beats “wood”.
- Include “seamless” or “tileable” in your prompt for better results.
- Add “top down view, flat even lighting” (auto-added, but reinforcing helps).
- Generate 4 variations and pick the most uniform one.
2.8 Using in Blender
Import the texture set
- Open your Blender project.
- In the Shader Editor, create a new Principled BSDF material.
- Add Image Texture nodes for each map:
| Map file | Connect to | Notes |
|---|---|---|
*_diffuse.png or *_tileable_1024.png |
Base Color | Set color space to sRGB |
*_normal.png |
Normal (via Normal Map node) | Set color space to Non-Color |
*_roughness.png |
Roughness | Set color space to Non-Color |
*_height.png |
Displacement (via Displacement node) | Set color space to Non-Color |
Set up tiling
- Add a Texture Coordinate node -> Mapping node before your Image Textures.
- Connect UV output from Texture Coordinate to Mapping input.
- Adjust Scale in the Mapping node (e.g., Scale X=2, Y=2 for 2x tiling).
Displacement setup (optional)
- Material Properties -> Settings -> Surface, set Displacement to “Displacement and Bump” or “Displacement Only”.
- Add a Displacement node between the height map and Material Output’s Displacement input.
- Adjust the Scale value (start with 0.01–0.05).
- Add a Subdivision Surface modifier so geometry has resolution to displace.
2.9 Troubleshooting
“ComfyUI: Offline” – the dot in the status bar is gray
ComfyUI lazy-spawns on the first AI request – click Generate from Prompt, Zoom Out 2x, or Generate PBR Maps and it will start automatically (~10–30 s). The basic tiling algorithm works without ComfyUI.
PBR generation fails or shows no maps
- Check the ComfyUI status dot is green.
- Click Stop ComfyUI in the toolbar (confirm), wait for the dot to go gray, then click Start ComfyUI to bring it back.
- Click View Log for error messages.
Tiling looks good but PBR maps look flat
The PBR model works best with textures that have visible surface detail. Use the Adjust Maps controls to boost contrast on the normal or height maps.
Zoom Out 2x result is washed out
Use the Match original contrast slider (default 100%) to restore the color/contrast from your original. If it’s still not right, try Regenerate.
App freezes during generation
- Click View Log to see what’s stuck.
-
Click Stop ComfyUI in the toolbar (confirm), wait for the dot to go gray, then click Start ComfyUI to bring it back. If ComfyUI looks orphaned even after Comfy Labs quits, use
Force-Quit-ComfyUI.batnext toComfy Labs.exe. - If the GPU itself is wedged (rare), press Win+Ctrl+Shift+B to reset the display driver.
3. Remove Background
Remove the background from any image with one click. Get a transparent PNG and a black/white mask – ready for compositing, 3D modeling, or use in other workflows.
3.1 Getting started
- Open Comfy Labs and click Open Workflows.
- Click Remove Background in the sidebar.
3.2 Upload image
Upload any image with a subject you want to isolate.
- Any size and aspect ratio.
3.3 Remove background
- After uploading, a preview of your source image appears.
- Click Remove Background.
- A spinner shows progress while the AI processes the image.
3.4 Results
Two outputs are displayed side by side:
| Output | Description |
|---|---|
| Result (left) | Transparent PNG – the subject with background removed |
| Mask (right) | Black/white mask – white = subject, black = removed area |
Click Download PNG to save the transparent result.
3.5 Tips for best results
- Clear subjects work best – objects, people, animals with distinct edges.
- Busy backgrounds are handled well, but very similar foreground/background colors may produce rough edges.
- Use this before Image to 3D Mesh – the mesh generator works best with objects on a plain or transparent background.
3.6 Troubleshooting
Edges are rough or jagged
The AI model handles most cases well. If edges are rough, try an image with higher contrast between the subject and background.
Part of the subject is removed
This can happen with thin or transparent elements (glass, wire, hair). The AI prioritizes the main subject mass.
Background removal fails
- Check the ComfyUI status dot.
- Click View Log for error messages.
- Click Stop ComfyUI in the toolbar (confirm), then Start ComfyUI once the dot goes gray.
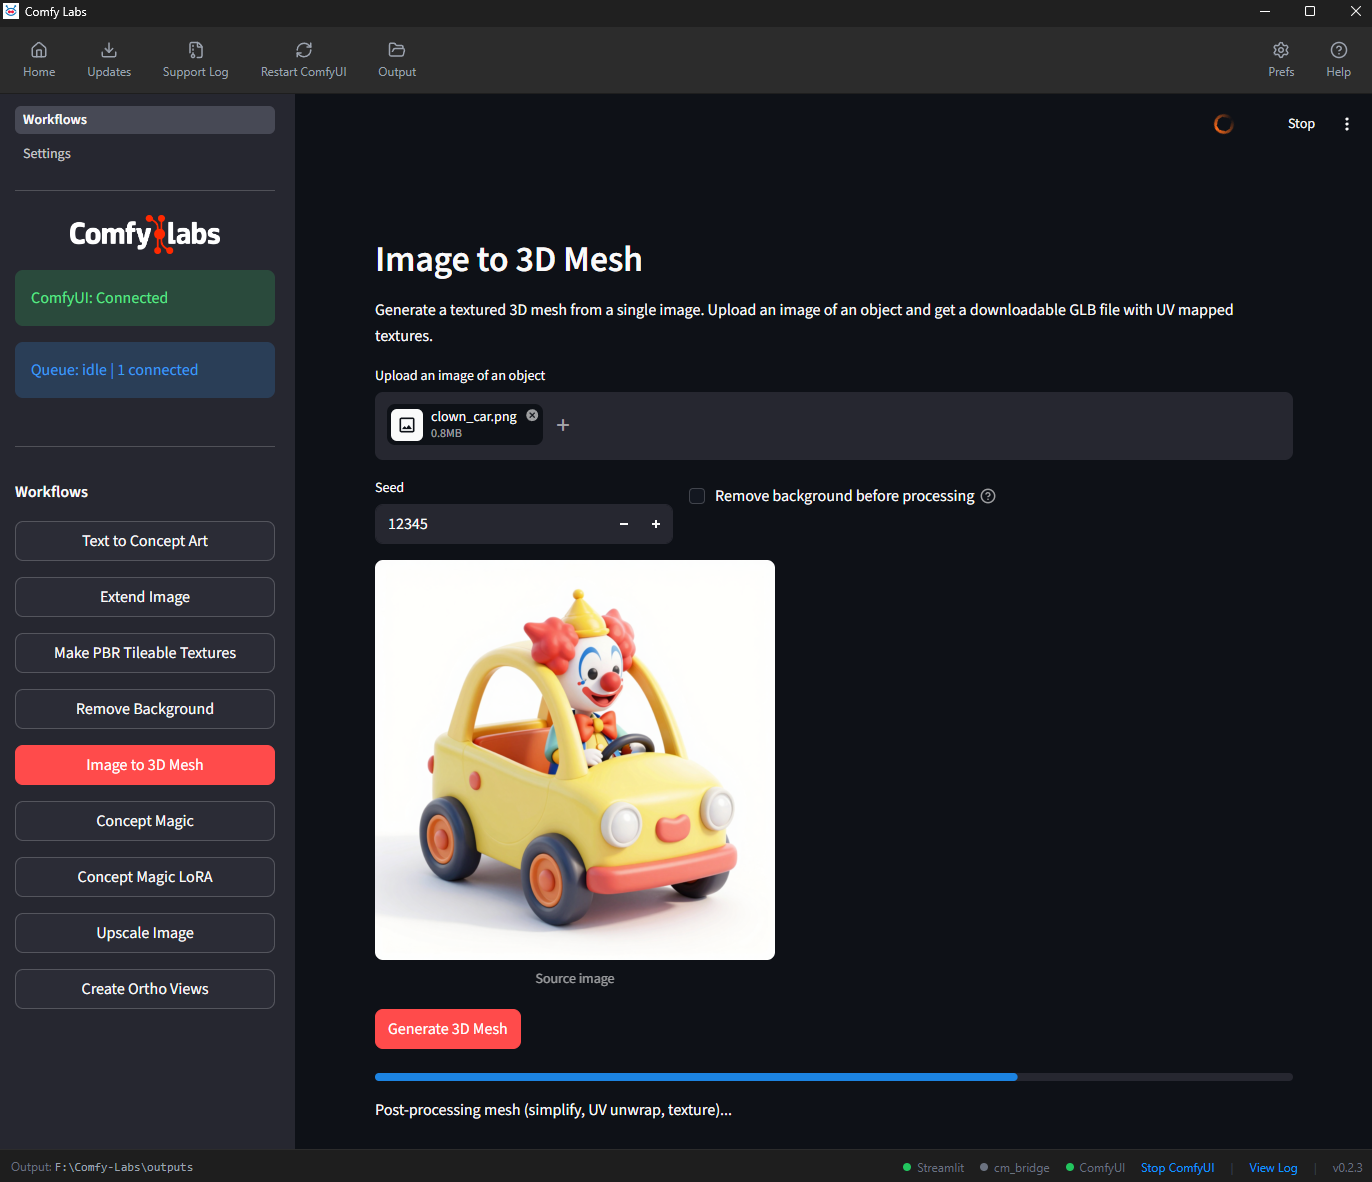
4. Image to 3D Mesh
Generate a textured 3D mesh from a single image. Upload a photo of an object and get a downloadable GLB file with UV-mapped textures – ready to import into Blender, Unity, Unreal, or any 3D application.
4.1 Getting started
- Open Comfy Labs and click Open Workflows.
- Click Image to 3D Mesh in the sidebar.
GPU note: Trellis2 (the underlying model) is fully validated on RTX 50-series; 30/40-series can run smaller meshes but may hit VRAM ceilings on complex geometry.
4.2 Upload image
Upload an image of the object you want to convert to 3D.
- Any size (will be processed internally).
- Best with: objects on a plain or transparent background.
4.3 Options
Seed
Same seed = same mesh. Change the seed to get a different interpretation.
Remove background before processing
Enable this if your image has a busy background. The AI removes the background first, which dramatically improves mesh quality.
- Off (default): Use when your object is already on a plain/white/transparent background.
- On: Use when the background is complex.
4.4 Generate
- Click Generate 3D Mesh.
- A progress bar tracks the generation pipeline.
-
Total wall time is typically 5–20 minutes depending on the input image and your hardware. The pipeline runs in two distinct phases:
- GPU phase (~30–90 seconds): Trellis2 sparse-structure sampling, low-res / high-res SLat, texture SLat, BVH build, and dual contouring all run on the GPU. You’ll see VRAM utilization spike here.
- CPU phase (~5–15 minutes): mesh post-processing, then UV unwrapping via xatlas. xatlas is a single-threaded CPU library – there is no GPU path for it – so during this phase nvidia-smi will show the GPU idle and one CPU core pinned at 100%. This is normal, not a hang. The Streamlit progress text updates with elapsed time every few seconds; if the elapsed counter is still incrementing, the unwrap is still working.
- Final GPU phase (~10–30 seconds): texture bake jumps back to the GPU.
Dense / complex meshes spend longer in the xatlas phase because chart computation is superlinear in face count. A simple object (~500k faces post-simplification) finishes in ~5 min; a clown-car-shaped or highly detailed object (~2M faces) can take 10–15 min on UV unwrap alone.
4.5 3D viewer
After generation, an interactive 3D viewer appears in-browser:
- Click and drag to rotate.
- Scroll to zoom.
- Auto-rotate is enabled by default.
- Lighting and shadows are applied.
The file path to the generated GLB is shown above the viewer.
4.6 Download
Click Download GLB to save the mesh. GLB includes:
- 3D geometry (mesh)
- UV-mapped textures
- Material data
GLB is widely supported by 3D applications, game engines, and web viewers.
4.7 Tips for best results
Input image quality
- Single object photos work best.
- Plain background (white, transparent) gives the cleanest results.
- Front-facing view with the full object visible produces the most complete mesh.
- Even lighting helps the model understand surface detail.
When to use Remove Background
| Scenario | Remove BG? |
|---|---|
| Object on white/plain background | No |
| Product photo on gradient background | No |
| Object in a real-world scene | Yes |
| Screenshot from a 3D viewport | No |
| Photo with cluttered background | Yes |
Object types that work well
- Props, furniture, vehicles, characters
- Hard-surface objects with clear geometry
- Objects with distinct silhouettes
Object types that are challenging
- Very thin/flat objects (cards, paper)
- Highly reflective/transparent objects (glass, mirrors)
- Objects with complex internal structure
4.8 Using in Blender
-
File -> Import -> glTF 2.0 (
.glb/.gltf). - Select the downloaded GLB file.
- The mesh imports with its UV-mapped texture already applied.
- You may need to adjust the scale.
Post-import cleanup
- Check the mesh topology – AI-generated meshes may need retopology for production use.
- The texture is baked into the material – you can re-UV and re-texture if needed.
4.9 Troubleshooting
Mesh is missing parts or looks incomplete
- Try a different angle that shows more of the object.
- Enable Remove background before processing.
- Try a different seed.
Mesh has no texture / appears gray
Click View Log for errors. The texture generation may have failed while the geometry succeeded.
Generation fails completely
- Check the ComfyUI status dot.
- Ensure Trellis2 models are installed (Settings page -> Image to 3D Mesh -> Ready).
- Click View Log for error messages.
3D viewer doesn’t load
The viewer requires JavaScript. Some browser extensions (ad blockers) may interfere with the model-viewer component (the Streamlit pane uses Chromium internally).
5. Text to Image
General-purpose text-to-image generation with a choice of diffusion model. Z Image Turbo ships by default (fast, ~6 GB); three additional model packs are opt-in installs surfaced inline on the workflow page: Flux 1 Dev (fp8 default ~17 GB, fp16 optional ~24 GB), Flux 2 Dev (~36 GB), and ERNIE Image Turbo (~16 GB). All four are Comfy-Org Hugging Face repackages – no Hugging Face account, no manual token flow.
This workflow replaces the older “Text to Concept Art” plugin. It drops the automatic background-removal step and the negative-prompt field, and adds the model picker, CFG slider, resolution presets, latent batching, and queue batching described below. If you still need transparent-background PNGs, run the standalone Remove Background workflow on the output.
5.1 Getting started
- Open Comfy Labs and click Open Workflows.
- Click Text to Image in the sidebar.
5.2 Pick a model
A radio at the top of the page lets you switch between:
- Z Image Turbo – bundled by default; the fastest model.
- Flux 1 Dev fp8 / Flux 1 Dev fp16 – opt-in pack. fp16 is a marginal quality bump over fp8 with much higher VRAM cost.
- Flux 2 Dev – opt-in pack.
- ERNIE Image Turbo – opt-in pack.
If the files for an opt-in pack aren’t on disk yet, the radio option is greyed out and a “Files needed” expander appears below the picker. The expander offers two paths:
- Scan an existing folder – if you already have these files in a separate ComfyUI install, click Browse, point at that ComfyUI’s models folder (or any folder above it), and Comfy Labs will recursively look for matching filenames and symlink them in (no copy, no redownload). A “Tip: Shift+Right-click a folder in Explorer -> Copy as path” caption is there as a fallback.
- Download from Hugging Face – pulls the files from the Comfy-Org repackage repos. Sizes are shown next to each entry so you know the disk cost up front.
The Flux 2 + ERNIE packs share a VAE file, so installing one of those packs partly satisfies the other.
Note: Model packs installed from inside this page are shared with Image to Image – same files on disk. Install Flux 1 here and it’s immediately available there too.
5.3 Write a prompt
Enter a description in the text field. Tip: press Ctrl+Enter to commit the textarea to Streamlit’s session state before clicking Generate – typing alone leaves the prompt staged but uncommitted, so a fast-followed Generate click can use the previous prompt. A small caption under the prompt reminds you of this.
There is no negative prompt, no “Fix Prompt” appender, and no auto-injected styling text. Whatever you type is what’s sent.
5.4 CFG, resolution, and batching
CFG slider
Sits directly under the prompt because that’s what it controls. Defaults are per-model and chosen to match each model’s upstream reference workflow:
- 1.0 for Z Image Turbo / Flux 2 Dev / ERNIE Turbo / Flux 1 Dev fp8 (these are distilled or flow-matching models where high CFG is usually counterproductive).
- 4.5 for Flux 1 Dev fp16 in true text-to-image mode.
You can override per-run; in practice the defaults are sensible starting points.
Resolution
Click the Aspect button to pick a ratio: Free, 1:1, 3:2, 2:3, 16:9, or 9:16. While a ratio is locked, adjusting Width auto-recomputes Height (and vice versa) on the 16-pixel grid. Switching INTO a locked mode keeps the current Width and snaps Height to match, so your output stays in the same ballpark size.
Width and Height inputs accept 256 to 2048 in 16-pixel steps.
Latent batch (per-run variations)
Produce N variations of the same prompt in a single sampling pass. Per-model caps protect smaller cards from OOM:
- Z Image Turbo / ERNIE Turbo: up to 4 variations.
- Flux 1 Dev fp8: up to 2 variations.
- Flux 1 Dev fp16 / Flux 2 Dev: 1 (the model is too large to batch).
Queue batch (run count)
Run the same prompt up to 1000 times in sequence. Each run uses a fresh seed (starting from the Start seed input; 0 means random). After the first run finishes, a rolling per-image timing average appears, so the ETA gets sharper as the batch progresses. Per-model timing is remembered across runs.
Seed
- Start seed: 0 (default) = each queue run picks a random seed.
- Any other number = fixed base seed for the queue’s first run; subsequent runs auto-increment.
5.5 Generate
Click Generate. While running, the page shows the current run number, the rolling ETA, and a live preview as each run completes. Outputs are saved to <output>/text-to-image/ with seeds embedded in the filenames so you can reproduce any image later.
5.6 Tips for best results
Picking the right model
- Z Image Turbo – start here. Fastest, smallest disk footprint, runs comfortably on 12 GB cards.
- Flux 1 Dev fp8 – step up when you want higher prompt-following accuracy. Roughly 2-3x slower than Z Turbo.
- Flux 1 Dev fp16 – only worth it if you have 24 GB+ VRAM and the fp8 quality isn’t enough.
- Flux 2 Dev – newest Flux family; best for complex scenes and text rendering. Large.
- ERNIE Image Turbo – distilled model with a different aesthetic; worth trying when the Flux outputs feel same-y.
Prompt tips
- Be specific about the subject, view, and style: “medieval iron warhammer, side view, isolated on neutral background, photoreal” beats “hammer”.
- Style cues that work: “photoreal”, “cinematic lighting”, “studio product photo”, “concept art”, “isometric”.
- Camera cues: “front view”, “3/4 angle”, “top-down”.
Choosing from latent-batch variations
- Set latent batch to the cap for your chosen model – 4 variations cost almost the same as 1 because they share the model load.
- If none of the variations land, change either the seed or one word in the prompt and run again.
5.7 Troubleshooting
Generated images don’t match the description
- Add more detail and structure to the prompt.
- Try a higher CFG (e.g. 3-4) on Flux 1 Dev fp16 if you’re using it. The fast / flow-matching models don’t benefit from higher CFG.
- Try a different model – ERNIE and Flux 2 sometimes succeed where Z Turbo / Flux 1 don’t, and vice versa.
Generate button doesn’t pick up my latest prompt edit
Press Ctrl+Enter inside the prompt textarea to commit the edit, then click Generate. (The caption under the textarea mentions this.)
“Files needed” expander never disappears even after install
Click Refresh in the workflow page header, or switch to a different sidebar entry and back. The plugin re-checks the model files on every render but a stale Streamlit fragment can hold the old state.
Generation fails
- Check the ComfyUI status dot.
-
Click View Log for error messages. If you see a
value_not_in_listline referencing one of the diffusion-model filenames, the file is on disk but ComfyUI can’t find it – run Stop ComfyUI then Start ComfyUI from the toolbar to refresh ComfyUI’s model index.
6. Concept Magic
Turn 3D blockouts, sketches, depth maps, or photos into photorealistic styled images. Upload any image, choose edge or depth control, enter a prompt, and the AI generates a styled result that follows the structure of your input.
6.1 Getting started
- Open Comfy Labs and click Open Workflows.
- Click Concept Magic in the sidebar.
6.2 Upload image
Upload the image you want to transform. This can be:
- 3D blockout / graybox render – rough 3D geometry from Blender, Maya, etc.
- Sketch or line drawing
- Depth map
- Photo – any existing image you want to restyle.
6.3 Prompt
Describe the desired output.
Examples:
- “futuristic Blade Runner city at night, neon lights, wet streets, rain, volumetric fog, cinematic, photoreal”
- “cozy medieval tavern interior, warm candlelight, wooden beams”
- “sleek sports car in a showroom, studio lighting, photorealistic”
The prompt controls style, mood, and content – the input image controls structure and composition.
6.4 Generation settings
Variations
1, 2, or 4.
- 1 variation: You choose the control type (Canny or Depth).
- 2 or 4 variations: Automatically split 50/50 between Canny and Depth.
Control type (1 variation only)
| Type | What it does | Best for |
|---|---|---|
| Canny | Detects edges in your image and uses them as a structural guide | Line art, sketches, 3D wireframes, images with clear edges |
| Depth | Estimates depth from your image and uses it as a spatial guide | 3D renders, photos, scenes with clear foreground/background separation |
Output resolution
- 512x512, 768x768, 1024x1024 (default)
- 512x904 (portrait), 904x512 (landscape)
Seed
- 0 (default): Random seed.
- Any other number: Fixed seed.
6.5 Generate and results
- Click Generate.
- A progress bar shows generation progress for each variation.
- Results appear in a grid below.
Each result shows the generated image, the control type used, the seed, and a Download button.
6.6 Tips for best results
Input image tips
- 3D blockouts produce the best results.
- Simple compositions work better than complex cluttered scenes.
- Consistent lighting helps coherent output.
- Higher contrast gives stronger structural guidance.
Canny vs Depth
- Use Canny for hard-surface design (architecture, mechanical).
- Use Depth for organic forms and environments.
- Generate 2 or 4 to compare both.
Prompt tips
- Focus on style and mood – structure comes from your image.
- Include lighting descriptions: “golden hour”, “neon lights”, “studio lighting”.
- Include material descriptions: “stone”, “metal”, “wood”, “glass”.
- Add “photorealistic” or “cinematic” for realism.
6.7 Troubleshooting
Output ignores the input structure
- The input image may not have enough contrast or clear structure.
- Try Canny for clear lines, Depth for clear spatial layout.
Output looks blurry or low quality
- Use 1024x1024 resolution.
- Add quality descriptors: “highly detailed”, “sharp”, “8K”.
Generation fails
- Check the ComfyUI status dot.
- Click View Log for error messages.
7. Concept Magic LoRA
Concept Magic with custom style support. Upload an image, pick a trained LoRA style, enter a prompt, and generate edge-guided results in that style.
7.1 Getting started
- Open Comfy Labs and click Open Workflows.
- Click Concept Magic LoRA in the sidebar.
- LoRAs are downloaded automatically when you install this workflow on the Settings page.
7.2 Upload image
Upload the image you want to transform (3D blockout, sketch, depth map, or photo).
7.3 LoRA style
Select a trained LoRA style from the LoRA style dropdown. Available styles are scanned from the LoRA directory at startup. Four styles ship by default:
- industrial-design1 – industrial/product design aesthetic
- scifi-outside-env – sci-fi exterior environments
- scifi-product-design – sci-fi product/vehicle design
- syd-mead – Syd Mead-inspired futuristic concept art
The trigger word for the selected LoRA is displayed below the selection. This word is automatically prepended to your prompt.
7.4 Prompt
Describe the desired output. The LoRA’s trigger word is auto-prepended – you don’t need to include it.
Example: trigger sydmead_style + your prompt “futuristic city street” = “sydmead_style, futuristic city street”.
7.5 Generation settings
Variations
1, 2, or 4.
Control type
- Canny – hard edges. Best for mechanical/architectural subjects.
- Depth – depth estimation. Best for organic shapes and depth-varied scenes.
Output resolution
- 512x512, 768x768, 1024x1024 (default)
- 512x904 (portrait), 904x512 (landscape)
- 1280x720, 720x1280 (widescreen)
LoRA strength
- 0.0 – no LoRA effect
- 1.0 – standard
- 1.75 (default) – stronger
- 3.0 – maximum (may over-stylize)
Seed
- 0 (default): Random.
- Any other number: Fixed.
7.6 Bypass options
| Toggle | What it does |
|---|---|
| Bypass LoRA | Disables the LoRA entirely – generates without style transfer. Useful for A/B comparison. |
| Bypass Seed Variance | Disables seed variance enhancement. Toggle if results look too similar across seeds. |
7.7 Generate and results
- The full prompt (with trigger word) is displayed when you click Generate.
- A progress bar shows generation progress for each variation.
- Results appear in a grid with the seed shown below each image.
- Each result has a Download button.
7.8 Tips for best results
LoRA strength tuning
- Start at 1.75 and adjust.
- Too low (< 1.0): Subtle style.
- Too high (> 2.5): Over-stylized.
- Each LoRA has its own sweet spot – experiment.
Input image tips
- Simple blockouts with clear geometry work best.
- High-contrast inputs give stronger Canny guidance.
Comparing with and without LoRA
Use Bypass LoRA to generate the same prompt without the style. This shows what the LoRA contributes vs. the base model.
7.9 Troubleshooting
“No LoRAs found” error
LoRA files haven’t been downloaded yet. Open Settings, find Concept Magic LoRA, click Download models.
Style is barely visible
- Increase LoRA strength (try 2.0–2.5).
- Make sure the trigger word is present in the prompt (it’s auto-prepended).
- Some LoRAs are trained subtly – this is by design.
Output has artifacts
- Reduce LoRA strength (try 1.0–1.5).
- Try a different seed.
Generation fails
- Check the ComfyUI status dot.
- Click View Log for error messages.
8. Upscale Image
Upscale any image using AI super-resolution. Choose between fast tensor-based upscaling that stays faithful to the original, or detail-enhancing AI diffusion that adds fine detail. Scale by multiplier (1x–4x) or set a maximum dimension.
8.1 Getting started
- Open Comfy Labs and click Open Workflows.
- Click Upscale Image in the sidebar.
8.2 Upload image
Upload any image you want to upscale. Any size and aspect ratio. Source dimensions are shown in the preview caption.
8.3 Upscaler
AI diffusion upscaling using SeedVR2.
- Quality: Adds fine detail and texture that wasn’t in the original.
- Best for: Most upscale jobs – photos, AI-generated art, textures, scans.
- Scale range: 1x–4x.
Note (v0.2.15+): the older “Fast (Tensor)” RTX VSR mode was dropped because its dependency (
nvidia-vfx) silently downloaded a 490 MB prebuilt wheel during install with zero output, hanging fresh installs on slow connections. SeedVR2 covers the same use cases with better quality, just slower.
8.4 Resize mode
Scale by multiplier
- Slider from 1.0x to 4.0x in 0.25 steps.
- Output dimensions shown in the preview caption.
- Dimensions are rounded to multiples of 8.
Max dimension
- Enter a value from 64 to 8192.
- Aspect ratio preserved – only the longest edge matches the target.
- Dimensions rounded to multiples of 8.
8.5 Upscale and compare
- Click Upscale.
- A spinner shows progress.
After completion, two views are displayed:
Detail comparison slider
- Left: Original image (nearest-neighbor upscale).
- Right: AI-upscaled result.
Drag the slider to compare detail quality.
Full result
The complete upscaled image at full resolution.
8.6 Download
Click Download to save the upscaled image as PNG. The filename includes the upscaler used and output dimensions (e.g., photo_seedvr2_2048x2048.png).
8.7 Tips for best results
Scale factor tips
- 2x is the sweet spot for most use cases.
- 4x works on clean source images; for noisy or already-soft sources, do two passes at 2x to keep the detail crisp.
- Very large upscales (8x+) almost always read better as two 2x passes than a single 4x.
Image quality considerations
- Clean source images produce better results than noisy or compressed ones.
- JPEG artifacts will be amplified – use PNG sources when possible.
- Detail (AI) can hallucinate detail – verify if accuracy matters.
8.8 Troubleshooting
Upscaled image looks blurry
- The source image may be too low resolution – SeedVR2 enhances detail but can’t recover information that isn’t there.
- Try a higher-resolution crop of the same source if available.
Upscaled image has artifacts
- Try 2x instead of 4x. Larger jumps over-extrapolate from the source and can hallucinate texture that wasn’t there.
- For very low-quality sources (heavy JPEG compression, screen-grabs), the AI will amplify the existing artifacts. Use a cleaner source if possible.
Generation fails or takes very long
- Large images at high scale factors require significant VRAM.
- Try a smaller scale factor or use Max dimension mode.
- Click View Log for out-of-memory errors.
- If a “⏱ timed out” banner appears, see Troubleshooting.
9. Create Ortho Views
Generate 4 orthographic views (front, side, back, side) from a single image. Uses AI multiview generation with automatic evaluation to drop low-quality or off-angle views.
9.1 Getting started
- Open Comfy Labs and click Open Workflows.
- Click Create Ortho Views in the sidebar.
9.2 Upload image
Upload an image of the object you want orthographic views of.
- Any size.
- Best with: clear photos of single objects, concept art, 3D renders.
9.3 Generate
Generate Ortho Views
Click Generate Ortho Views. The AI:
- Generates 6 multiview images from your input.
- Evaluates each view for angle accuracy.
- Keeps only the cardinal-direction views (0°, 90°, 180°, 270°).
- Drops any 3/4 angle or off-axis views.
Try New Seed
Click to regenerate with a different random seed.
9.4 Results
Composite view
Expand “All 6 generated views (before evaluation)” to see the raw output.
Orthographic views
The kept views are displayed in a grid, labeled by direction (FRONT, BACK, LEFT, RIGHT).
Final sheet
A combined sheet image showing all accepted orthographic views in a single image – useful as a modeling reference sheet.
9.5 Download
Each individual view has its own Download button with a descriptive filename (e.g., ortho_robot_front.png).
The Download Sheet button saves the combined reference sheet.
9.6 Tips for best results
Input image tips
- Single, clear subject with a distinct silhouette.
- Plain or transparent background.
- Front or 3/4 view works best as input.
- Well-lit, detailed images.
What works well
- Characters and figurines
- Vehicles and props
- Hard-surface objects with clear geometry
- Objects with distinct features on all sides
What’s challenging
- Symmetrical objects
- Very flat objects (cards, screens)
- Objects with no clear “front” (spheres, abstract shapes)
Using as modeling reference
- Download the sheet and import it as a background image in your 3D viewport.
- Or download individual views and set them as front/side/back reference images.
- The views are approximately orthographic – use them as guides, not exact projections.
9.7 Troubleshooting
“No orthographic views passed evaluation”
The AI’s views were all at off-angles. Click Try New Seed for a different result, or try a different input image with a clearer front-facing view.
Only 2 or 3 views generated (not 4)
The evaluation step filters aggressively – it only keeps genuinely cardinal-direction views. Some objects may not produce clean views from all 4 angles.
Views don’t look consistent
The AI generates views independently, so there may be slight inconsistencies between views. This is a known limitation of current multiview generation models.
Generation fails
- Check the ComfyUI status dot.
- Click View Log for missing-model errors.
10. Image to Image
Re-imagine an uploaded image with a text prompt. Picks from the same four diffusion-model variants as Text to Image – Z Image Turbo, Flux 1 Dev (fp8 or fp16), Flux 2 Dev, ERNIE Turbo – and adds a denoise slider that controls how far the result drifts from the source.
This workflow shares its optional model packs with Text to Image: same files on disk. Installing a pack from either plugin satisfies the other immediately.
10.1 Getting started
- Open Comfy Labs and click Open Workflows.
- Click Image to Image in the sidebar.
10.2 Upload image
Upload any reference image. Any size and aspect ratio. The plugin uploads the file to ComfyUI’s input directory; if the file is already there, it is reused without a redundant upload.
10.3 Pick a model
Same radio as Text to Image. Z Image Turbo is bundled and always available; Flux 1 Dev fp8 / fp16, Flux 2 Dev, and ERNIE Turbo are opt-in packs that appear greyed out until installed.
If a pack isn’t installed, the “Files needed” expander offers the same two install paths (Scan folder, or Download from Hugging Face) as Text to Image. Pack installs done here are visible in Text to Image on the next render.
10.4 Prompt, CFG, and denoise
Prompt
Type a description of what you want the output to be. Ctrl+Enter commits the textarea to session state (the caption under the field reminds you of this).
CFG slider
Per-model defaults: 1.0 for Z Image Turbo / Flux 2 Dev / ERNIE Turbo / Flux 1 Dev fp8, 4.5 for Flux 1 Dev fp16. Override per run if you want.
Denoise slider
Controls how much the model is allowed to deviate from the source image.
- 0.00 = keep the source untouched (no point clicking Generate).
- 0.50 = Flux 1 Dev fp16 default; preserves recognizable structure while restyling.
- 0.75-0.78 = Z Image Turbo / Flux 2 Dev / ERNIE Turbo defaults; most of the source’s composition stays intact but textures and lighting get rewritten.
- 1.00 = ignore the source entirely; equivalent to running Text to Image with the same prompt.
The defaults are chosen to match each model’s upstream reference workflow. Adjust if your reference image is very different stylistically from what the prompt asks for (lower denoise) or if you want a freer reinterpretation (higher denoise).
10.5 Resolution and batching
Resolution
Same aspect-lock radio (Free, 1:1, 3:2, 2:3, 16:9, 9:16) and 256-2048 / 16-pixel-step W/H inputs as Text to Image. The source image is resized to your chosen W/H before being encoded by the VAE; aspect mismatch will stretch the source, so try to match its native aspect when in doubt.
Latent batch
Same per-model caps as Text to Image: 4 for Z Turbo / ERNIE, 2 for Flux 1 fp8, 1 for Flux 1 fp16 / Flux 2. Produces N variations of the same prompt + source + denoise combination in a single sampling pass.
Queue batch + seed
Same queue model: up to 1000 runs, Start seed picks the base seed (0 = random), each queued run increments. Rolling ETA appears after the first run.
10.6 Generate
Click Generate. Outputs land in <output>/image-to-image/. The filename embeds the source filename, the chosen model, the denoise value, and the seed – so you can A/B different denoise levels of the same source without losing track of which is which.
10.7 Tips for best results
Choosing denoise
- 0.30-0.50 – restyling, color-grading, light cleanup. The source’s composition and details are preserved.
- 0.60-0.75 – significant restyling but the underlying scene shape stays. Good for “make this rough sketch look photoreal”.
- 0.80-0.95 – the source becomes a loose composition hint; texture, color, and small details all change.
- 1.00 – you’re doing text-to-image with the source ignored. Just use Text to Image instead.
Picking the right model
Same advice as Text to Image (section 5.6). Z Image Turbo is the fast default; step up to Flux when you need better prompt adherence.
When the result looks unchanged
- Increase denoise. The default for Flux 1 Dev fp16 is 0.50, which can read as “barely touched” on simpler source images.
- Make the prompt more demanding (“photoreal cinematic lighting” vs. “nice photo”).
When the result has nothing to do with the source
- Decrease denoise.
- Check that your prompt isn’t fighting the source. If the source is a rough sketch but your prompt asks for something completely different (“a banana” when the sketch is a car), the model will favor the prompt at high denoise.
10.8 Troubleshooting
“Files needed” expander stays after install
Click Refresh in the workflow page header, or navigate to a different sidebar entry and back.
Output looks identical to the source
Denoise is too low. Try 0.7-0.8.
Output looks like pure text-to-image with no source influence
Denoise is too high. Try 0.5-0.7.
Generation fails
- Check the ComfyUI status dot.
-
Click View Log. The most common failure with the optional model packs is a
value_not_in_listline; Stop ComfyUI then Start ComfyUI from the toolbar to refresh ComfyUI’s model index.
11. Image to Video
Turn a still image into a short video clip. Two generators are available behind a pack picker:
- LTX 2.3 – 22B distilled, ~42 GB pack. Faster; 25 fps native.
- WAN 2.1 I2V 480p – ~24.7 GB pack. Slower, 16 fps native, but generally better motion quality.
Generation runs at the model’s native ~480p resolution, with aspect taken from your input image. After generation, an optional post-process stage unlocks for RIFE 2x frame interpolation + SeedVR2 spatial upscale to 720p / 1080p / 1440p / 4K.
Nothing downloads until you pick a pack. The three packs (LTX 2.3, WAN 2.1 I2V, post-process) each install on demand from inside the workflow page.
11.1 Getting started
- Open Comfy Labs and click Open Workflows.
- Click Image to Video in the sidebar.
- If neither generator pack is installed yet, both radio options appear greyed out and a “Files needed” expander offers the same Scan-folder / HF-download install paths as Text to Image. Pick a pack and let it download (or scan in from an existing ComfyUI install).
11.2 Upload image
Upload a still image. Any size and aspect ratio.
The clip’s resolution will be ~480p along the shortest edge of the input’s aspect ratio. Square inputs come out around 480x480; 16:9 inputs around 854x480; 9:16 around 480x854.
11.3 Pick a generator
Radio at the top of the page. LTX 2.3 and WAN 2.1 I2V 480p are the two choices; whichever pack isn’t installed shows greyed out with a per-pack “Files needed” expander to install it.
Choosing between them:
| LTX 2.3 | WAN 2.1 I2V | |
|---|---|---|
| Pack size | ~42 GB | ~24.7 GB |
| Native fps | 25 fps | 16 fps |
| Max length | 5 seconds | 10 seconds |
| Speed | Faster | Slower |
| Motion quality | Good | Generally better |
Pick LTX 2.3 when you want a fast turnaround and your clip is short; pick WAN when motion fidelity matters or you need a longer clip.
11.4 Prompt and length
Prompt
Describe the action or motion you want. Press Ctrl+Enter to commit the textarea to session state before clicking Generate (the caption under the field reminds you of this).
The image gives the generator the visual subject; the prompt tells it what should happen in the clip. “A camera slowly orbiting around the object” / “the character walks toward the camera” / “leaves blow in the wind from left to right” are all reasonable shapes.
Length (seconds)
- LTX 2.3: 1-5 seconds.
- WAN 2.1 I2V: 1-10 seconds.
Longer = more time and more VRAM. The output is a video clip at the generator’s native frame rate (25 fps LTX, 16 fps WAN).
11.5 Generate
Click Generate. Generation typically runs in the 1-5 minute range depending on length, generator, and GPU. Output lands in <output>/image-to-video/ as an MP4 at the generator’s native fps.
When the run finishes, the page shows an inline preview and the post-process controls appear below it.
11.6 Post-process: smooth + upscale
After a successful generation, a second stage unlocks. It requires the post-process pack (~3.9 GB: RIFE 4.26 frame interpolator + SeedVR2 3B model + VAE). If the pack isn’t installed, the post-process section shows a “Files needed” expander for it.
The post-process always writes two MP4s:
- Native fps timeline – the smoothed + upscaled clip at the generator’s original fps (25 fps for LTX, 16 fps for WAN). Best for further editing.
- 30 fps timeline – the same content re-timed to 30 fps, which is what most video editors and players expect. Best for direct delivery.
Smooth (RIFE 2x frame interpolation)
RIFE inserts a synthetic frame between every adjacent pair of frames, doubling the effective frame rate. Useful for taking a 16 fps WAN clip and making the motion feel smoother. RIFE is fast (sub-minute on most cards).
Upscale (SeedVR2 spatial upscale)
Pick a target resolution: 720p, 1080p, 1440p, or 4K. SeedVR2 upscales each frame independently to that target’s shortest-edge.
4K shows an OOM warning because the 3B SeedVR2 model needs significant VRAM to operate at 4K spatial resolution. On a 16 GB card it can succeed on short clips but is more likely to OOM on longer ones; on 24 GB+ it is more reliable. Try 1440p first if you are on a smaller card.
Upscaling is the slow part of the pipeline – a 5-second clip at 1080p typically takes a few minutes on a 5090, longer on slower cards.
11.7 Tips for best results
Input image choice
- Clear subject with a recognizable foreground / background separation reads best for both generators.
- Square or 16:9 framings are the safest defaults; very tall or panoramic inputs sometimes produce odd boundary behavior at 480p.
- For character motion, a 3/4 angle input gives the generator more pose information to work with than a flat front view.
Prompt tips
- Describe what moves and how, not just what the scene looks like. The image already provides the scene; the prompt should provide the motion.
- “Slow”, “fast”, “gentle”, “drifting” – speed cues help.
- Camera motion is also valid (“camera orbits left”, “slow zoom in”).
Length tips
- Start at 3 seconds for both generators. It is the fastest way to see whether the prompt + image combo is going to work before committing to a 10-second WAN run.
- If a 3-second test looks right, run the full length you want.
Post-process tips
- For social media / web delivery, 1080p at 30 fps with RIFE smoothing is the sweet spot.
- For editorial use (re-timing, color grading), pick 1440p at native fps so you don’t bake in the 30 fps re-time before edit.
- Skip the upscale if you are still iterating on the prompt – it doubles or triples the wall time.
11.8 Troubleshooting
“Files needed” expander never goes away after install
Click Refresh in the workflow page header, or switch to a different sidebar entry and back. The post-process pack and the generator packs are checked separately, so make sure you installed the right one.
Generation runs but the motion looks frozen or barely changes
- Increase the prompt’s motion language – the image is doing most of the work; the prompt should be explicit about what should happen.
- LTX is more conservative with motion than WAN. If LTX outputs look static, try the WAN pack.
Output looks 480p / blurry
That is the generator’s native resolution. Use the post-process Upscale stage to get to 1080p or higher. The two MP4s the post-process writes are sharper than the raw generation output.
4K upscale OOMs
- Drop to 1440p – much more forgiving on VRAM and still a substantial bump from 480p.
- Make the clip shorter and re-run the upscale.
- Close other GPU-using apps (browser hardware acceleration, etc.).
Generation fails with value_not_in_list
The generator pack’s files are on disk but ComfyUI’s model index is stale. Stop ComfyUI then Start ComfyUI from the toolbar to refresh.
“MP4 didn’t write” / output folder is empty
Check View Log. The most common cause is the post-process pack being only partially installed (RIFE present, SeedVR2 missing, or vice versa). Re-open the “Files needed” expander for the post-process pack and run install again.
12. Inpaint Image
Paint a brush mask over part of an image and have the AI either replace the masked region with new content (prompt-guided) or erase it cleanly (object removal). Sister workflow to Extend Image – both run on Flux Fill Dev and share its model weights, so installing one after the other is a no-op for the ~12 GB of Flux Fill weights.
Two fill engines:
- Flux Fill (creative) – generative replacement. Best when you want to swap one object for another (a chair becomes a table, a sky becomes a sunset).
- LaMa (clean removal) – purpose-built object eraser. Best when you want something gone. Doesn’t invent new objects from a strong prompt the way Flux Fill can.
Both engines support multiple generations per click and the Use as new source iteration pattern.
12.1 Getting started
- Open Comfy Labs and click Open Workflows on the welcome screen.
- Click Inpaint Image in the sidebar (just below Extend Image).
- ComfyUI will lazy-spawn on the first generation; the status dot in the bottom status bar goes yellow (starting) then green (running).
12.2 Upload image
Upload any image you want to inpaint.
- Any size and aspect ratio
- Source dimensions are shown above the brush canvas
12.3 Fill mode
Choose the engine:
Flux Fill (creative)
Generative replacement. Use this when you want to replace the masked area with specific content.
- Prompt-guided – describe what you want to appear in the masked area
- Tends to produce highly detailed results
- Risk: with a strong prompt or empty prompt + a vivid surrounding scene, may “spill over” and recreate the object you tried to remove (or invent prompt-matching content in unmasked regions). The graph composites the result against the original so unmasked pixels are byte-preserved regardless, but visible seams can show at the mask edge with very high guidance.
LaMa (clean removal)
Purpose-built inpainting model trained for object removal. Doesn’t invent new content – it extends surrounding texture into the masked area.
- No prompt
- Reliably erases what you mask, instead of recreating it
- Runs at 256px native resolution internally, then upsamples; the masked area can look soft on high-res sources – the Refine with Flux Fill option (next section) sharpens it back up
12.4 Painting the mask
The canvas shows your source image at up to 800px wide (or native size if smaller). The right-hand column has the brush controls.
Brush
Stroke width slider, 5–150 pixels (default 40). Larger brush for big areas, smaller for precise edges.
Clear mask
Wipes everything you’ve painted. Useful when you want to restart without re-uploading the image.
Undo last stroke
The canvas itself supports Ctrl+Z to undo individual brush strokes.
Mask visibility
Painted area shows in semi-transparent red so you can see your image through it. The mask is binary internally – partial brush opacity gets thresholded to 0 or 100% inpaint. Use Mask grow in Advanced settings if your brush didn’t quite cover an object’s edges or shadow.
12.5 Prompt (Flux Fill mode only)
A single text area for describing what should appear in the masked region.
- Empty prompt + Flux Fill tends to recreate similar objects from surrounding context. If you’re trying to erase something, switch to LaMa mode instead.
- For replacement: describe what you want (e.g. “a wooden table”, “clear blue sky”).
- For removal (if you’re stuck on Flux Fill): describe the BACKGROUND that should appear behind the removed object (e.g. “empty laboratory floor, polished concrete, no equipment in foreground”).
LaMa mode hides the prompt box – the model doesn’t use one.
12.6 Refine with Flux Fill (LaMa mode only)
Default on. Adds a second-stage Flux Fill pass over the LaMa output to sharpen the masked area back to source-matching detail. Costs roughly 2x the runtime of LaMa alone but produces a noticeably less-blurry result.
Refine strength
Slider beside the checkbox, range 0.2–0.8 (default 0.55).
- 0.2 – barely touches the LaMa output (fastest, but stays blurry)
- 0.55 – balanced default; visible sharpening without inventing new content
- 0.8 – strong refine; may invent plausible detail (lab equipment, foliage, etc.) in the previously-erased space
If 0.55 still looks blurry, push to 0.7. If 0.7 starts inventing equipment in the erased space, drop back to 0.55. Uncheck Refine with Flux Fill entirely for the fast, soft-but-clean LaMa-only output.
12.7 Seed control
- Seed – controls randomness. Same seed + same mask = same result.
- Lock checkbox – keeps the seed fixed between runs. When unlocked, a new random seed is used each generation.
12.8 Generations
Radio: 1, 2, or 4. Runs the inpaint that many times with incrementing seeds, all using the same mask.
- Each generation takes the same time as a single run, so 4 = ~4x the wait
- Useful when the model has creative latitude (empty Flux Fill prompt, or LaMa+Refine at high strength) and you want to pick the best variation
- Results render in a 1, 2, or 2x2 grid; each result has its own Download and Use as source buttons
- LaMa is mostly deterministic per seed – 4 LaMa-only runs will look almost identical. Generations is most useful in Flux Fill or LaMa+Refine modes.
12.9 Advanced settings
An Advanced expander below the prompt / refine controls. Defaults are sensible for most images – only touch these if you have a specific reason.
Guidance (Flux Fill mode only)
How strongly Flux Fill follows the prompt (1.0–50.0, default 10).
- Higher = stronger prompt steering, but more “spillover” risk (Flux Fill may try to fit prompt content into unmasked regions)
- The composite step preserves unmasked pixels regardless, but visible seams at the mask edge can appear at very high guidance (30+)
Steps (Flux Fill mode only)
Number of denoising steps (15–40, default 20).
- More steps help with complex content
- Linear time cost – 40 steps takes twice as long as 20
Mask feather
Width of the soft edge between the inpainted area and the surrounding image (0–64 pixels, default 12).
- 0 = hard edge (good for sharp replacements like text removal)
- Higher = smoother blend (good when the object has soft edges or is surrounded by gradients)
Mask grow
Dilates the mask before feathering (0–64 pixels, default 0).
- Useful when your brush didn’t quite cover an object’s edges, shadow, or halo
- Bump to 8–16 if the result shows ghost-edges of the original object at the mask boundary
12.10 Generate and download
- Click Inpaint to start. The button is disabled until you’ve painted at least one stroke on the canvas.
- A spinner shows progress – the label tells you which engine is running (“Flux Fill”, “LaMa”, or “LaMa+Refine”) and which generation is in flight (e.g., “generation 2/4”).
- Result(s) appear below in a 1 / 2 / 2x2 grid.
-
Each result has two buttons:
- Download – save the inpainted PNG to your output folder.
- Use as source – promote that specific result to be the new canvas source for another inpaint pass. Mask resets so you can paint a new region; padding values, prompt, and Advanced settings carry over; seed regenerates unless Lock is checked.
Output filenames are tagged by engine so you can compare side by side:
-
<source>_inpaint_flux_<seed>.png– Flux Fill mode -
<source>_inpaint_lama_<seed>.png– LaMa-only mode -
<source>_inpaint_refined_<seed>.png– LaMa + Refine
12.11 Tips for best results
- Choose the right engine for the goal. Want to replace an object with a different one? Flux Fill. Want to erase an object? LaMa (with Refine on).
- Paint generously. Cover the whole object plus a small halo around its edges. If the object has a shadow or reflection, mask those too – otherwise they hint at the removed object and the model will sometimes regenerate it.
- For Flux Fill object removal, describe the background. “Empty floor, plain wall, nothing in foreground” is much more effective than an empty prompt at erasing an object via Flux Fill.
- Iterate, don’t over-mask. Mask one region, run, then Use as source and mask the next region. Inpainting one large compound area in a single pass is harder than inpainting each piece separately.
- Bump Mask grow to 8–16 when you see ghost-edges of the removed object at the mask boundary.
- Use 4 generations when Flux Fill has lots of creative latitude (empty prompt, big mask) – pick the best of four.
12.12 Troubleshooting
“Erase” with Flux Fill keeps recreating the object
Switch to LaMa mode. Flux Fill is fundamentally a fill model, not an erase model – it sees a tall vertical mask in an industrial scene and helpfully invents a tall vertical thing to put there. LaMa is purpose-built for clean removal.
LaMa output is blurry
Make sure Refine with Flux Fill is checked (default on). If it’s checked and still blurry, raise Refine strength from the default 0.55 to 0.7.
LaMa+Refine invents new equipment in the supposedly-erased area
Drop Refine strength to 0.4 or 0.45. Above 0.65, Flux Fill has enough creative freedom to add detail that wasn’t in the LaMa output. Trade-off: less refine = softer-but-cleaner removal.
Flux Fill spills the prompt into unmasked regions
Drop Guidance in Advanced settings from 10 to 6–7. Higher guidance amplifies prompt-spillover. The composite step ensures unmasked pixels are byte-identical to the source regardless, but at high guidance you can sometimes see a visible seam at the mask edge.
Mask edges show a ghost of the removed object
Bump Mask grow to 8–16 in Advanced settings, then optionally raise Mask feather to 20–30. Together they expand and soften the mask so the model has room to extend surrounding texture cleanly.
Generation fails
- Check the ComfyUI status dot in the status bar.
- Click View Log for error messages.
-
LaMa requires
big-lama.pt(~196 MB) in the models/inpaint folder – if it’s missing or the wrong format, the View Log error mentionsUnsupportedModelErrorfrom spandrel. Re-install the workflow from the Settings page; the manifest points at the canonical Sanster build.
Concept Magic Bridge (Blender add-on integration)
If you use the Concept Magic Blender add-on, Comfy Labs hosts the FastAPI HTTP service the add-on talks to. The bridge runs on http://127.0.0.1:8000 (loopback only – nothing exposed to your LAN) and exposes a versioned /v1/... API that proxies requests to the ComfyUI backend.
Enabling the bridge
The bridge is off by default so users who don’t use the Blender add-on don’t pay for an idle uvicorn process.
- Open Prefs in the toolbar.
- Check Enable Concept Magic bridge.
- Click Save.
The bridge spawns immediately (status dot in the bottom bar turns yellow then green). Toggling the checkbox stops/starts the bridge live – no app restart needed.
The bridge only spawns once first-run setup is complete (first_run_complete: true in config.json). This prevents spurious crash panes when ComfyUI hasn’t been warmed up yet.
What the Blender add-on can do
-
Pre-load Concept Magic models into VRAM (
/v1/warmup) -
Free VRAM after a session (
/v1/unload) -
Generate styled images from a Blender viewport render (
/v1/generate) -
Generate with a custom LoRA (
/v1/generate/lora) -
Send/receive base64-encoded images for in-process pipelines (
/v1/generate/base64) -
Check the lifecycle state of all three Comfy Labs subprocesses (
/v1/process-status) -
Lazy-spawn ComfyUI on demand (
/v1/ensure-comfyui-running)
For the full API contract, see <app folder>\resources\python\cm_bridge\CM_BRIDGE_API_v1.md.
Add-on connection states
The add-on always shows you what’s happening:
- “Comfy Labs is not running. Start it from the Start menu.” – the Comfy Labs window is closed.
- “ComfyUI is starting (~10–30 s). Please wait.” – ComfyUI is warming up.
- “ComfyUI crashed. Open Comfy Labs to restart it.” – ComfyUI exited; check the crash pane in Comfy Labs.
-
“Workflow X failed:
” – per-job error returned from/v1/generate.
Spurious cm_bridge HTTP 400 errors
If you have Enable Concept Magic bridge turned on but you have not installed the Concept Magic workflow’s models, the bridge’s startup pre-load attempt will fail with a noisy validation error in the log (look for HTTP 400 lines mentioning z_image_turbo_bf16.safetensors or Z-Image-Turbo-Fun-Controlnet-Union).
Two safe fixes:
- Install the Concept Magic workflow from the Settings page (downloads the missing models).
- Or, if you don’t use Concept Magic at all, uncheck Enable Concept Magic bridge in Preferences. The bridge stays off entirely.
Updates
Comfy Labs has two independent update channels. They check different mirrors and update different things; nothing in one ever blocks the other.
App update channel (the toolbar Updates button)
Comfy Labs checks for new versions of the app shell itself automatically 30 seconds after each launch, and on demand when you click Updates in the toolbar.
The check fetches https://www.widgetgadget.com/cw1/Comfy-Labs/version.json (a tiny JSON file with version, downloadUrl, and an optional releaseNotes link), compares the published version to the running version with a numeric semver comparison, and broadcasts one of four states to the renderer:
- Update available – a thin blue banner appears below the toolbar with the new version number, Release notes and Download buttons, and a × dismiss button. Both buttons open the matching URL in your default browser.
- Up to date – a green banner appears (only when you clicked the toolbar button manually; the silent startup check does not show this).
- Offline – a yellow banner saying “Cannot reach update server.” Same caveat: only shown for manual checks.
- Dev build – gray banner; only ever shown in unpackaged dev runs.
Comfy Labs is portable – to install an update, just unzip the new version into a new folder next to your current one and launch its Comfy Labs.exe. Your config (in %APPDATA%), models folder, output folder, pip wheel cache, and installed workflows all carry over automatically because they live outside the app folder. The full procedure is in UPGRADING_COMFY-LABS.md.
The app will never download or install an app update without your action. Clicking Download just opens the URL in your browser. You stay in control of when and where the new version lands.
Workflow update channel (the StatusBar badge)
Workflows are versioned independently from the app. New LoRAs, fixed graphs, or brand-new workflows can ship without an app release.
On every launch, the Electron main process fetches catalog.json from the workflow mirror (primary https://filedn.com/lLMW4jXsJqxXkRYjd1UCoKL/comfy-labs/, with https://web.cw4.me/comfy-labs/ as a backup) and semver-compares each workflow’s version: field against your locally installed manifest’s version: field (v0.2.53+):
- An installed workflow whose local version is older than the catalog version = a workflow update is available.
- A catalog entry with no local manifest at all = a brand-new workflow you can install.
The combined count surfaces in the StatusBar as a clickable badge:
- “N workflow update(s) available”
- “N new workflow(s) available”
- “N updates + M new available”
Click the badge to jump straight to the Settings page. Each affected workflow card shows an Update or Install button. Workflow installs are incremental – only the files that changed get downloaded (manifest.yaml lists every shippable file with its sha256 + size, the client diffs hashes against local copies, and pulls only differing or missing files). For most workflow updates that means a few hundred KB instead of the full multi-GB workflow folder.
After a workflow install or update completes, Comfy Labs shows a restart-required dialog (“Workflow installed – Restart now / Later” or “Workflow updated …”). The model paths register cleanly with ComfyUI on the next launch, so Restart now is the right answer unless you have a reason to defer.
If the catalog mirror is unreachable on launch, the badge stays hidden and Settings falls back to your locally bundled list. No network = no nag.
Troubleshooting
Cross-cutting issues that affect more than one workflow. For workflow-specific problems, see the Troubleshooting subsection inside each workflow’s chapter.
Comfy Labs won’t launch
“Windows protected your PC” / SmartScreen warning
The build is unsigned during the closed beta. Click More info -> Run anyway.
Comfy Labs.exe opens then immediately closes
Make sure you didn’t move Comfy Labs.exe out of its folder – the sibling resources/ tree is required. If you want a shortcut elsewhere, right-click the .exe and choose Pin to taskbar, Pin to Start, or Send to -> Desktop (create shortcut).
If the issue persists:
-
Open
%APPDATA%\Comfy Labs\app.login Notepad to see the last error. - Try unzipping the build again to a fresh folder.
“Another instance is already running”
Comfy Labs uses a single-instance lock to prevent port collisions on 8501 / 8000 / 8188. Either bring the running window to the foreground (the new launch focuses it automatically) or close it from Task Manager (Comfy Labs.exe).
Workflow timing out on a slow GPU
Every workflow has a built-in time limit (typically 2–30 minutes depending on the workflow). If processing takes longer, the operation aborts and you’ll see a ⏱ banner.
This is most common on lower-VRAM GPUs (10 GB or less) doing large outputs. When a model exceeds dedicated VRAM, Windows spills the overflow into shared system memory accessed over PCIe, which is 10–100× slower than VRAM.
First steps (no config changes)
- Reduce the input image size, scale factor, output dimension, or batch.
- Close other GPU-using apps (browsers with hardware acceleration, video editors, games).
- Click View Log in the status bar – it tells you which step actually timed out.
Extending timeouts globally
Set a Windows environment variable before launching the app:
COMFY_LABS_TIMEOUT_MULTIPLIER=2.0
-
Range:
0.5to10.0. Use2.0to double,3.0to triple. Default =1.0. - Applies to every workflow.
- Set it via System Properties -> Advanced -> Environment Variables, or in a batch file that launches the app.
Pinning the SeedVR2 (Detail-AI) upscaler to an exact value
Set:
SEEDVR2_TIMEOUT_S=3600
-
Range:
60to7200seconds. - Affects only the Detail (AI) upscaler.
-
Most users should use
COMFY_LABS_TIMEOUT_MULTIPLIERinstead.
A workflow fails with a generic error (likely out of VRAM)
If a workflow finishes with a vague banner like “Generation failed”, “Failed to generate variation N”, or “Upscale failed. No specific error was returned. Open View Logs to see what happened.” – and ComfyUI did not crash (its dot is still green) – the most common cause is the GPU ran out of VRAM during the run. Comfy Labs reports this generically today; the specific reason lives in the log.
Confirming it’s OOM
- Click View Log in the status bar.
-
Scroll to the moment the workflow failed and look for any of these markers in the
[PY-comfyui]/[PY-comfyui ERR]lines:-
CUDA out of memory -
OutOfMemoryError -
Allocation on device 0 would exceed allowed memory -
torch.cuda.OutOfMemoryError
-
If one of those is in the log, it was OOM. (If the log shows a different error – missing model, custom node import failure, network timeout to a download – that’s a different problem; see the matching section below or in the workflow’s own Troubleshooting.)
What to do
In rough order of how much they help:
- Close other GPU-using apps – browsers with hardware acceleration, video editors, image editors with GPU previews, games, even an idle Blender viewport with Eevee/Cycles loaded. Each can hold 1–3 GB of VRAM.
- Reduce the workflow’s output size or batch. Lower the longest-edge target, the upscale factor, or the variation count. The biggest VRAM cost is usually the latent and VAE buffer, both of which scale with output pixels.
- Drop unused LoRAs. Each loaded LoRA adds to peak VRAM. If a workflow lets you stack LoRAs, try with fewer.
- Restart ComfyUI between runs. Click Stop ComfyUI in the toolbar, wait for the dot to go gray, then Start ComfyUI. Some workflows leave residual VRAM allocated even after they finish; a restart fully reclaims it.
- If you’re consistently right at the edge, consider whether your card actually meets the workflow’s recommended VRAM (each workflow chapter lists its requirement). Some workflows (Extend Image, Trellis2, large SeedVR2 upscales) are 16 GB minimums in practice even where the card datasheet says 12 GB is enough.
Why isn’t the error message clearer?
ComfyUI’s /prompt API doesn’t return a structured error code for VRAM exhaustion – the OOM happens deep inside a model node, gets caught generically, and the workflow finishes with a non-success status that Comfy Labs surfaces as the generic “failed” banner. We’re tracking this; for now the log is the source of truth.
ComfyUI status dot stays gray after clicking a workflow
ComfyUI is lazy-spawned on the first request. Wait 10–30 seconds – the dot should go yellow (starting) then green (running). If it stays gray:
-
Click View Log – look for
[PY-comfyui]lines and anyERRlines. - Click Start ComfyUI in the toolbar to spawn it explicitly. (If the toolbar reads Stop ComfyUI, the backend is already running – click Stop, wait a couple of seconds for the dot to go gray, then click Start to do a clean restart.)
ComfyUI crashed (red dot, crash pane appears)
The crash pane shows the captured stderr. Common causes:
- Out of memory – reduce input size or scale factor; close other GPU apps. See A workflow fails with a generic error (likely out of VRAM) for the longer checklist; the steps there work for the crash case too.
- Missing model – a model file the workflow needs isn’t on disk. Open Settings -> the affected workflow -> Download models.
- Custom node import failure – usually a Python dependency conflict; click Send Error Report and share the ZIP.
Click Restart in the crash pane to relaunch the backend (or Start ComfyUI in the toolbar). The other Comfy Labs services keep running.
GPU appears stuck or VRAM stays full after a failure
- Click Stop ComfyUI in the toolbar – this prompts for confirmation, then frees VRAM. Click Start ComfyUI to bring the backend back up. Usually enough.
- If the GPU itself is wedged (rare), reset the Windows display driver with Win+Ctrl+Shift+B.
- As a last resort, close Comfy Labs (the window-close fully shuts down all subprocesses) and relaunch.
Streamlit dot is gray and Open Workflows is disabled
Streamlit failed to start. Click View Log – look for [PY-streamlit] lines. Most likely causes:
-
Port 8501 in use – another app is bound to the port. Stop the other app or set
COMFY_LABS_STREAMLIT_PORTto a free port before launching. - Python venv missing – the install is corrupted. Re-run the wizard (the next launch will detect the missing venv and offer to reconfigure).
Drive moved or unmounted (Reconfigure mode)
If your install drive disappears (external SSD unplugged, drive letter reassigned, folder deleted), the next launch shows the wizard in Reconfigure mode with a yellow banner explaining what’s missing.
- If the drive is back: re-pick the same install folder; the wizard detects the existing venv and skips the bootstrap step.
- If the drive is permanently gone: pick a new install folder; the wizard re-runs the bootstrap. Your models folder, if on a different drive that’s still mounted, is preserved – you don’t need to re-download model weights.
Update check fails with “Cannot reach update server”
Check your internet connection. If you’re offline by design, dismiss the banner – update checks never block app functionality.
ComfyUI is still running after Comfy Labs quit
If you force-killed Comfy Labs.exe from Task Manager (or it crashed without cleaning up), the ComfyUI Python process can be left behind, holding the GPU and TCP port 8188. Symptoms: relaunching Comfy Labs shows the ComfyUI dot stuck at gray or red, the GPU sits at full VRAM in Task Manager, or another app reports port 8188 is in use.
A standalone helper ships next to Comfy Labs.exe:
-
Force-Quit-ComfyUI.bat– double-click. (It launchesForce-Quit-ComfyUI.ps1in the same folder.)
What it does:
-
Reads your install path from
%APPDATA%\Comfy Labs\config.json. -
Lists every
python.exerooted in that install dir, plus anything bound to TCP port 8188. -
Shows you the candidate PIDs and asks for confirmation (
Y/N). -
On
Y, runstaskkill /T /Fon each process tree, then re-checks port 8188 and reports whether it is free.
Safe to run any time – if no orphans are detected it prints “Nothing to do” and exits. Use it before relaunching Comfy Labs whenever you suspect a stale ComfyUI is still alive.
I need to reset everything
See Uninstall for the safe reset procedure.
Uninstall
Comfy Labs ships a standalone interactive uninstaller (Uninstall-Comfy-Labs.bat) in the same folder as Comfy Labs.exe. There are two ways to remove the app – the recommended interactive script, or fully manual PowerShell for users with non-standard installs.
Method 1 – Standalone interactive uninstaller (recommended)
Find the uninstaller
You can find Uninstall-Comfy-Labs.bat two ways:
-
From inside the app: click the red Uninstall Comfy Labs button at the bottom of the welcome screen. The app does not uninstall itself – it just opens Windows Explorer with
Uninstall-Comfy-Labs.batselected and shows a dialog telling you to close Comfy Labs and double-click the .bat. -
From Explorer directly: navigate to the folder containing
Comfy Labs.exe.Uninstall-Comfy-Labs.batandUninstall-Comfy-Labs.ps1sit next to it. (If you would rather run the PowerShell file directly, right-clickUninstall-Comfy-Labs.ps1-> Run with PowerShell.)
Run it
After closing Comfy Labs, double-click Uninstall-Comfy-Labs.bat. A console window opens, scans your install for size, and presents a 7-item checklist with live folder sizes:
| # | Item | Default | Notes |
|---|---|---|---|
| 1 | Electron app folder | ON | The folder containing Comfy Labs.exe itself. |
| 2 | Runtime + ComfyUI | ON | Your install folder (the Comfy-Labs folder picked during the wizard). Holds the Python runtime, ComfyUI, and custom nodes. |
| 3 | Models folder | ON if separate | Only enabled when your models folder is outside the Runtime folder. If models live inside Runtime, item 3 is shown as “will be deleted with item 2.” |
| 4 | Output folder | ON if separate | Same logic as Models. |
| 5 | HuggingFace cache (%USERPROFILE%\.cache\huggingface) |
OFF | Other AI apps on your system may share this cache. Only delete it if you are sure no other tool needs it. |
| 6 | App config + logs (%APPDATA%\Comfy Labs) |
ON | Window position, settings, log files. |
| 7 | Pip wheel cache (%LOCALAPPDATA%\Comfy Labs\pip-cache) |
ON | Cached Python wheels (~4 GB). Safe to delete – speeds up future re-installs but not required. |
Controls
-
1-7– toggle that item on/off. -
A– toggle all enabled items at once. -
C– confirm and proceed (shows a final “Are you sure?” prompt). -
Q– quit without doing anything.
What it does when you confirm
-
Stops
Comfy Labs.exeand any orphanedpython.exeprocesses still rooted in your install folder. Safe to run even if the app appears to still be holding files. - Deletes each selected item, with retries for transiently-locked files. Items inside the Runtime folder that you chose to keep (e.g. Models with item 2 selected but item 3 unchecked) are preserved.
- Verifies each path is gone and prints a green “removed” line per item, or a yellow warning for anything it could not fully delete.
After it finishes
If item 1 (Electron app folder) was selected and you ran the .bat from that same folder, the script can’t delete itself – it leaves only Uninstall-Comfy-Labs.bat and Uninstall-Comfy-Labs.ps1 behind, and prints You can now delete this folder: <path>. Open Explorer and delete the folder yourself.
If you linked from an existing ComfyUI install during step 4 of the wizard, those files are not deleted – the .comfy_labs_manifest.json records hardlinks vs. copies, and the uninstaller leaves your other ComfyUI install untouched.
Method 2 – Fully manual
For users whose install is in a non-standard location, or who want to script the cleanup themselves. Run the following in PowerShell, replacing <install_dir> with the folder you picked during the wizard (defaults to something like D:\Comfy-Labs) and <app_dir> with the folder containing Comfy Labs.exe:
# 1. Kill any running Comfy Labs or related Python processes
Get-Process "Comfy Labs" -ErrorAction SilentlyContinue | Stop-Process -Force
Get-Process python* -ErrorAction SilentlyContinue | Where-Object {
    $_.Path -like "<install_dir>\*"
} | Stop-Process -Force

# 2. Delete the install directory (runtime + ComfyUI + models + outputs)
Remove-Item -Recurse -Force "<install_dir>"

# 3. Delete the app config + Electron data
Remove-Item -Recurse -Force "$env:APPDATA\Comfy Labs"

# 4. Delete the pip wheel cache
Remove-Item -Recurse -Force "$env:LOCALAPPDATA\Comfy Labs\pip-cache"

# 5. Delete the Electron app folder (the folder containing Comfy Labs.exe)
Remove-Item -Recurse -Force "<app_dir>"

# 6. (Optional) Delete the HuggingFace model cache. WARNING: other AI apps
#    on your system may share this cache. Only run if you are sure.
Remove-Item -Recurse -Force "$env:USERPROFILE\.cache\huggingface"
If you have custom Models or Output folders set in Preferences that live outside <install_dir>, delete those separately.
What does NOT need cleanup
- Windows Registry – Comfy Labs writes no registry entries.
- Start Menu / Desktop shortcuts – the portable build creates none.
- Windows services – none installed.
- System PATH – not modified.
- System Python – not touched. Comfy Labs ships its own Python runtime inside the install folder.
Appendix A – Folder structure
This appendix documents the installed app layout – what you see on your machine after running the wizard.
Installed app – what lives where
After first-run setup, Comfy Labs spans four locations on disk:
<wherever you unzipped Comfy Labs.exe>\        # Portable app (~255 MB packed)
+-- Comfy Labs.exe                              # Main executable
+-- resources\
|   +-- app\                                    # Vite-built React + Electron main
|   +-- python\                                 # Streamlit app + 9 workflow plugins
|   +-- python-bootstrap\                       # bootstrap.py + custom_nodes.txt
|   +-- python-runtime\                         # Bundled CPython 3.12.13 tarball (~46 MB)
|   +-- git-runtime\                            # Bundled MinGit 2.54.0 tarball (~40 MB)
|   \-- public\                                 # Icons, hero image, debug_logs/
+-- LICENSES.md                                 # Third-party attributions (ships next to the .exe)
+-- Uninstall-Comfy-Labs.bat / .ps1             # Standalone uninstaller (interactive 7-item checklist)
+-- Force-Quit-ComfyUI.bat / .ps1               # Hard-kill orphaned ComfyUI / Python on port 8188
\-- ...

%APPDATA%\Comfy Labs\                           # User data on C: (~10 MB total)
+-- config.json                                 # All your settings
+-- window-state.json                           # Window position + size
+-- app.log                                     # Combined log (Electron + 3 subprocesses)
\-- workflows\                                  # Manually-imported workflows (optional)
    \-- <workflow-id>\

%LOCALAPPDATA%\Comfy Labs\                      # Local-only caches (typically a few GB after a full install)
\-- pip-cache\                                  # Pip wheel cache (~4 GB after a full install). Wipeable
                                                #   from Prefs; never auto-cleaned.

<install_dir you picked>\                       # Heavy install (~21 GB), e.g. D:\Comfy-Labs\
+-- python-runtime\                             # Bundled CPython 3.12.13 (extracted on first run, ~150 MB)
|   \-- python.exe                              # Base interpreter -- never on PATH, never registered with the OS
+-- git-runtime\                                # Bundled MinGit 2.54.0 (extracted on first run, ~80 MB)
|   \-- cmd\git.exe                             # Used only by bootstrap clone steps (env var COMFY_LABS_GIT_EXE)
+-- runtime\                                    # Python venv built on top of python-runtime\python.exe
|   +-- Scripts\
|   |   \-- python.exe                          # Venv Python (PyTorch, ComfyUI deps, custom-node deps)
|   +-- Lib\site-packages\                      # All Python packages
|   \-- pyvenv.cfg
+-- comfyui\                                    # ComfyUI source (cloned at pinned commit via the bundled git)
|   +-- main.py                                 # ComfyUI entry point
|   +-- custom_nodes\                           # 26 pinned custom nodes installed here
|   \-- ...
+-- models\                                     # (default) AI model weights, see below
\-- output\                                     # (default) Generated images, meshes, etc.

<models_folder you picked>\                     # AI weights (5--70 GB, on whichever drive you picked)
+-- diffusion_models\                           # Stable Diffusion / Flux / Z-Image .safetensors
+-- clip\                                       # CLIP and T5 text encoders
+-- vae\                                        # VAE weights
+-- checkpoints\                                # Misc model checkpoints
+-- model_patches\                              # ControlNet, IP-Adapter weights
+-- inpaint\                                    # LaMa inpainting weights
+-- microsoft\                                  # Trellis2 (Image to 3D Mesh)
+-- diffusers\                                  # BiRefNet (background removal for 3D)
+-- facebook\                                   # DINOv3 feature extractor
+-- LLM\Qwen-VL\Qwen3-VL-2B-Instruct\           # QwenVL captioning model (Extend Image, HF transformers, v0.2.18+)
+-- loras\                                      # LoRA styles for Concept Magic LoRA
\-- .comfy_labs_manifest.json                   # Provenance: which files came from where
                                                # (so uninstall doesn't delete linked-from-existing files)
Why so many separate locations?
| Location | Purpose | Survives .zip update? |
|---|---|---|
| App folder (where the .exe lives) | Portable; replaceable. Also holds Uninstall-Comfy-Labs.bat, Force-Quit-ComfyUI.bat, and LICENSES.md. |
No – you replace it on update |
%APPDATA%\Comfy Labs\ |
Settings (config.json), window state, app log, manually-imported workflows |
Yes |
%LOCALAPPDATA%\Comfy Labs\pip-cache\ |
Pip wheel cache so partial-install retries don’t redownload PyTorch | Yes – never auto-wiped |
<install_dir>\python-runtime\, \git-runtime\ |
Bundled CPython + MinGit, extracted once on first run | Yes – not re-extracted on app update |
<install_dir>\runtime\, \comfyui\ |
Heavy Python venv + ComfyUI clone | Yes – separate from the app folder, not affected by .zip updates |
<models_folder>\ |
Multi-GB model weights | Yes – on whichever drive you picked |
<output_folder>\ |
Your generated work | Yes |
This split is deliberate: app updates are small and fast (replace the .exe folder), while the heavy stuff (runtime, models, outputs, pip cache) is preserved across updates. The bundled-runtime tarballs in the app folder are the source-of-truth for first-run extraction; once they have been unpacked into <install_dir> once, app updates do not touch them again.
Appendix B – File reference
A quick index of the most useful files, grouped by what you’d come looking for.
“I want to change a setting”
| File | Lives at | Purpose |
|---|---|---|
config.json |
%APPDATA%\Comfy Labs\ |
All user settings: install_dir, models_folder, output_folder, output_retention, cm_bridge_enabled, discover_path, first_run_complete, hardware_audit, version (config schema version, currently 2). Edit at your own risk – the in-app Prefs dialog is the supported path. |
window-state.json |
%APPDATA%\Comfy Labs\ |
Window position and size. Separated from config.json so electron-store’s debounced writes don’t race with the wizard’s writes. |
“Something broke; I need logs”
| File | Lives at | Purpose |
|---|---|---|
app.log |
%APPDATA%\Comfy Labs\ |
Combined log: Electron main, React renderer (forwarded via IPC), and all three Python subprocesses (Streamlit / cm_bridge / ComfyUI). View with the in-app Log Viewer or any text editor. |
comfy-labs-report-<timestamp>.zip |
Your Desktop | Bundle generated by Support Log (toolbar) or Send Error Report (crash pane). Contains app.log + subprocess state + app info + installed-workflows manifest. Email this to whoever is helping you. No model files, no user images, no upload endpoint. |
“I want to understand what subprocess does what”
The app folder where you unzipped Comfy Labs.exe contains a resources\ subfolder that ships the bundled Python code. Power users can read it directly; nothing in there is the supported way to change behavior, but it is useful when you want to know exactly what is running.
| Subprocess | Port | Entry (relative to resources\) |
Purpose |
|---|---|---|---|
| Streamlit | 8501 | python\Workflows.py |
The workflow UI. Always on while the app is running. Boots in ~3–5 seconds. |
| cm_bridge | 8000 | python\cm_bridge\api_server.py (uvicorn) |
FastAPI for the Concept Magic Blender add-on. Off by default; opt-in via Prefs. |
| ComfyUI | 8188 | <install_dir>\comfyui\main.py (cloned by the wizard) |
The AI compute backend. Lazy-spawned on first request. ~10–30 s cold start; up to 240 s if Triton caches are stale. |
All three log to the same app.log with [PY-streamlit], [PY-cmBridge], [PY-comfyui] prefixes (errors get an extra ERR tag).
“I want to install or update a workflow”
The Settings page inside the Streamlit pane is the supported path: open the app -> Open Workflows -> sidebar -> Settings.
If you want to inspect a workflow’s contents on disk, the bundled copies ship in <app folder>\resources\python\workflows\<id>\, and any workflow you imported via the Import Workflow button lands in %APPDATA%\Comfy Labs\workflows\<id>\ (which survives app updates).
| File | Purpose |
|---|---|
manifest.yaml (per workflow) |
Workflow metadata. Schema: id, name, version, description, gpu_min_sm, vram_gb, download_size_gb, display_order (int, default 100; lower = earlier in nav), category (str, optional, used to group the nav), models[] (each: key, filename, subdir, size_bytes, source, repo_id, repo_file, optional baked_in; LoRA-pack entries bind to an index_url instead of scraping a directory), custom_nodes[], wheels{} (per-SM-key list), and files[] – every shippable file with its path + sha256 + size. The client diffs hashes against local copies on every install/update and downloads only differing or missing files. SHA mismatches hard-fail. |
ui.py (per workflow) |
Streamlit render(api) function called when the user picks the workflow. The api object exposes both convenience high-level methods (api.generate_concept_art etc) and a set of low-level primitives (api.run_workflow, api.upload_image, api.find_output_image, api.download_image, api.run_and_save, api.load_sibling("graph")). |
graph.py (per workflow) |
ComfyUI graph builder for that workflow. Imported via api.load_sibling("graph"). Lets a workflow ship a graph fix without rebuilding the app – every shipping workflow now follows this pattern. |
python\workflows\catalog.json |
Bundled fallback catalog. Used only when both the primary (filedn.com) and backup (web.cw4.me) mirrors fail. The live catalog carries manifest_sha256 per workflow; the client verifies that hash after fetching the manifest, before running the per-file diff. |
python\workflow_manager.py |
Catalog fetch (5-minute soft TTL across launch + Settings navigation), per-workflow install/update via sha256-diffed file lists, GPU compatibility check, and load_workflow_ui(wf_id) – the function Workflows.py calls to dynamically render each workflow. The module cache is keyed on (ui.py mtime, module), so a swapped-in ui.py hot-reloads on the next page render. |