Ultra-Mat — Complete Manual
Version 1.4.10 · Blender 5.0+
Convert textures and existing .blend files into CW Ultra materials.
Project home: https://cw1.me/ultra-mat
Quick video tutorial:
What is Ultra-Mat?
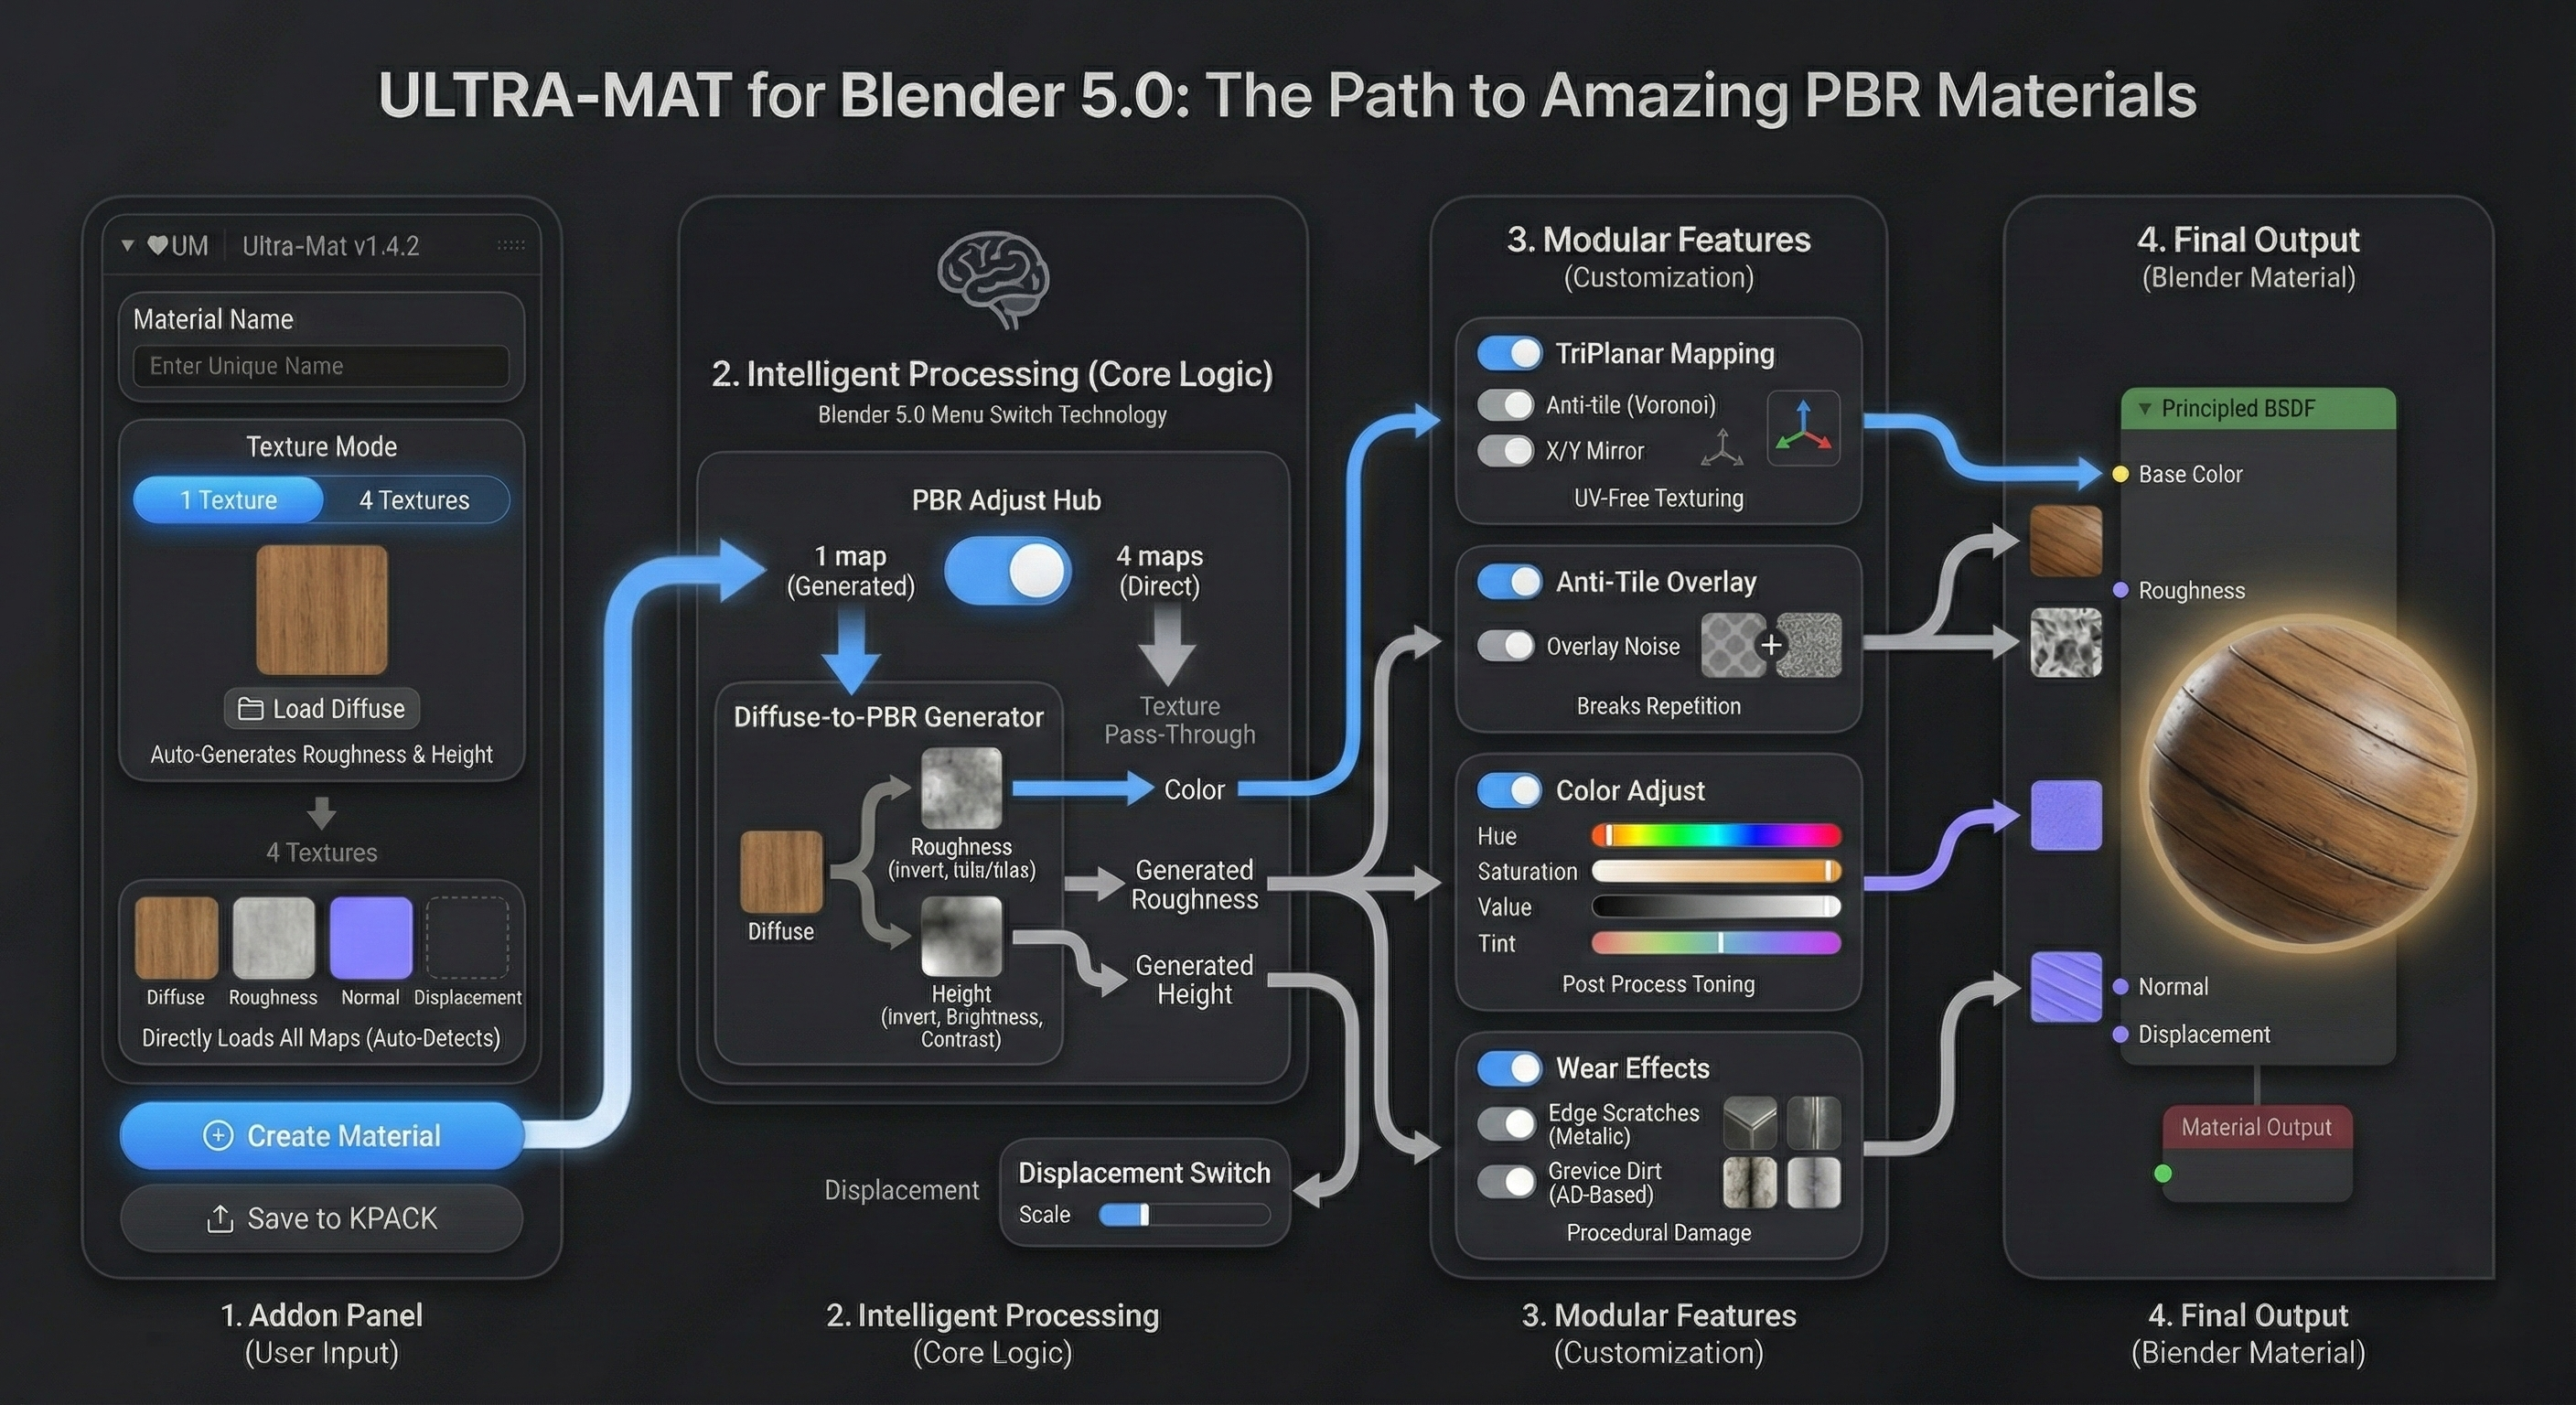
Ultra-Mat is a core material workflow within the EEVEE + Cycles Material System, designed to make creating, tuning, and reusing materials in Blender both more powerful and more approachable. Rather than relying on a single shader model or fixed preset approach, Ultra-Mat provides a flexible, structured material that adapts to the data you have available — from a single diffuse image to a complete PBR texture set. It combines triplanar mapping, anti-tiling, and physically informed wear into a single material that works consistently across EEVEE and Cycles, without requiring UV unwrapping or texture painting.
More importantly, Ultra-Mat represents a shift toward material ownership and longevity. Materials created with Ultra-Mat are not dependent on an add-on to function or be adjusted — all meaningful controls live directly inside the material itself. Once created, materials can be saved to KIT OPS libraries or Blender’s Asset Browser, turning them into reusable production assets rather than one-off results.
Ultra-Mat operates in two modes:
-
KIT OPS Mode (default) — point Ultra-Mat at a diffuse texture (and optionally roughness, normal, displacement), and it appends the
cw_ultratemplate material, wires your images into it, names it whatever you want, and is ready to save into a KPACK. -
DEV Mode (advanced) — take a whole folder of existing
.blendfiles (typically KIT OPS material INSERTs from another library) and batch-convert them to use a single template material while preserving the original diffuse image, object layout, and KIT OPS metadata.
Under the hood, the CW Ultra material is built from a bundled ultra_template.blend whose key node groups are prefixed TP_* (TP_Diffuse, TP_Roughness, TP_Normal, TP_Displacement). Ultra-Mat plugs your images into those node groups and toggles a Maps Switch inside the material to match how many textures you provided.
Installation
Ultra-Mat ships as a Blender 4.2+ extension (.zip).
- Edit → Preferences → Get Extensions → ▾ menu (top right) → Install from Disk…
-
Select
ultra_mat-1.4.10.zip. -
The addon enables itself and registers under module name
bl_ext.user_default.ultra_mat.
Blender minimum: 5.0.0. License: GPL-3.0-or-later.
Finding the Panel
Press N in the 3D Viewport to open the Sidebar, then click the ♥UM tab.
View3D ▸ Sidebar (N) ▸ ♥UM


-
Version + help button — current version (
v1.4.10) and a ? icon that opens the project home page in your browser. - Material Name — name for the new material in Blender’s material list.
- Texture Mode — toggle between 1 Texture (diffuse only, the rest auto-generated) and 4 Textures (full PBR set).
- Load Diffuse — opens a file picker. In 4-Texture mode this also auto-detects matching roughness, normal, and displacement files in the same folder.
Quick Start
The fastest path from “I have a texture” to “I have a CW Ultra material”:
- Open the ♥UM sidebar panel.
- Type a name into Material Name.
- Leave Texture Mode on 1 Texture.
- Click Load Diffuse and pick your color/albedo image.
- Click Create Material.
The material now exists in bpy.data.materials under the name you chose, with TP_Roughness / TP_Normal / TP_Displacement cleared and the Maps Switch set to “1 map” so the material auto-generates the missing PBR data from the diffuse.
If KIT OPS is installed, the Save to KPACK button below will save the material into the currently selected KPACK.
KIT OPS Mode
KIT OPS Mode is the default mode and the only one most users will need. If you don’t see a mode switcher at the top of the panel, you’re already in it.
Material Name
The first box. This is the name your new material will have in Blender’s material list. Default text is “My Material” — change it before clicking Create Material.
⚠ If a material with this name already exists in the file, Create Material refuses with
Material '<name>' already exists. Pick a different name or delete the existing one first.
Texture Mode: 1 Texture vs 4 Textures
Two toggle buttons in the Texture Mode box:
| Mode | Use when… | What the material does |
|---|---|---|
| 1 Texture | You only have a color/diffuse image. | Auto-generates roughness, normal-like detail, and height from the diffuse via the material’s internal triplanar/procedural network. Maps Switch is set to “1 map” inside the PBR Adjustments group. |
| 4 Textures | You have a full PBR set (diffuse + roughness + normal + displacement). | Wires each image into its TP_* group. Maps Switch is set to “4 maps”. |
Switching between modes does not wipe loaded textures — they stay loaded, you just choose which set is used at Create time.
Loading Textures
1-Texture mode shows a single large thumbnail card with a Load Diffuse button:
- Click the big Load Diffuse button (or the folder icon next to “Diffuse”) → file picker opens.
-
Supported formats:
.png,.jpg,.jpeg,.tif,.tiff,.exr,.hdr,.bmp. - After loading, the card shows a thumbnail and the filename (truncated to ~20 chars if long).
- Re-clicking the folder icon re-opens the file picker in the same folder as last time, for convenience.

- Material Name populated with a custom value before clicking Create Material.
- Diffuse card — once loaded, the thumbnail and filename appear here; Create Material unlocks.
4-Texture mode shows a 2×2 grid:
| Diffuse | Roughness |
| Normal | Displacement |
Each card has three controls when populated:
- Big Load button (only shown when the slot is empty)
- Folder icon — re-open file picker for that slot
- X icon — clear this slot (only visible if a texture is loaded)
Auto-Detection (4-Texture mode)
When you load a diffuse texture in 4-Texture mode, Ultra-Mat automatically scans the same folder for matching roughness, normal, and displacement maps using Node Wrangler-style filename keywords:
| Slot | Primary keywords | Fallback keywords |
|---|---|---|
| Roughness | roughness, rough, rgh |
gloss, glossy, glossiness |
| Normal | normal, nor, nrm, nrml, norm |
(none) |
| Displacement | displacement, displace, disp, dsp, height, heightmap |
bump, bmp |
How filename matching works. The detector strips the extension, removes digits, splits CamelCase boundaries, and treats _, ., -, # as separators. So WallTexture_diff_2k.png becomes the components ['wall', 'texture', 'diff', 'k'], which matches the diffuse keyword diff.
DirectX normal-map filter. When auto-detecting a Normal map, Ultra-Mat skips files whose name contains dx or directx. This biases detection toward OpenGL-style normal maps (which Blender expects). If your only normal map is the DirectX one, load it manually via the folder icon.
The header info bar after a successful auto-detect reads, e.g.:
Loaded Diffuse + auto-detected: Roughness, Normal, Displacement

- 4 Textures toggle active — the grid view replaces the single big card.
- Diffuse card — populated; filename shown below; folder + X clear icons on the right.
-
Roughness card — auto-detected from
wood_shutter_rough_2k.exr(matched onrough). -
Normal card — auto-detected from
wood_shutter_nor_gl_2k.exr(matched onnor; DirectX names would have been skipped). - Displacement — no match found in the folder, slot stays empty showing Load. Click to add manually.
Create Material
The big Create Material button is enabled once Material Name is non-empty and Diffuse is loaded.
When you click it:
-
The bundled
templates/ultra_template.blendis opened. -
The material named
cw_ultrais appended, along with the node groups it depends on. - The material is renamed to your chosen name.
-
Your diffuse image is loaded into the material’s
TP_Diffusenode group. -
1-Texture mode:
TP_Roughness,TP_Normal,TP_Displacementare cleared; Maps Switch → “1 map”. 4-Texture mode: each loaded image is wired into its TP_* group; Maps Switch → “4 maps”. Roughness / Normal / Displacement images are marked Non-Color colorspace (so Blender doesn’t gamma-correct data maps). -
A fresh random UUID is written into
mat.kitops.id(if the KIT OPS property exists). This stops KIT OPS from deduplicating two visually-different materials just because they share a name pattern. -
UI preview images (
_ultramat_*entries in Blender’s image list) are deleted, and texture paths in the panel are cleared, leaving the UI ready for the next material.
A green check below the button confirms Created: <your material name>.
Save to KPACK
Below the Create Material box is the Save to KPACK section.
-
KIT OPS installed: A button labeled Save selected Material to KPACK appears. Click it to invoke KIT OPS’s
mesh.ko_auto_create_insertoperator withcreate_type='MATERIAL'. This saves the current material as a Material-type INSERT in your currently-selected KPACK. Requires an active object in the scene. -
KIT OPS not installed: A warning reads
Install KIT OPS to save materials. The button is hidden.
Tips
-
Naming Convention — use descriptive names like
Brick_Red_Wornrather thanMaterial.001. - Texture Organization — keep all maps for a material in the same folder so auto-detection can find them.
-
Normal Maps — Ultra-Mat prefers OpenGL normal maps and skips files containing
_dx(DirectX). - Start Simple — try 1-Texture mode first; auto-generated roughness often looks great.
DEV Mode (advanced)
DEV Mode is for batch-converting existing .blend files so they all use a shared CW Ultra-style template material. The typical use case: you have a folder of KIT OPS material INSERTs (one material per .blend) and you want every one of them to be re-skinned with the same node tree while keeping each original’s diffuse image.
Enabling DEV Mode
DEV Mode is hidden by default. To enable it:
- Edit → Preferences → Add-ons → Ultra-Mat.
- Expand the addon’s preferences and tick Developer Mode.
- Back in the ♥UM panel, a new row of two buttons appears at the top: KIT OPS | DEV ONLY. Click DEV ONLY.
Turning Developer Mode off hides the switcher entirely and forces the panel back to KIT OPS mode.

- Add-ons section in the Preferences sidebar.
-
Search filter — type
Ultra-Matto find the addon quickly. - Disclosure arrow (▾) on the Ultra-Mat row — click to expand the addon’s details and preferences.
- Developer Mode checkbox — the one persistent preference that controls the panel’s mode switcher.
Once DEV Mode is enabled, the panel exposes all four DEV steps:

- KIT OPS / DEV ONLY mode toggle (only visible while Developer Mode is on).
- Step 1 — Clear Scene — resets Blender to a clean state for batch work.
-
Step 2 — Select Template File… — pick the
.blendwhose material will become the template. -
Output Naming → Append — suffix added to converted filenames and material names (default
ultra). -
Step 3 — Convert Single File… — convert one
.blend. Disabled until a template material is appended. -
Step 4 — Process Folder… — batch-convert every
.blendin a folder. Disabled until a template is appended.
Step 1 — Clear Scene
Button: Clear Scene (trash icon).
Resets Blender to a known clean state before you start batch work:
- Loads an empty homefile.
- Deletes any objects, materials, and meshes still present.
- Runs Purge Orphans three times (local + linked + recursive).
The info bar confirms New scene created and cleared.
Use this between batch jobs to make sure stale node groups, images, or .001-suffixed orphans from a previous run don’t follow you into the next conversion.
Step 2 — Template Material
This step tells Ultra-Mat which material from which .blend file is the template every converted file will adopt.
-
Click Select Template File… → choose a
.blendcontaining your template material. -
The panel shows
File: <name>.blendand a Material dropdown populated with every material name inside that file. - Pick a material from the dropdown.
- Click Append Material.
What “Append Material” does:
- Appends the selected material, all its node groups, and all its images into the current Blender session.
-
Stores the material name in addon preferences (
template_material) so it persists across Blender restarts. - Marks the session as “appended” so the batch operators can run.
A Stored: <material> line with a checkmark confirms success.
If the template file is moved or deleted between Blender sessions, you’ll see
Template file not foundon next launch — re-select the file.
Output Naming (Append String)
A text field labeled Append, default value ultra.
This string is appended to both the output filename and the new material’s name during conversion:
-
Source:
wall_brick.blendcontaining materialwall_brick. -
After conversion:
wall_brick_ultra.blendcontaining materialwall_brick_ultra.
Pick whatever suffix you like — cwultra, v2, final, etc. The setting is persistent.
Batch mode uses this string to skip files that have already been converted (see Step 4).
Step 3 — Convert Single File
Button: Convert Single File…. Only enabled once a template material is appended.
Click it → choose a single .blend file → Ultra-Mat will:
-
Copy the source file to a sibling named
<basename>_<append_string>.blend. (Critically, Ultra-Mat works on the copy — your original is untouched, and copying preserves the original’s KIT OPS INSERT metadata.) - Open the copy.
-
Find the original diffuse image in the file by scanning image names for
diff,color,albedo,base, or falling back to any non-system image with a.jpg/.pngextension. -
Append the template material and its node groups (only those that don’t already exist — this avoids creating
.001duplicates). -
Clear all images out of
TP_Diffuse,TP_Roughness,TP_Normal,TP_Displacementin the appended template, then assign the file’s original diffuse image intoTP_Diffuse. -
Rename the appended template material to
<basename>_<append_string>and write a freshkitops.idUUID. - Reassign the renamed material to all original objects, remove the old material(s), remove any extra objects the template might have brought in, purge orphans, and save (not Save As, so KIT OPS INSERT properties are preserved).
The info bar reads Converted: <filename>.
Step 4 — Batch Convert Folder
Button: Process Folder…. Only enabled once a template material is appended.
Click it → pick any .blend file inside the folder you want to process. The folder containing that file is the batch target.
Ultra-Mat will then:
-
Iterate every
.blendin the folder. -
Skip any file whose name already contains
_<append_string>(these are previous conversion outputs). -
Run the same single-file conversion process on every other
.blend. -
After all conversions complete, delete every
.blend1backup file in the folder (Blender creates these automatically on save; Ultra-Mat cleans them up to avoid clutter). - Show the cursor as WAIT while processing.
Final info bar example:
Converted 18 files, skipped 3, cleaned 18 backup files
⚠ Batch conversion saves over the copies but the originals remain. Always keep a backup of the source folder before doing destructive batch work.
The Material Node System
The following sections document the internal node structure of the CW Ultra material. Use these if you want to fine-tune materials by hand, customize the template, or understand why a particular slider does what it does.
Signal Flow Overview
Texture Inputs (TP_ Node Groups)
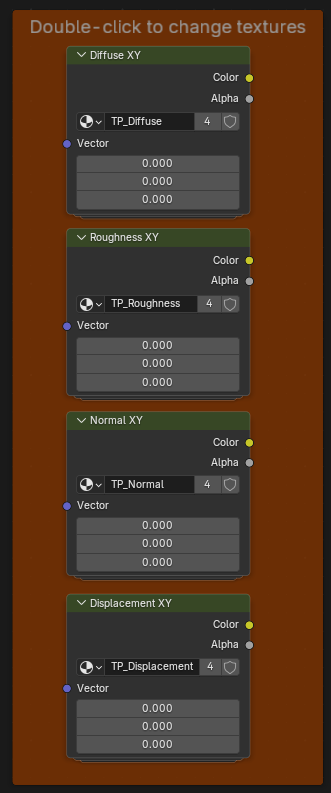
Four texture pass-through groups hold your images:
| Node Group | Purpose |
|---|---|
| TP_Diffuse | Base color/albedo map |
| TP_Roughness | Roughness map (uses red channel) |
| TP_Normal | Normal map (tangent space) |
| TP_Displacement | Height/displacement map |
These are simple containers with an Image Texture node. The addon automatically assigns images to these groups when creating materials. Double-click on a texture node to change the image input for that node manually.
Core Node Groups
The core node groups are colored orange in the material’s node tree.
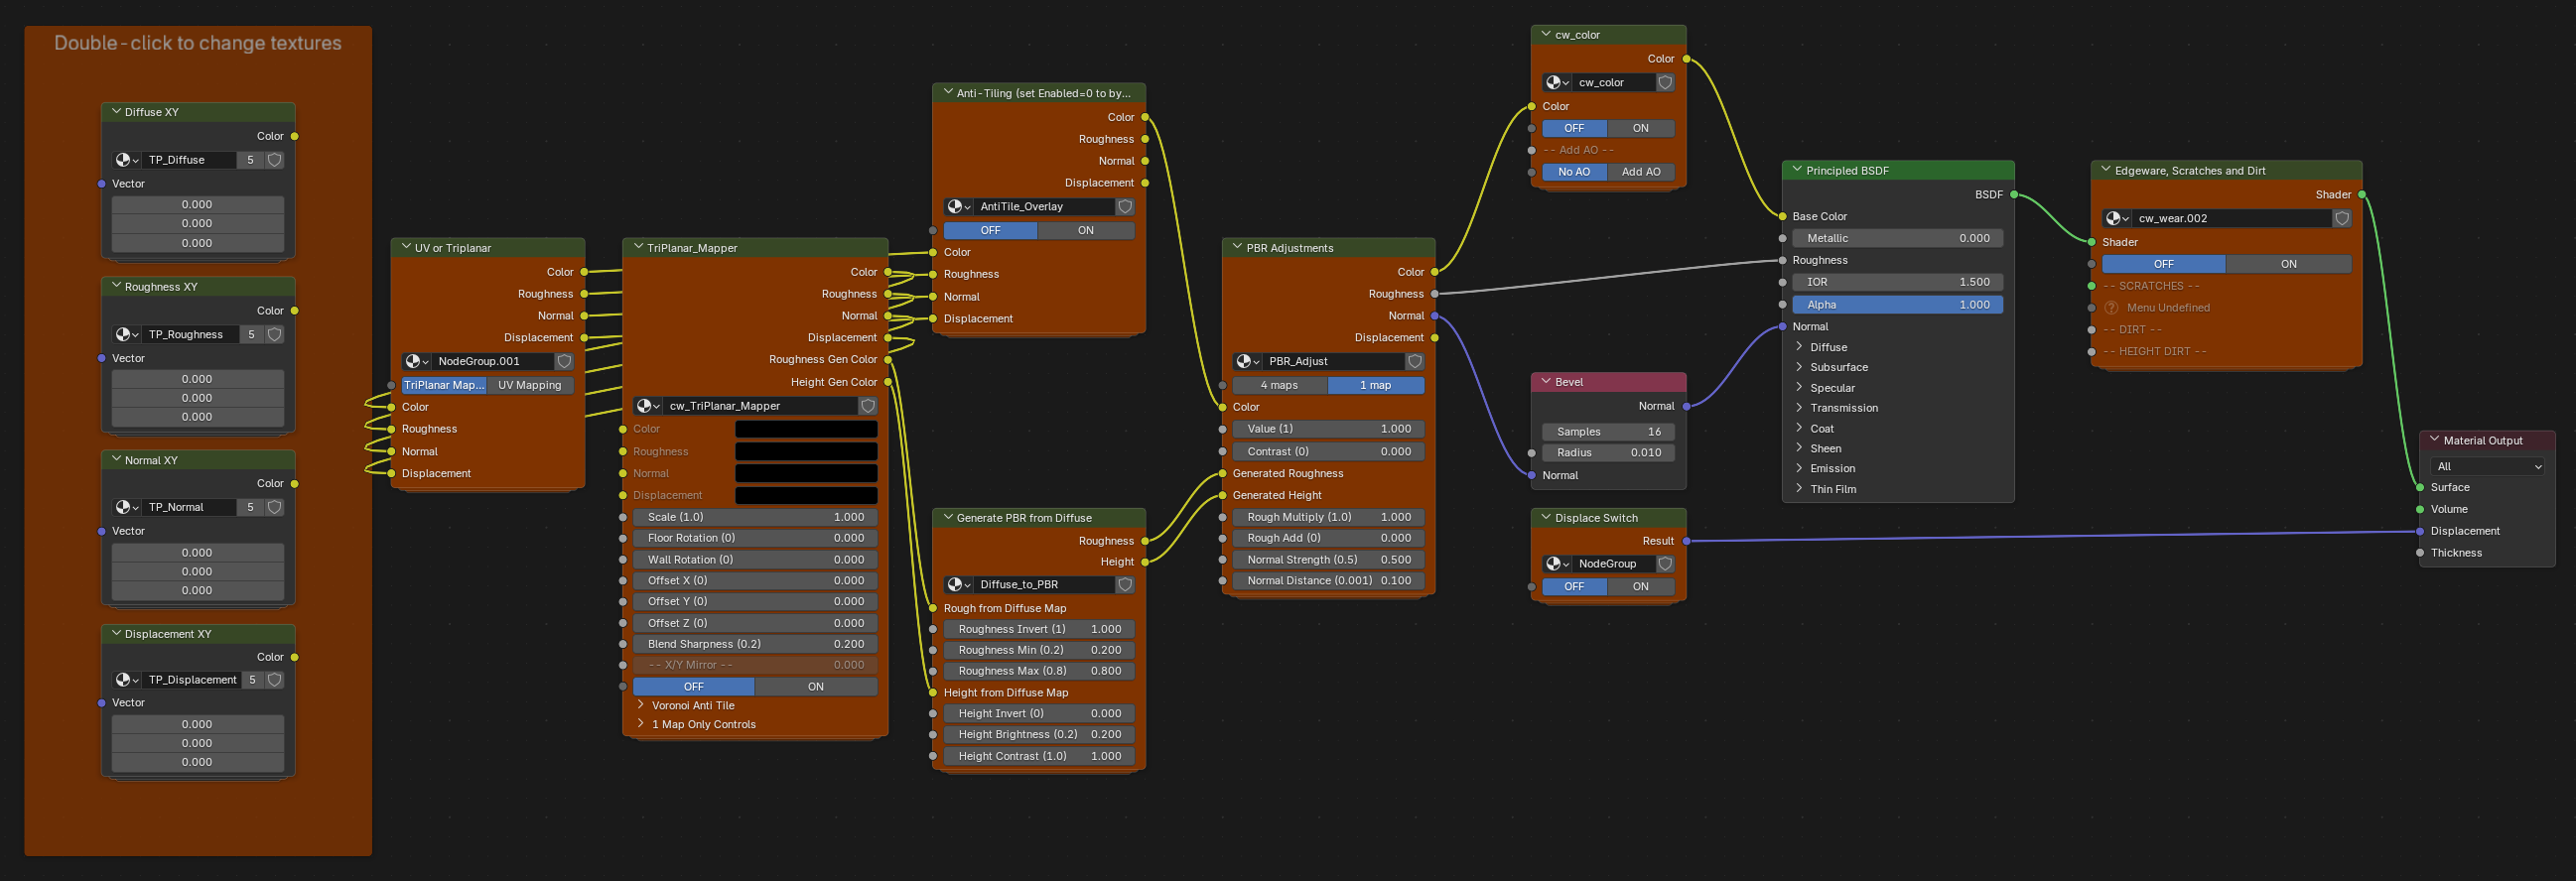
1. Mapping Type Switch (cw_uv_or_tri)
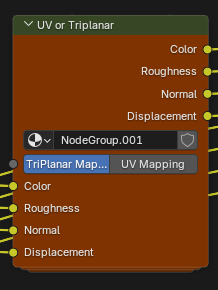
Before textures reach the TriPlanar Mapper, this switch determines the mapping method.
| Option | Behavior |
|---|---|
| TriPlanar Mapping | Projects textures from three axes — no UV unwrapping needed (default) |
| UV Mapping | Uses the object’s UV coordinates for texture mapping |
Use TriPlanar Mapping for hard surface models, architectural elements, or any object without proper UVs. Use UV Mapping when you have carefully unwrapped UVs and need precise texture placement.
2. TriPlanar Mapper (cw_TriPlanar_Mapper)

Projects textures from three axes (X, Y, Z) and blends them together. Essential for texturing objects without proper UV maps.
Menu Switch: X/Y Mirror
| Option | Behavior |
|---|---|
| OFF | Normal tri-planar projection |
| ON | Mirrors texture on X/Y axes (good for symmetrical patterns) |
Menu Switch: Voronoi Anti-Noise
| Option | Behavior |
|---|---|
| Voronoi OFF | Standard texture sampling |
| Voronoi ON | Applies Voronoi-based randomization to break up tiling |
Each texture channel (Roughness, Normal, Displacement) has its own Voronoi switch for independent control.
Menu Switch: Rough Mirror / Height Mirror
| Option | Behavior |
|---|---|
| OFF | Roughness/Height follows the main X/Y Mirror setting |
| ON | Independent mirror for Roughness or Height channel |
These allow you to mirror the roughness or displacement independently from the color texture.
Inputs
| Input | Description |
|---|---|
| Scale (1.0) | Texture scale (affects all axes uniformly) |
| Floor Rotation (0) | Rotation for floor/ceiling projections (degrees) |
| Wall Rotation (0) | Rotation for wall projections (degrees) |
| Offset X/Y/Z | Position offset for texture |
| Blend Sharpness (0.2) | How sharply the three projections blend (lower = softer) |
| AT Scale (1.0) | Voronoi anti-tile cell scale |
| AT Softness (0.2) | Voronoi blend softness |
| AT Seed (0) | Random seed for Voronoi pattern |
| Roughness Scale (1.0) | Independent scale multiplier for roughness texture |
| Height Scale (1.0) | Independent scale multiplier for displacement texture |
3. Anti-Tile Overlay (cw_antitile)
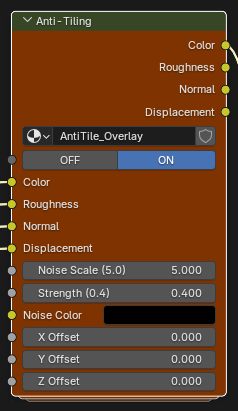
Breaks up visible tiling by overlaying procedural noise on all texture channels (Color, Roughness, Normal, Displacement).
| Option | Behavior |
|---|---|
| OFF | Pass-through (no processing) |
| ON | Apply noise-based variation |
Inputs
| Input | Default | Description |
|---|---|---|
| Noise Scale | 5.0 | Scale of the noise pattern |
| Strength | 0.4 | How much noise affects the textures |
| Noise Color | Brown | Color tint of the noise overlay |
| X/Y/Z Offset | 0.0 | Position offset for the noise pattern |
4. Diffuse-to-PBR Generator (cw_gen_PBR)

Automatically creates roughness and height maps from a diffuse texture. Only used when Maps Switch = “1 map”.
How it works:
- Converts diffuse to grayscale.
- Roughness: grayscale → optional invert → map to min/max range.
- Height: grayscale → optional invert → brightness/contrast adjust.
Inputs
| Input | Default | Description |
|---|---|---|
| Roughness Invert | 1 | Invert roughness (1 = dark areas are rough) |
| Roughness Min | 0.2 | Minimum roughness value |
| Roughness Max | 0.8 | Maximum roughness value |
| Height Invert | 0 | Invert height (0 = bright areas are high) |
| Height Brightness | 0.2 | Brightness offset for height |
| Height Contrast | 1.0 | Contrast for height map |
5. PBR Adjust (cw_adjust_PBR)
4 maps:
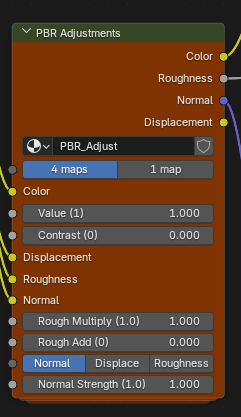
1 map:

The central hub that switches between full PBR textures and auto-generated maps.
Maps Switch (Menu)
| Option | Behavior |
|---|---|
| 4 maps | Uses your Roughness, Normal, and Displacement textures directly |
| 1 map | Auto-generates roughness and height from the diffuse texture |
When “1 map” is selected, the actual texture inputs are completely bypassed — Blender doesn’t process them at all.
Menu Switch: Normal Type
| Option | Behavior |
|---|---|
| Normal | Use the normal map texture directly (default for 4 maps) |
| Displace | Generate normals from the displacement/height map |
| Roughness | Generate normals from the roughness map |
Useful when you have 4 maps but your normal map is missing or low quality — generate bump-based normals from another channel instead.
Inputs
| Input | Description |
|---|---|
| Color | Diffuse color input |
| Value (1) | Brightness multiplier for color |
| Contrast (0) | Contrast adjustment for color |
| Rough Multiply (1.0) | Multiplier for roughness values |
| Rough Add (0) | Offset added to roughness |
| Normal Strength (1.0) | Strength for normal maps (4 maps mode) |
| Normal Strength (0.5) | Strength for bump normals (1 map mode) |
| Normal Distance (0.1) | Bump distance for 4 maps mode |
| Normal Distance (0.001) | Bump distance for 1 map mode |
6. Color Adjust (cw_color)

Post-processing color adjustments applied after PBR processing.
Menu Switch: Enable
| Option | Behavior |
|---|---|
| OFF | Pass-through (no color adjustment) |
| ON | Apply all color adjustments |
Menu Switch: Blend Mode
| Option | Behavior |
|---|---|
| Overlay | Overlay blend with tint color |
| Mix | Linear mix with tint color |
Inputs
| Input | Default | Description |
|---|---|---|
| Color (tint) | Gray | Color to blend with |
| Amount | 0.5 | Blend amount |
| Hue | 0.5 | Hue shift (0.5 = no change) |
| Saturation | 1.0 | Saturation multiplier |
| Value | 1.0 | Value/brightness multiplier |
| Gamma | 1.0 | Gamma correction |
Menu Switch: Add AO
| Option | Behavior |
|---|---|
| No AO | default; do not add additional AO to material |
| Add AO | Apply additional ambient occlusion to material |
Menu Switch: Inside/Outside AO
| Option | Behavior |
|---|---|
| Inside | default; apply AO to inside valleys of objects |
| Outside | apply AO to outside surfaces of object |
Note: AO is only local.
7. Displacement Switch (cw_displace_switch)
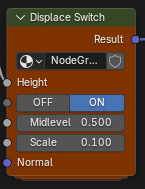
Controls whether displacement is output to the material.
| Option | Behavior |
|---|---|
| OFF | No displacement output |
| ON | Output displacement to material |
Inputs
| Input | Default | Description |
|---|---|---|
| Midlevel | 0.5 | Displacement midpoint |
| Scale | 0.1 | Displacement strength |
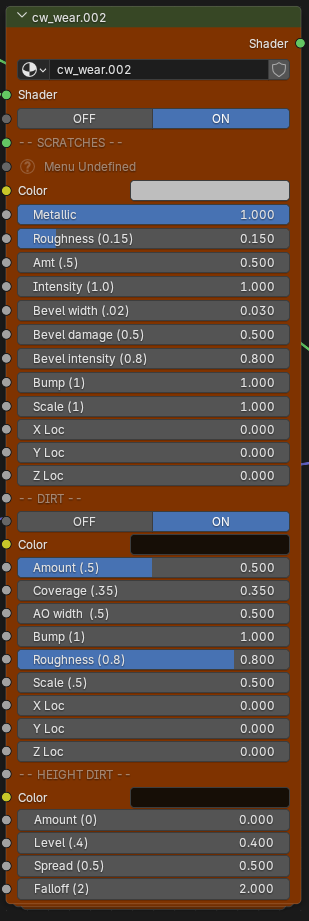
8. Wear Effects (cw_wear.002)
Procedural wear system that adds scratches and dirt based on geometry.
Master Menu Switch
| Option | Behavior |
|---|---|
| OFF | Bypass all wear effects (pure pass-through) |
| ON | Enable wear effects system |
Scratches Section — metallic scratches that appear on edges and bevels.
| Input | Default | Description |
|---|---|---|
| Color | Gray | Scratch metal color |
| Metallic | 1.0 | Metallic value for scratches |
| Roughness | 0.15 | Roughness of scratch surfaces |
| Amt | 0.5 | Overall scratch amount |
| Intensity | 1.0 | Scratch visibility |
| Bevel width | 0.02 | Width for edge detection |
| Bevel damage | 0.5 | How much bevels show damage |
| Bevel intensity | 0.8 | Bevel scratch strength |
| Bump | 1.0 | Bump depth of scratches |
| Scale | 1.0 | Scratch pattern scale |
| X/Y/Z Loc | 0.0 | Offset for scratch pattern |
Dirt Section (Enable Dirt Menu) — AO-based dirt accumulation in crevices.
| Option | Behavior |
|---|---|
| OFF | No dirt processing |
| ON | Apply AO-based dirt |
| Input | Default | Description |
|---|---|---|
| Color | Dark Brown | Dirt color |
| Amount | 0.5 | Dirt coverage amount |
| Coverage | 0.35 | How much area dirt covers |
| AO width | 0.5 | Ambient occlusion sample width |
| Bump | 1.0 | Dirt bump depth |
| Roughness | 0.8 | Dirt surface roughness |
| Scale | 0.5 | Dirt pattern scale |
| X/Y/Z Loc | 0.0 | Dirt pattern offset |
Height Dirt Section — dirt that accumulates based on world-space height (top surfaces).
| Input | Default | Description |
|---|---|---|
| Color | Dark Brown | Height dirt color |
| Amount | 0.0 | Height dirt amount (0 = disabled) |
| Level | 0.4 | Height threshold |
| Spread | 0.5 | Transition softness |
| Falloff | 2.0 | Falloff curve power |
Anti-Tiling Techniques
Ultra-Mat provides multiple techniques to reduce visible texture repetition. These can be combined for maximum effect.
The Four Techniques
| Technique | Description | Works On | Availability |
|---|---|---|---|
| Mirror | Flips texture on X/Y axes to eliminate seams | All channels | TriPlanar only |
| Noise Overlay | Blends procedural noise over texture | All channels | UV + TriPlanar |
| Voronoi | Breaks texture into randomized cells with soft edges | Color, Roughness, Displacement (not Normals) | TriPlanar only |
| Independent Scale (1-map mode only) | Scales roughness/height differently from color | Generated roughness/height | UV + TriPlanar |
When to Use Each
- Mirror — for non-tileable textures (TriPlanar only).
- Noise Overlay — universal; safe for all texture types including geometric patterns.
- Voronoi — great for organic textures (concrete, stone, dirt) but avoid on geometric patterns (brick, wood, tiles) as it deforms them.
- Independent Scale — desynchronizes generated maps from color so repetition is less noticeable.
UV Mode Decision Guide
brick, wood, tiles,
linear patterns} Geometry -->|Yes| GeoOnly[Use: Noise only] GeoOnly --> Done1([Done]) Geometry -->|No - Organic| Maps{How many maps?} Maps -->|4 maps| Org4[Use: Noise] Maps -->|1 map| Org1[Use: Noise +
Independent Scale] Org4 --> Done2([Done]) Org1 --> Done2 style GeoOnly fill:#963,color:#fff,stroke:#fff style Org4 fill:#396,color:#fff,stroke:#fff style Org1 fill:#396,color:#fff,stroke:#fff
TriPlanar Mode Decision Guide
tileable?} Tileable -->|No| NonTile[Use: Mirror + Noise] NonTile --> NonTileMap{How many maps?} NonTileMap -->|4 maps| Done1([Done]) NonTileMap -->|1 map| NonTile1[Add: Independent Scale] NonTile1 --> Done1 Tileable -->|Yes| Geometry{Strong geometry?
brick, wood, tiles,
linear patterns} Geometry -->|Yes| GeoOnly[Use: Noise only] GeoOnly --> Done2([Done]) Geometry -->|No - Organic| Maps{How many maps?} Maps -->|4 maps| Org4[Use: Noise +
Voronoi optional] Maps -->|1 map| Org1[Use: Noise +
Independent Scale +
Voronoi optional] Org4 --> Done3([Done]) Org1 --> Done3 style NonTile fill:#369,color:#fff,stroke:#fff style NonTile1 fill:#396,color:#fff,stroke:#fff style GeoOnly fill:#963,color:#fff,stroke:#fff style Org4 fill:#396,color:#fff,stroke:#fff style Org1 fill:#396,color:#fff,stroke:#fff
Performance: Menu Switch Benefits
Blender 5.0’s Menu Switch nodes provide significant performance benefits:
When a Menu Switch option is not selected, the nodes connected to that option are completely skipped during rendering.
This means:
- “1 map” mode — all 4 texture lookups for roughness/normal/displacement are skipped.
- Anti-tile OFF — all noise generation is skipped.
- Wear OFF — all scratch/dirt calculations are skipped.
- Color Adjust OFF — all color processing is skipped.
- Displacement OFF — displacement calculation is skipped.
This is fundamentally different from using Mix nodes where both inputs are always calculated. Menu Switches provide true conditional evaluation.
Typical Workflows
Quick Material (1 Texture)
- Load only a diffuse texture.
- Maps Switch: 1 map.
- Adjust Roughness Min/Max in Diffuse-to-PBR for desired surface feel.
- Done — roughness and normals are auto-generated.
Full PBR Material (4 Textures)
- Load diffuse, roughness, normal, and displacement textures.
- Maps Switch: 4 maps.
- Fine-tune with Rough Multiply/Add and Normal Strength.
- Enable displacement if needed.
Architectural / Hard Surface
- Use TriPlanar Mapper for UV-free texturing.
- Enable Voronoi Anti-Noise to break up tiling.
- Enable Wear effects for realistic edge damage and dirt.
Stylized / Clean Look
- Keep Anti-tile: OFF.
- Keep Wear: OFF.
- Use Color Adjust to tint or saturate.
Supported File Formats & Filename Conventions
Image extensions
.png, .jpg, .jpeg, .tif, .tiff, .exr, .hdr, .bmp
Filename keyword vocabulary (auto-detection)
| Channel | Recognized tokens |
|---|---|
| Diffuse | diffuse, diff, albedo, base, col, color, basecolor |
| Roughness | roughness, rough, rgh (fallback: gloss, glossy, glossiness) |
| Normal | normal, nor, nrm, nrml, norm (skips dx, directx) |
| Displacement | displacement, displace, disp, dsp, height, heightmap (fallback: bump, bmp) |
Filenames are tokenized after digit removal and CamelCase / separator splitting, so all of these match diffuse:
-
wood_diffuse_2k.jpg -
WoodAlbedo4K.png -
wood-COL-1024.tif -
wood.base.exr
Template .blend requirements (DEV mode)
A custom template .blend for DEV mode needs:
-
At least one material that uses the four
TP_Diffuse,TP_Roughness,TP_Normal,TP_Displacementnode groups. -
Each of those node groups should contain an Image Texture node — Ultra-Mat finds the first
TEX_IMAGEnode inside each TP_* group and writes images into it. -
(Optional) A “Maps Switch” Menu Switch input inside the material’s PBR-related group, with options literally named
1 mapand4 maps. Without it, KIT OPS mode still works but the 1-vs-4 toggle has no effect.
The bundled templates/ultra_template.blend ships with cw_ultra already meeting all of these requirements.
Preferences
Edit → Preferences → Add-ons → Ultra-Mat → Preferences
The visible UI shows only one toggle:
- Developer Mode — shows/hides DEV mode in the sidebar panel.
Three additional preferences persist across sessions but are set from the sidebar panel rather than the preferences UI:
| Preference | Set from | Default |
|---|---|---|
| Template file path | DEV mode → Select Template File… | (empty) |
| Template material name | DEV mode → Append Material | (empty) |
| Append string | DEV mode → Output Naming field | ultra |
These are stored persistently per-user (Blender preferences). The texture paths and panel mode are session-only and reset when Blender restarts.
Errors & Troubleshooting
KIT OPS mode — Create Material
| Message | Cause | Fix |
|---|---|---|
Please enter a material name |
Material Name field is blank. | Type a name. |
Please load a diffuse texture |
No diffuse loaded. | Click Load Diffuse. |
Material '<name>' already exists |
A material with that exact name exists in the file. | Rename, or delete the existing material first. |
Template file not found: <path> |
The bundled ultra_template.blend is missing. |
Reinstall the extension. |
Failed to append cw_ultra material from template |
The bundled template doesn’t contain a material named cw_ultra. |
Reinstall the extension. |
DEV mode — Append Material
| Message | Cause | Fix |
|---|---|---|
Please select a template file first |
No template .blend selected, or the path is stale. |
Use Select Template File… again. |
No material selected |
Dropdown shows NONE — the chosen .blend had no materials, or none readable. |
Choose a different .blend, or open the file in Blender to confirm it has materials. |
Template file not found (label) |
Path is stored but file is missing on disk. | Re-select the file. |
DEV mode — Convert Single / Process Folder
| Message | Cause | Fix |
|---|---|---|
Please select and append a template material first |
You skipped Step 2. | Run Append Material before converting. |
Template file not found |
Template path is stale. | Re-select and re-append in Step 2. |
Console: ERROR: No image found in file! |
Conversion source .blend has no images (or only Render Result / Viewer Node). |
Skip that file or add a diffuse image to it first. |
Save to KPACK
| Message | Cause | Fix |
|---|---|---|
Install KIT OPS to save materials (label) |
KIT OPS isn’t installed or isn’t enabled. | Install/enable KIT OPS, then reopen the panel. |
| Button disabled | No active object. | Select any object in the scene first. |
Console-only warnings (worth knowing about)
These print to Blender’s System Console but don’t show in the UI:
-
Node group '<name>' not found in material …— the chosen material isn’t using one of the expected TP_* groups. The other channels will still work; the missing one will be silently skipped. -
No TEX_IMAGE node found in '<group>'— a TP_* group has no Image Texture node. The image won’t be assigned. -
Could not find 'Maps Switch' input in material— the Maps Switch input is missing from PBR Adjustments. The 1-vs-4 toggle has no effect.
Quirks & Behaviors Worth Knowing
-
Mode visibility. DEV mode is gated by the Developer Mode preference. Without it, the panel forces KIT OPS mode regardless of any saved
panel_modevalue. - Colorspace. Diffuse images load with Blender’s default colorspace (sRGB). Roughness, Normal, and Displacement images are forced to Non-Color so Blender doesn’t gamma-correct them — this is correct for data maps.
-
Maps Switch. Inside the material’s PBR Adjustments node group is a Menu Switch with values
1 mapand4 maps. Ultra-Mat sets this automatically based on Texture Mode at the moment you click Create Material. (Seedev/blender5-menu-switch-guide.mdif you’re customizing the template.) -
.001node group copies. When you append a material whose node groups (e.g.TP_Diffuse) already exist in the file, Blender createsTP_Diffuse.001,.002, etc. Ultra-Mat finds each material’s own copy by walking that material’s node tree, so cross-contamination between materials in the same file is avoided. -
.blend1cleanup. Batch conversion deletes the.blend1backup files Blender creates during save. If you rely on those for recovery, copy your folder before batch-converting. -
Auto-skip on re-runs. Batch mode skips files whose name already contains
_<append_string>. Run the same folder twice and only new files get converted. -
KIT OPS UUID. Every material Ultra-Mat creates or converts gets a fresh UUID at
mat.kitops.idso KIT OPS treats them as distinct INSERTs even if names collide. - Texture path memory. The last folder you loaded a texture from is remembered for the current session — the next file picker opens there automatically.
- Filename truncation in UI. Long filenames in the texture cards are truncated to ~20 characters in the panel; the full path is preserved internally.
- Help button. The ? icon in the panel header opens https://cw1.me/ultra-mat.
Reference Tables
Persistent vs session state
| Property | Persistence |
|---|---|
template_path |
Persistent (across Blender sessions) |
template_material |
Persistent |
append_string |
Persistent |
developer_mode |
Persistent |
panel_mode |
Session only |
material_name |
Session only |
texture_mode |
Session only |
diffuse_path / roughness_path / normal_path / displacement_path |
Session only |
last_texture_folder |
Session only |
material_enum |
Session only (dynamic list) |
created_material |
Session only |
is_appended |
Session only |
Operator reference (for scripting / keymaps)
| Operator | bl_idname |
|---|---|
| Load Diffuse | matconv.load_diffuse |
| Load Roughness | matconv.load_roughness |
| Load Normal | matconv.load_normal |
| Load Displacement | matconv.load_displacement |
| Clear Texture | matconv.clear_texture (param: texture_type) |
| Create Material | matconv.create_material |
| Save to KPACK | matconv.save_to_kpack |
| Clear Scene | matconv.clear_scene |
| Select Template File | matconv.select_template_file |
| Append Material | matconv.append_material |
| Convert Single File | matconv.convert_single |
| Process Folder | matconv.process_folder |
Key metadata
| Item | Value |
|---|---|
| Addon ID | ultra_mat |
| Module name (extension install) | bl_ext.user_default.ultra_mat |
| Version | 1.4.10 |
| Minimum Blender | 5.0.0 |
| License | SPDX:GPL-3.0-or-later |
| Maintainer | Chipp Walters <chipp@altuit.com> |
| Panel tab | ♥UM |
| Help URL | https://cw1.me/ultra-mat |
| Default append string | ultra |
| Template material name | cw_ultra |
| Template node groups | TP_Diffuse, TP_Roughness, TP_Normal, TP_Displacement |
This manual reflects Ultra-Mat 1.4.10. For changelog, see changes.md. For Blender 5.0 Menu Switch internals (relevant if you’re customizing the template), see dev/blender5-menu-switch-guide.md.