
Illustration, line art, screentone and blueprint render engine for Blender 4.5+
By Chipp Walters
Check out my other addons:
Superhive: https://superhivemarket.com/creators/altuit
Gumroad: https://chippwalters.gumroad.com
Support: https://cw1.me/discord
Illustration Station Manual
Render your Blender scenes as illustrations and manga backgrounds: clean or sketchy ink lines, screentone, solid blacks and crisp cast shadows, from the active camera or live in the viewport. Fifteen styles cover line art, screentone, flat and shaded color, clay, blueprint, pencil-grey sketches, comics and hand-drawn sketchy lines, and you can mix their parts into looks of your own. Illustration Station Pro has every style and setting; Illustration Station Free has one style, Sketch Style (see Free and Pro Editions).
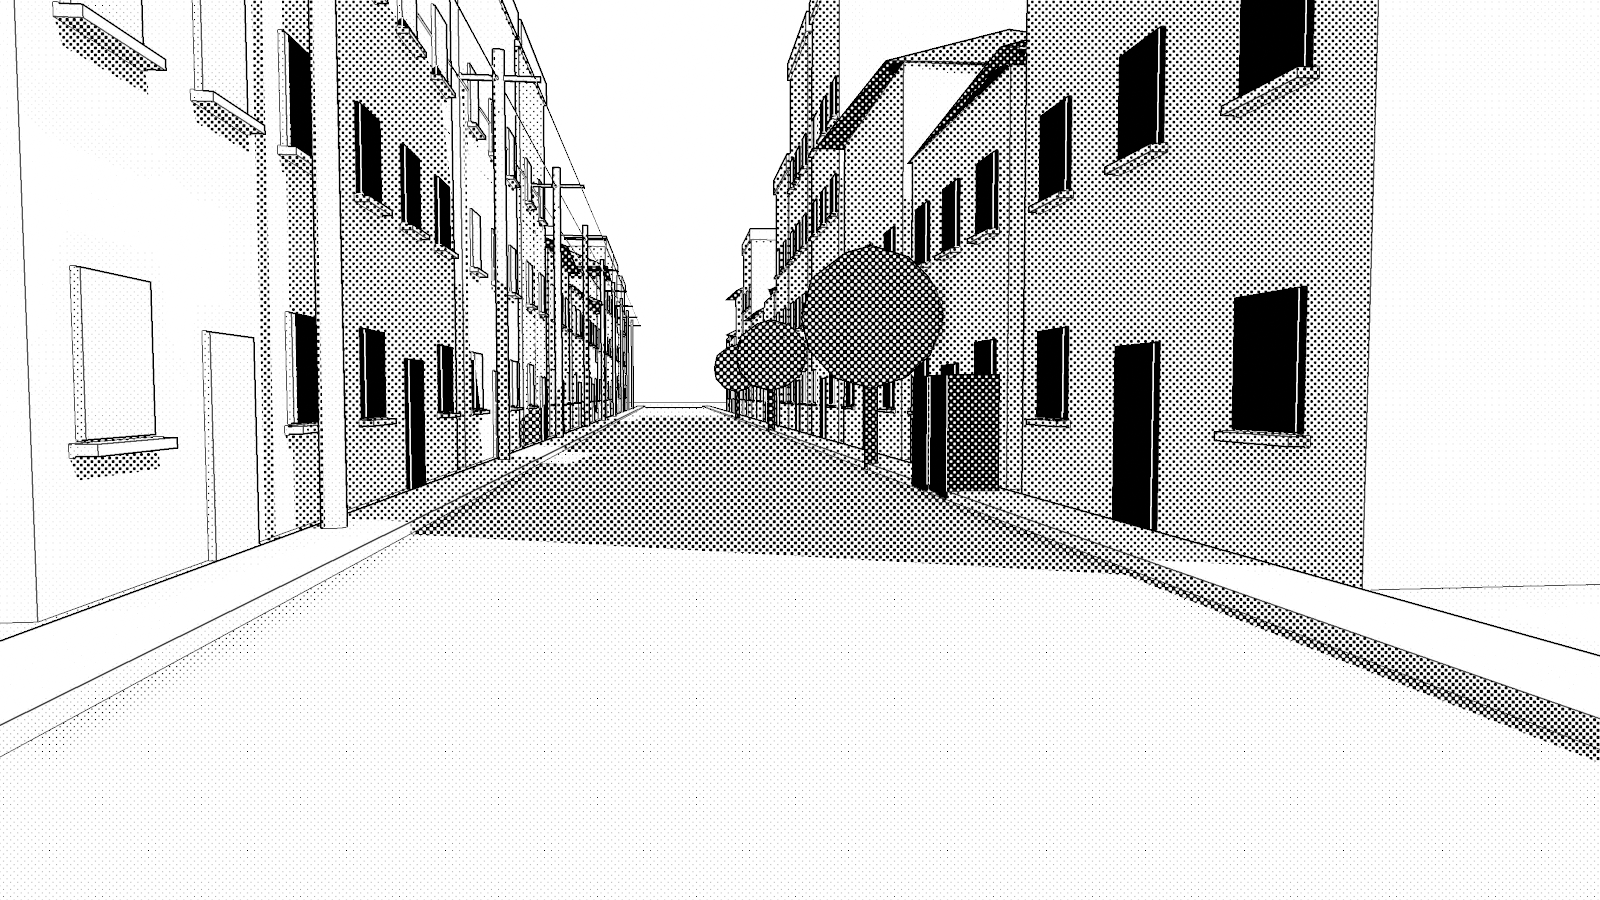
Illustration Station is a complete render engine. It draws the scene itself on the GPU and turns it into line art and tone, so you don’t need Freestyle, Line Art modifiers or Grease Pencil. Stills render in a fraction of a second, animations render frame by frame like any other engine, and the Rendered viewport shows the same look while you work.
Requirements
- Blender 4.5 LTS or later
- A GPU that runs Blender’s viewport, with either the OpenGL or the Vulkan backend (Edit > Preferences > System > Backend)
Installation
Download the .zip of your edition first:
- Illustration Station Free – free (pay what you want) from Gumroad: https://chippwalters.gumroad.com/l/illustration-station-free
- Illustration Station Pro – from Gumroad: https://chippwalters.gumroad.com/l/illustration-station (details on the product page: https://chippwalters.com/illustration-station.html)
Keep the file zipped; Blender installs it straight from the .zip.
- In Blender, open Edit > Preferences > Get Extensions.
-
Open the drop-down menu at the top right and choose Install from Disk…, then pick the
.zipof your edition, Illustration Station Pro or Illustration Station Free. - Make sure Illustration Station Pro (or Illustration Station Free) is enabled in the list.
Both editions install the same way (see Free and Pro Editions).
Quick Start
- In Render Properties, set Render Engine to Illustration Station.
- If the panel shows a warning about the view transform, click Use Standard View Transform so the background renders pure white and the lines pure black.
- Add a sun lamp and aim it: click Add Sun in the Shading panel (or Shift+A > Light > Sun), then rotate it with R. Without a sun lamp the scene is lit from Azimuth and Elevation. To use lamps already in the scene instead, set Light to Scene Lights (see Scene Lights).
- Pick a look in Style (see Styles).
- Press F12 to render the active camera, or Ctrl+F12 to render the animation.
- To preview while you work, switch a 3D Viewport to Rendered shading (Z > Rendered) and press Numpad 0 to look through the camera.
Styles
Choose the look with Render Properties > Illustration Station > Style. Style is a picker: the large thumbnail shows the current style on a café scene. Click it to open a grid of all fifteen styles, each shown on the same scene, then click one to pick it. The Style menu below the thumbnail lists the same styles by name. Hover a thumbnail or a menu entry for a one-line description.
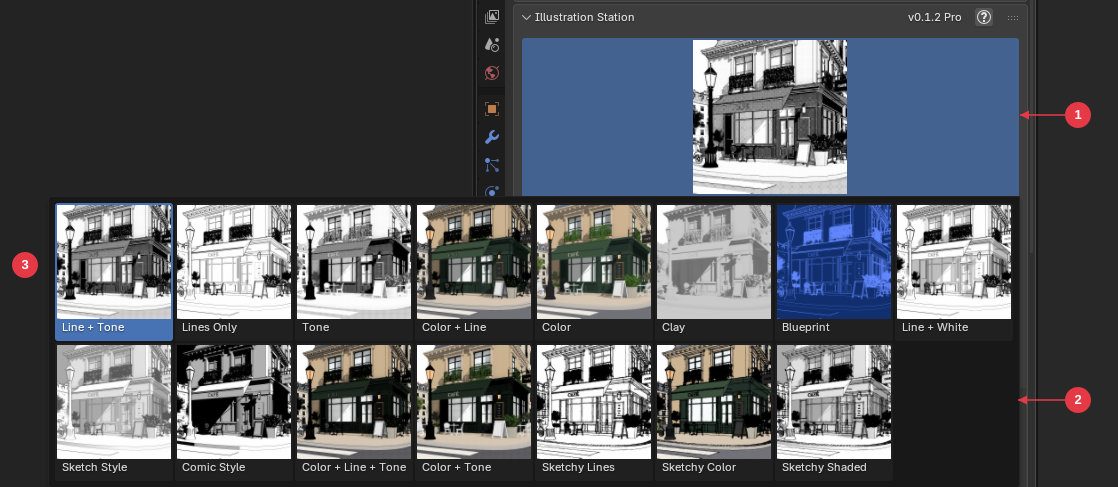
- Style thumbnail – The current style. Click it to open the grid.
- Style grid – All fifteen styles on the same scene, each with its name under the thumbnail. Click one to pick it.
- Current style – Highlighted in the grid.
How a style is built
Every look is made of four choices, each at the top of its own panel:
| Choice | Panel | Options |
|---|---|---|
| Line Style | Lines | Off, Clean (smooth lines on depth steps, creases and object borders), Sketchy (wobbly lines drawn twice, overshooting at corners) |
| Surface | Shading | Paper (the background color; tone and lines are inked on it), Flat Color (object colors, no shading), Shaded Color (object colors shaded by the light), Clay (untextured grey, shaded by the light), White Bands (white objects in three light grey bands), Greys (grey by how much each face turns to the light), Comic Bands (black shade, a mid tone and light) |
| Pattern | Tone | Off, Dots, Lines, Cross Hatch, Sand, Flat Grey (see Tone and Solid Black) |
| Color Set | Colors | Paper & Ink (background and line colors), Blueprint (light blue on blueprint blue), Sketch (grey pencil colors), Comic (black lines and shade, grey mid tone) |
A style is a starting point that fills in all four. Change any of them and the style keeps its name with a * after it, for example Line + Tone*; pick the style again to go back to its own choices. Every setting stays editable whatever the style.
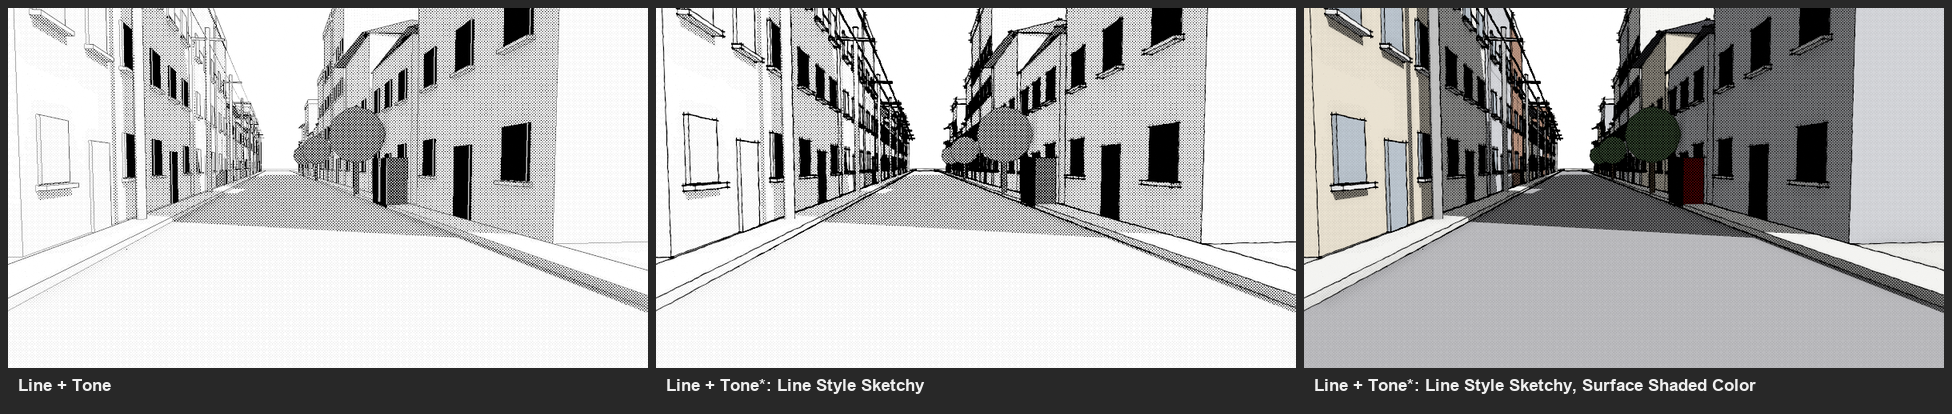
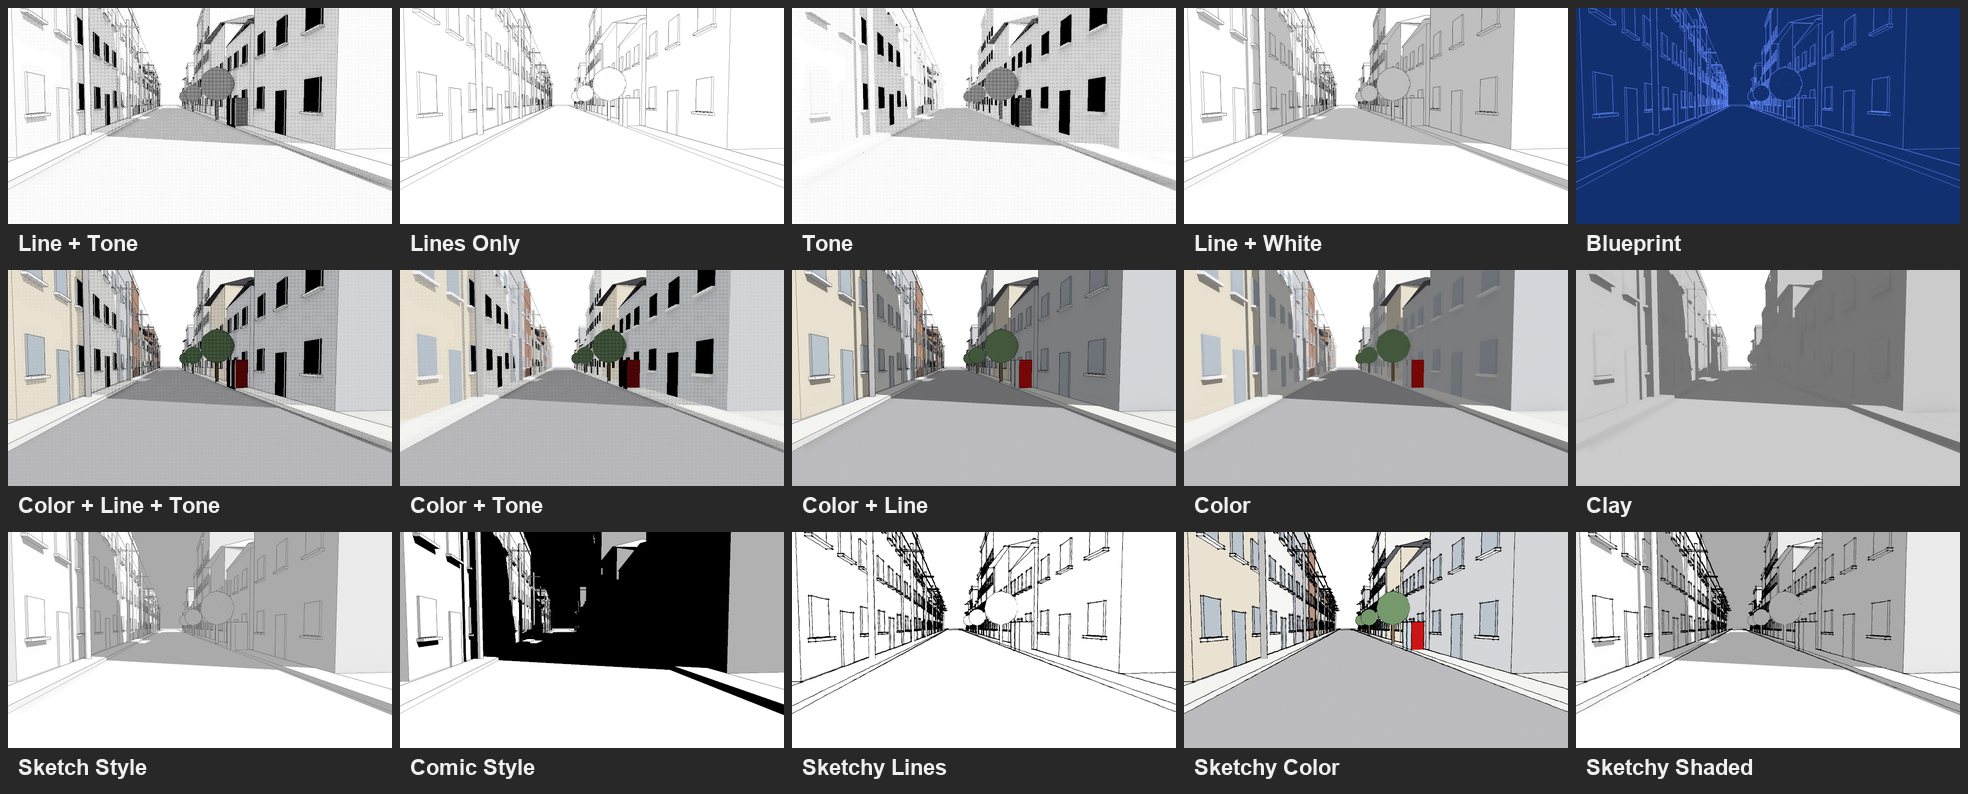
The fifteen styles:
| Style | Line Style | Surface | Pattern | Color Set | Result |
|---|---|---|---|---|---|
| Line + Tone | Clean | Paper | Dots | Paper & Ink | Ink lines, screentone for shading and material darkness, solid black in the darkest areas. The classic manga background. |
| Lines Only | Clean | Paper | Off | Paper & Ink | Ink lines only. |
| Tone | Off | Paper | Dots | Paper & Ink | Screentone and solid black without lines. |
| Color + Line + Tone | Clean | Flat Color | Dots | Paper & Ink | Flat object colors with ink lines, screentone dots and solid black. The light does not shade the colors; it only sets how dense the dots are. |
| Color + Tone | Off | Flat Color | Dots | Paper & Ink | The same without lines. |
| Color + Line | Clean | Shaded Color | Off | Paper & Ink | Shaded material colors with ink lines. |
| Color | Off | Shaded Color | Off | Paper & Ink | Shaded material colors, no lines. |
| Clay | Off | Clay | Off | Paper & Ink | Untextured grey with shadows and ambient occlusion, for checking composition and lighting. |
| Blueprint | Clean | Paper | Off | Blueprint | Light-blue lines on blueprint blue, with no shading, matching Simple Sketch Pro’s Blueprint preset (see Blueprint). |
| Line + White | Clean | White Bands | Off | Paper & Ink | Ink lines on white objects shaded in three light bands: white where lit, 87.5% white where half lit, 75% white in shade and cast shadow. Material colors are ignored. |
| Sketch Style | Clean | Greys | Off | Sketch | Grey pencil lines on white objects on a grey background; each face gets its own grey from how far it turns toward the light (see Sketch Style and Comic Style). |
| Comic Style | Clean | Comic Bands | Off | Comic | Black lines, black shade, black cast shadows and a black background; lit faces are white toward the light and mid grey where they turn partly away. |
| Sketchy Lines | Sketchy | Paper | Off | Paper & Ink | Wobbly ink lines drawn twice, overshooting at corners, on unlit paper (see Sketchy Lines). |
| Sketchy Color | Sketchy | Flat Color | Off | Paper & Ink | Sketchy ink lines over flat object colors. |
| Sketchy Shaded | Sketchy | Greys | Off | Sketch | Sketch Style’s greys, shadows and grey background with sketchy lines. |
A tone style uses the pattern the scene is set to, Dots by default. With the Paper surface and no pattern (Lines Only, Blueprint, Sketchy Lines) or the Flat Color surface and no pattern (Sketchy Color), the look is unlit: light, shadows and ambient occlusion don’t apply.
Only the Flat Color and Shaded Color surfaces show material colors (for example the Color + Line or Color + Line + Tone style). On the other surfaces a material’s color counts only through its darkness, and only while a pattern is on: darker colors get denser tone.
Free and Pro Editions
Illustration Station comes in two editions with the same engine and the same panels:
- Illustration Station Pro (Pro) – every style, every layer option and every setting.
- Illustration Station Free (Free) – one style, Sketch Style (Clean lines over the Greys surface), on a white background. You can change Line Style (Clean or Off), Thin Lines, Thick Lines, Screen Space, Crease and Light Threshold, light the scene with a sun lamp (see Light in Free below), and use the Rendered viewport, F12 renders and animation.
The panel header tells you which one you have: Pro shows the version number followed by Pro, Free shows it followed by Free and an Upgrade button. The ? button opens this manual online in both.
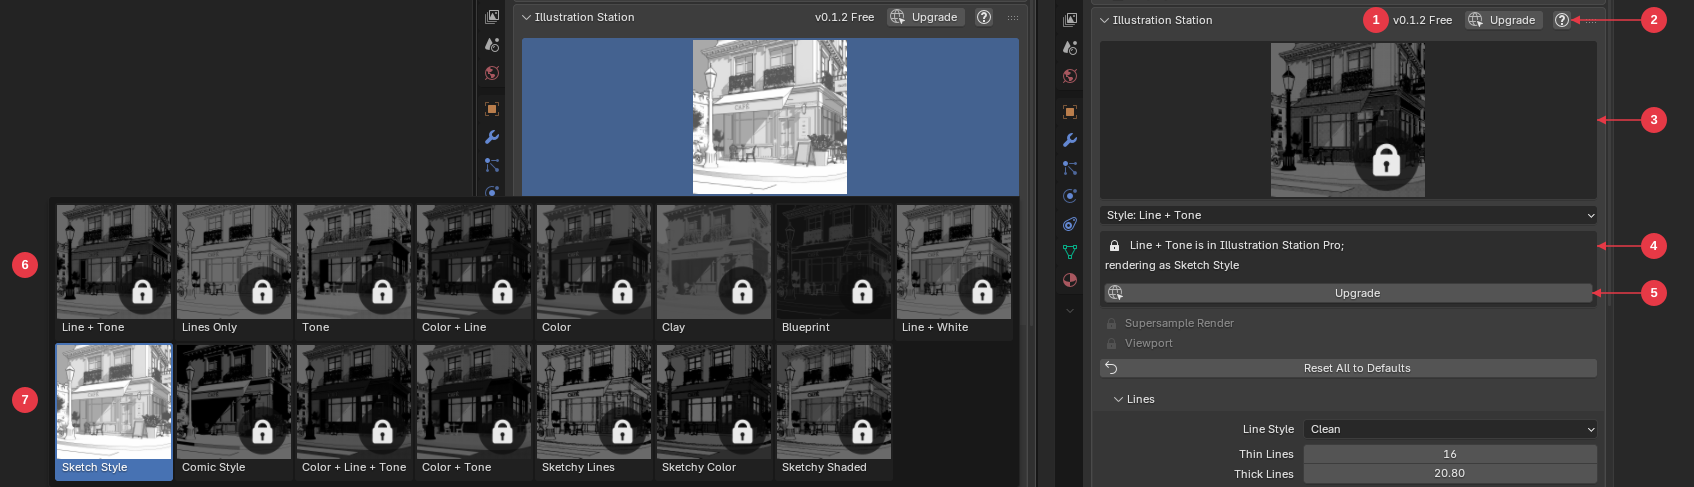
The picture joins two screenshots: the Style picker (left) and the panel of a scene saved in Line + Tone (right), because the open picker covers the notice.
-
Edition and Upgrade – The header reads
Freeafter the version and shows an Upgrade button, which opens the upgrade page. - Help – Opens this manual online.
- Style thumbnail – The style stored in the scene, here Line + Tone, shown locked.
- Notice – The scene is saved in a style that is in Illustration Station Pro, so it renders as Sketch Style.
- Upgrade – Opens the upgrade page.
- Locked styles – In the picker, darkened thumbnails with a padlock.
- Sketch Style – The one style of Illustration Station Free, highlighted as the current style.
Locked settings. Free shows every setting of Pro, so you can see what Pro adds. The ones Free doesn’t change are greyed out with a padlock, and their tooltip says “Available in Illustration Station Pro”; clicking one opens the upgrade page. Free renders them at their default values.
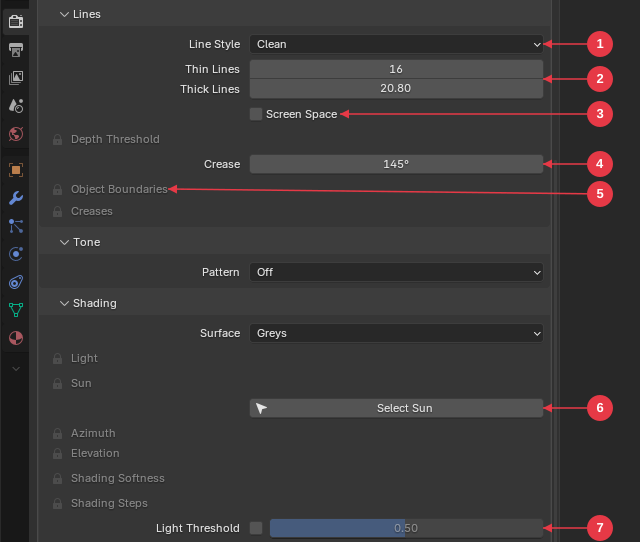
- Line Style – Clean or Off. Sketchy is locked.
- Thin Lines / Thick Lines – Thickness of inner lines and of silhouettes (see Lines).
- Screen Space – The same line thickness everywhere, or thinner lines farther away.
- Crease – Which folds between faces get a line.
- Locked setting – Here Detect: Object Boundaries, greyed with a padlock: available in Pro.
- Select Sun – Selects the sun lamp that lights the render, so you can rotate it. In a scene without a sun lamp this button is Add Sun (see Light in Free).
- Light Threshold – Two greys instead of a gradient (see Shading).
Light in Free. In Free the light moves only with a sun lamp in the scene. Azimuth and Elevation are locked, so a scene without a sun lamp is always lit from the same direction (Azimuth 135°, Elevation 45°). That is the side Blender’s default camera stands on, so the faces you see are evenly lit and the shadows fall behind the objects. To set the light:
- In Render Properties > Illustration Station > Shading, click Add Sun. While the scene has no sun lamp, the panel shows this button in place of Select Sun, under the note “No sun lamp: lit from Azimuth and Elevation”. The new sun shines from the same direction, so the render doesn’t change yet, and it is selected.
- Press R in the 3D Viewport and rotate the sun. Only its rotation matters, not where it stands.
- To find the sun again later, click Select Sun.
Locked styles and options. In Free, the other fourteen styles appear in the Style picker with a darkened thumbnail and a padlock, and the layer options Free doesn’t have show a padlock in their menus. Picking one keeps your current look and opens the upgrade page (https://cw1.me/is-upgrade) in your browser.
Files saved in a Pro style. A scene saved in, for example, Line + Tone keeps its style and settings when you open it in Free. It renders as Sketch Style, and the panel shows the notice with an Upgrade button. Nothing is lost: in Pro the scene renders in its own style.
Upgrading. Install the Illustration Station Pro .zip the same way as the Free one (see Installation). It replaces Illustration Station Free, and your settings and files are kept.
Render Settings
All scene settings are in Render Properties > Illustration Station, in the main panel and its Lines, Tone, Shading, Ambient Occlusion and Colors sub-panels. Lines, Tone, Shading and Colors always show their choice row (Line Style, Pattern, Surface, Color Set); the rest of a panel shows when the look uses it, for example the Tone settings only when Pattern is not Off. Hover any setting or button for a one-line tooltip that describes it.
Main Settings
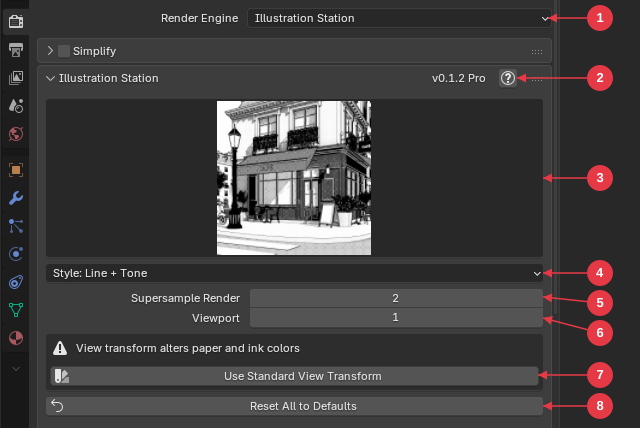
- Render Engine – Choose Illustration Station here to make it the scene’s renderer.
- Version and Help – The header shows the add-on version and edition, and the ? button opens this manual online. In Illustration Station Free an Upgrade button sits next to the ? (see Free and Pro Editions).
- Style thumbnail – The current style on a café scene. Click it to open the grid of all fifteen styles (see Styles).
-
Style menu – The same choice as a menu, by name. A
*after the name means you changed one of the style’s four choices. - Supersample Render – Renders at 2× (up to 4×) the output size and averages down for smoother lines. Higher values use more GPU memory.
- Viewport – Supersampling for the Rendered viewport (1 or 2).
- Use Standard View Transform – Shown only when color management would tint the background and lines. One click sets the Standard view transform.
- Reset All to Defaults – Resets every Illustration Station render setting in the scene, the style included (asks first, undoable).
Lines
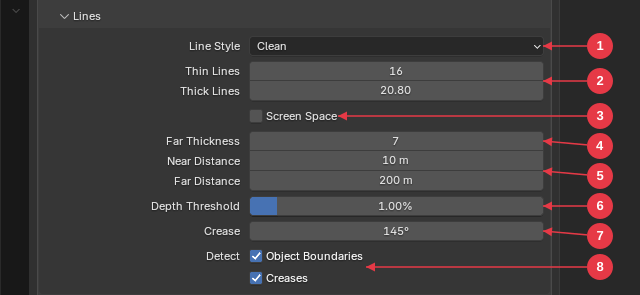
- Line Style – Clean, Sketchy (see Sketchy Lines) or Off.
- Thin Lines / Thick Lines – Thickness of the thin lines (creases and borders between objects) and of the thick lines (silhouettes). 10 is 1 pixel in a 1080-pixel-tall image, and lines scale with your output size: the default Thin Lines of 16 is 1.6 pixels. Thick Lines uses the same scale and stays between half and four times Thin Lines; changing Thin Lines keeps the Thick Lines value.
- Screen Space – On: every line has the same thickness, near or far. Off (the default): lines thin out with distance, set by the three rows below.
- Far Thickness – Thin line thickness at and beyond Far Distance, on the Thin Lines scale. Greyed out while Screen Space is on.
- Near / Far Distance – Lines keep their full thickness up to Near Distance and thin to Far Thickness by Far Distance.
- Depth Threshold – How big a depth jump must be to count as a silhouette. Lower finds smaller steps.
- Crease – Which folds between faces get a line, as in Blender’s Line Art: higher shows more lines. A fold gets a line when it bends by more than 180° minus Crease; the default 145° draws folds sharper than 35°.
- Detect: Object Boundaries / Creases – Turn those kinds of inner lines on or off.
Lines finds edges in three ways: silhouettes (jumps in depth), creases (sharp folds in the surface) and boundaries between different objects.
Tone and Solid Black
The Tone panel’s Pattern turns screentone on. Tone combines two layers, like two sheets of screentone laid on top of each other: shading from the light, and each material’s own darkness. The Solid Black sub-panel appears while a pattern is on.
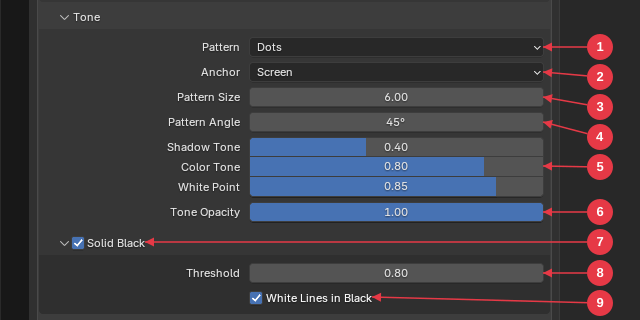
- Pattern – Off, Dots (halftone), Lines (hatching), Cross Hatch, Sand (random grain) or Flat Grey.
- Anchor – Screen fixes the pattern to the image, like printed screentone. Object fixes it to each object’s surface, so it moves with objects in animation.
- Pattern Size – Cell size: in pixels (for a 1080-pixel-tall image) when anchored to the screen, in scene units when anchored to objects. Hidden for Flat Grey.
- Pattern Angle – Rotation of the dots or hatching. Hidden for Sand and Flat Grey.
- Shadow Tone / Color Tone / White Point – Shadow Tone is the tone density on surfaces facing away from the light or in cast shadow. Color Tone is the density from the darkness of each material’s color. Colors at least as light as White Point get no color tone.
- Tone Opacity – Strength of the whole tone layer.
- Solid Black – Checkbox that fills the darkest areas with solid ink.
- Threshold – Darkness at which areas turn solid black. Lower gives more black.
- White Lines in Black – Draws inner lines in the background color inside black areas, so detail stays readable.
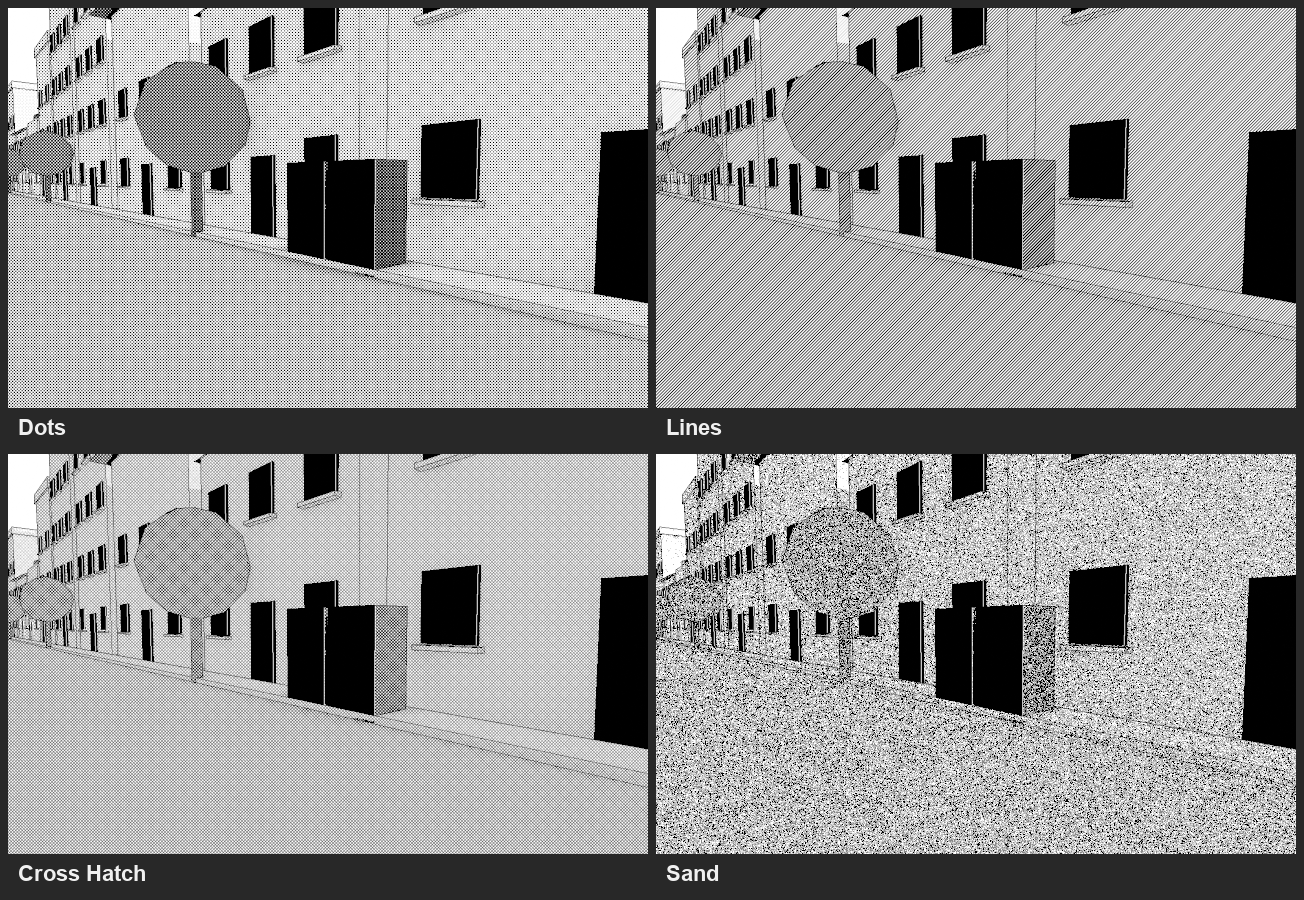
The dots, hatching and solid black are drawn in the Ink Color (see Colors). On the Flat Color surface (Color + Line + Tone, Color + Tone) they are inked over each object’s flat color, which the light doesn’t shade; the light only sets the dot density. White Lines in Black works on the Paper and Flat Color surfaces; outlines stay ink.
When a pattern’s cells get smaller than a few pixels, the tone blends to flat grey of the same darkness to avoid moiré. With the Paper surface, saturated reds and blues are dark, so they come out dense or solid black, like the vending machines above; use the material’s Tone or Black Bias to lighten them.
Shading and Ambient Occlusion
The Shading panel’s Surface chooses what the objects are filled with (see Styles). Its light and shadow settings show when the look is lit: every surface except Paper and Flat Color, and any surface while a Pattern is on, since the tone density comes from the light.
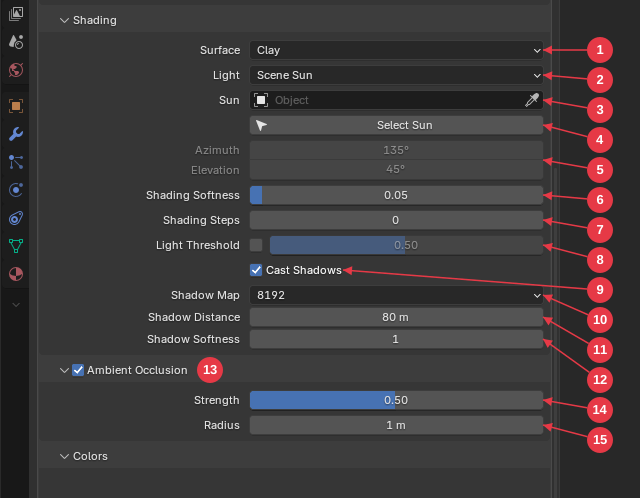
- Surface – Paper, Flat Color, Shaded Color, Clay, White Bands, Greys or Comic Bands.
- Light – Scene Sun uses the chosen Sun (or the first visible sun lamp). Scene Lights uses all of the scene’s own lamps (see Scene Lights below). Custom Direction uses Azimuth and Elevation instead.
- Sun – The sun lamp to use. Leave empty to use the first visible one.
- Select Sun / Add Sun – Shown only for Scene Sun. Select Sun selects the sun lamp that lights the render and makes it the active object, so you can rotate it right away. In a scene without a sun lamp the panel reads “No sun lamp: lit from Azimuth and Elevation” and the button is Add Sun: it adds a sun lamp shining from Azimuth and Elevation (so the render doesn’t change) and selects it; rotate it with R to move the light.
- Azimuth / Elevation – Light direction for Custom Direction, and for Scene Sun when there is no sun lamp (the two rows are then active).
- Shading Softness – How gradually surfaces turn from lit to shaded as they curve away from the light. 0 gives a hard two-tone cel edge; 1 gives a smooth gradient across the whole lit side, so smooth-shaded meshes such as trees and rounded corners read as soft forms. The default, 0.05, is a nearly hard edge.
- Shading Steps – Rounds the shading to this many levels from shade to full light, so smooth gradients become stepped bands. 0 (the default) keeps the smooth gradient. Outside the Greys surface the gradient comes from Shading Softness, so raise that first (at the default 0.05 there is hardly a gradient to step). Ambient occlusion stays smooth on top of the steps.
- Light Threshold – Checkbox and value: two tones instead of a gradient. Surfaces with more light than the threshold get the full light, everything else the shade; cast shadows are always shade. 0 lights anything the light reaches, 1 puts everything in shade. While it is on it replaces Shading Steps.
- Cast Shadows – Turns cast shadows on or off.
- Shadow Map – Resolution of the shadow maps (2048, 4096 or 8192): each of the four sun shadow maps, or the single map of a point, spot or area Shadow Lamp (see Scene Lights). Higher is sharper.
- Shadow Distance – How far from the camera sun shadows reach. The four sun shadow maps are sharpest near the camera, so a smaller distance gives sharper shadows. Shadows fade out at this distance.
- Shadow Softness – Width of the shadow edge, 0 (crisp) to 4 (soft).
- Ambient Occlusion – Checkbox that darkens creases and contact areas, such as the ground around an object’s base.
- Strength – How dark the occlusion gets.
- Radius – How far, in scene units, occlusion reaches.
Which rows show depends on the look:
| Setting | Shows with |
|---|---|
| Shading Steps, Light Threshold | Shaded Color, Clay or Greys surface, or any surface with a Pattern on |
| Full Light Angle | Greys or Comic Bands surface (see Sketch Style and Comic Style) |
| Ambient Occlusion sub-panel | Shaded Color, Clay, White Bands or Greys surface, or any surface with a Pattern on |
White Bands and Comic Bands have their own fixed bands; Shading Steps and Light Threshold show there only while a pattern is on, where they step the tone.
Scene Lights
Scene Lights lights the scene with the lamps you already have, such as the Area lights of a Cycles setup. Every Sun, Point, Spot and Area lamp lights each surface from where the lamp actually is: surfaces closer to a lamp get more light, a spot lights only inside its cone, and an area lamp lights only the side it faces. A lamp in the middle of a room lights each wall from the correct side.
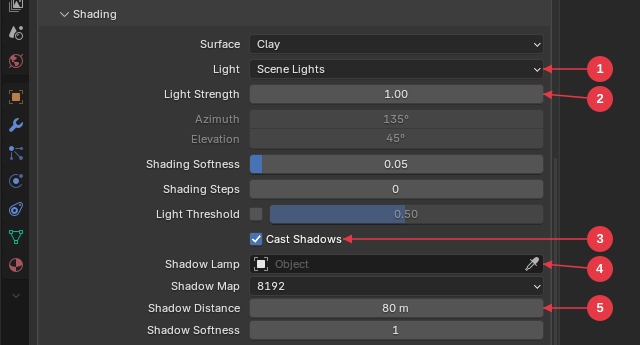
- Light – Scene Lights.
- Light Strength – Brightness of all lamps together. At 1 (the default) the lamp that is brightest at the middle of the scene fully lights surfaces facing it there; nearer surfaces get more light and farther ones less, in the same proportions as the lamps’ real power, color and distance. Raise it if the scene looks too dark away from the lamps.
- Cast Shadows – One lamp casts the shadows (see Shadow Lamp); the other lamps light without shadows. A point, spot or area lamp casts shadows that spread out from the lamp. A spot shadows everything inside its cone; a point or area lamp shadows what lies toward the middle of the scene, so a point lamp surrounded by objects on every side only shadows the ones on the scene’s side of it.
- Shadow Lamp – The lamp that casts the shadows. Leave it empty to use the lamp that is brightest at the middle of the scene. Pick a lamp when you are moving or rotating lamps: otherwise turning an Area lamp away from the scene can make another lamp the brightest, and the shadow jumps to that lamp’s side. If the chosen lamp is hidden from renders, the brightest lamp casts the shadows instead.
- Shadow Distance – Applies only when the shadow lamp is a sun. Shadows from other lamps reach the whole scene; a very large ground plane makes them softer, because the shadow map has to cover it.
Up to eight lamps light the scene: the Shadow Lamp, then the brightest of the rest. Lamps hidden from renders are left out, also in the viewport. If no lamp reaches the middle of the scene, Scene Lights falls back to Custom Direction. With the Paper surface and a pattern on, very dark materials can still turn solid black where they are lit (see Tone and Solid Black).
Colors
The Colors panel’s Color Set chooses which colors the look uses, and the rows below it change with the set.
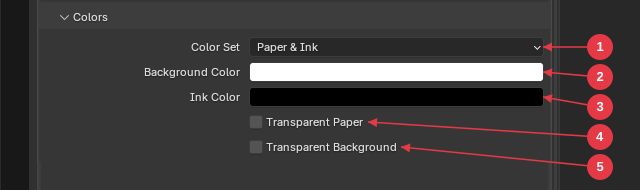
- Color Set – Paper & Ink, Blueprint, Sketch or Comic.
- Background Color – The background, and on the Paper surface also the color of every surface.
- Ink Color – Lines, screentone and solid black. Without a pattern this row reads Line Color.
- Transparent Paper – Only the ink stays opaque, so you can lay the render over other artwork (see Transparent PNGs). It works with the Paper surface (Line + Tone, Lines Only, Tone, Blueprint, Sketchy Lines) and is greyed out otherwise.
- Transparent Background – Blender’s Film Transparent setting: no background behind the scene.
The rows of each color set:
| Color Set | Rows |
|---|---|
| Paper & Ink | Background Color, Line Color (Ink Color with a pattern on) |
| Blueprint | Background Color (default #123070), Line Color (default #6288FF) |
| Sketch | Light (default white), Shade (default #AAAAAA), Line Color (default #595959), Background Color (default #AAAAAA) |
| Comic | Light (default white), Mid Tone (default #B1B1B1), Line Color (lines, shade and shadow, default black), Background Color (default black) |
Light, Shade and Mid Tone color the Greys and Comic Bands surfaces. The Blueprint, Sketch and Comic colors are separate from the Paper & Ink colors, so switching between sets keeps each one’s colors. The hex values are what you get with the Standard view transform; other view transforms shift them.
Blueprint
The Blueprint style draws light-blue lines on blueprint blue, with no tone, shading or shadows: every surface is the same blue as the background, so only the lines read. The colors match the Blueprint preset in Simple Sketch Pro.
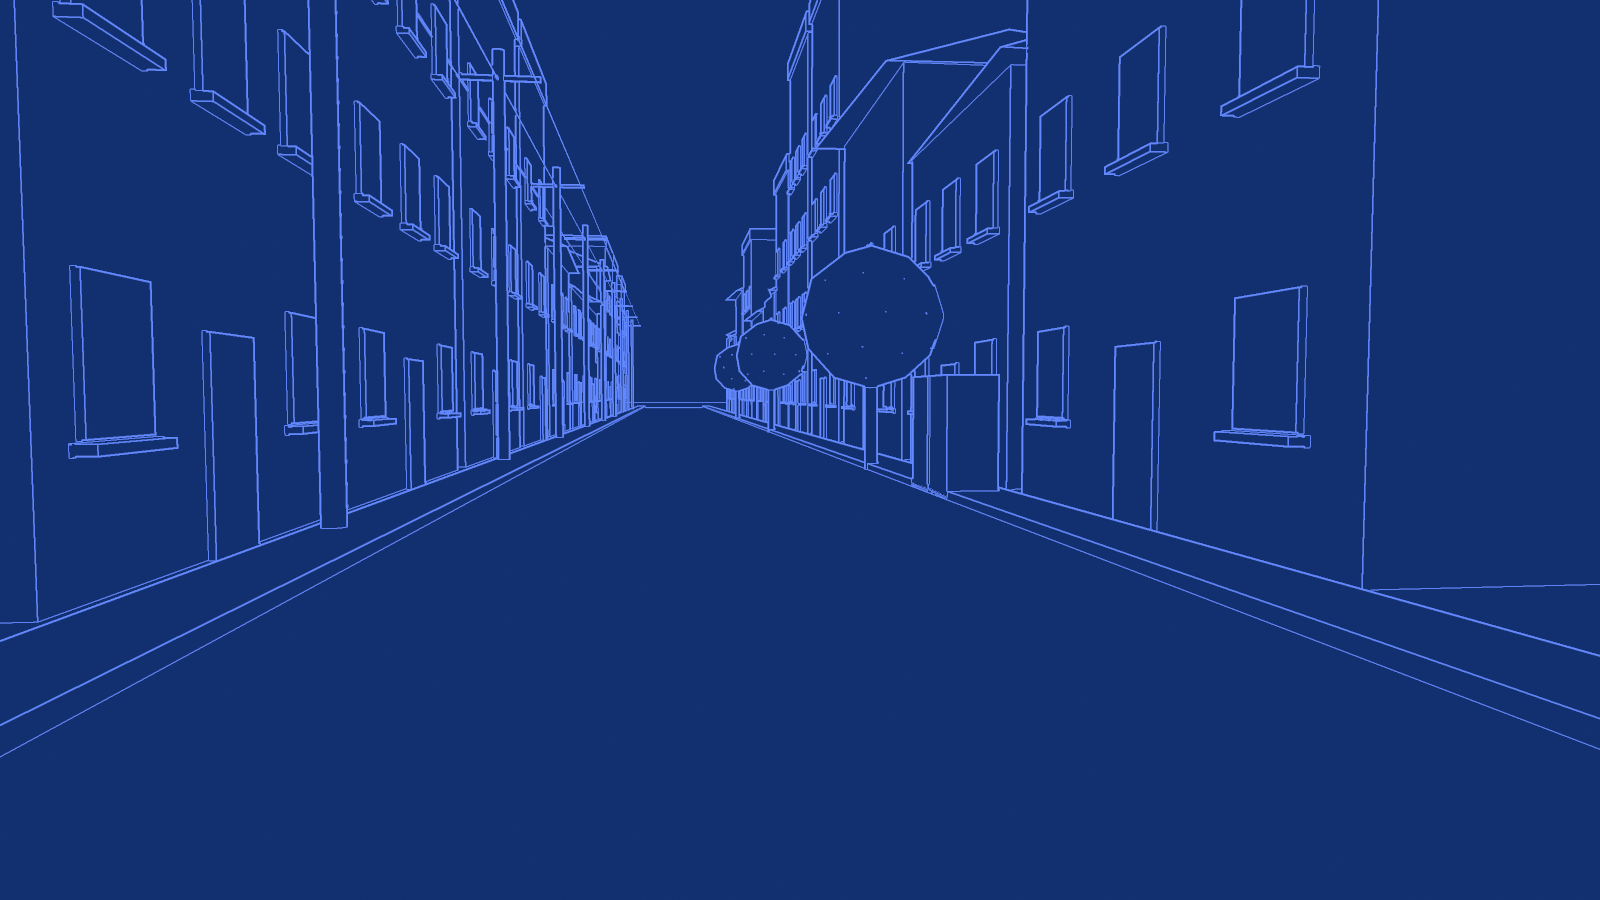
Set Style to Blueprint. The panel then looks like this:
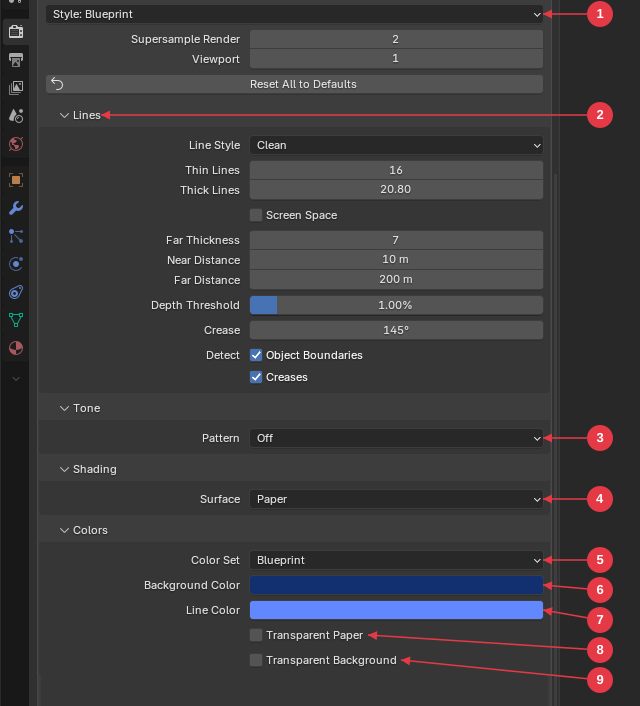
- Style – Blueprint.
- Lines – All line settings work as in the other styles: thickness, distance thinning, crease and what gets detected.
- Pattern – Off: no tone. Pick a pattern to add screentone in the line color.
- Surface – Paper: every surface takes the background blue. The light and shadow settings are hidden because the look is unlit.
- Color Set – Blueprint.
-
Background Color – The blueprint blue, used for the background and every surface. Default
#123070. -
Line Color – Default
#6288FF. - Transparent Paper – Keeps only the lines, on a transparent background.
- Transparent Background – Removes only the empty background; surfaces stay blueprint blue.
Reset All to Defaults restores the Simple Sketch Pro colors. The Blueprint color set works with any surface: with Shaded Color, for example, the objects keep their shaded colors on a blueprint-blue background with blueprint lines.
Sketch Style and Comic Style
Sketch Style and Comic Style draw every object white, whatever its material, and shade it by how far each face turns toward the light. In Sketch Style (the Greys surface) the grey changes smoothly with the angle, so each flat face of a curved row (curb stones, steps, a faceted column) gets its own grey. In Comic Style (the Comic Bands surface) the same light is cut into three flat bands: black, mid grey and white.
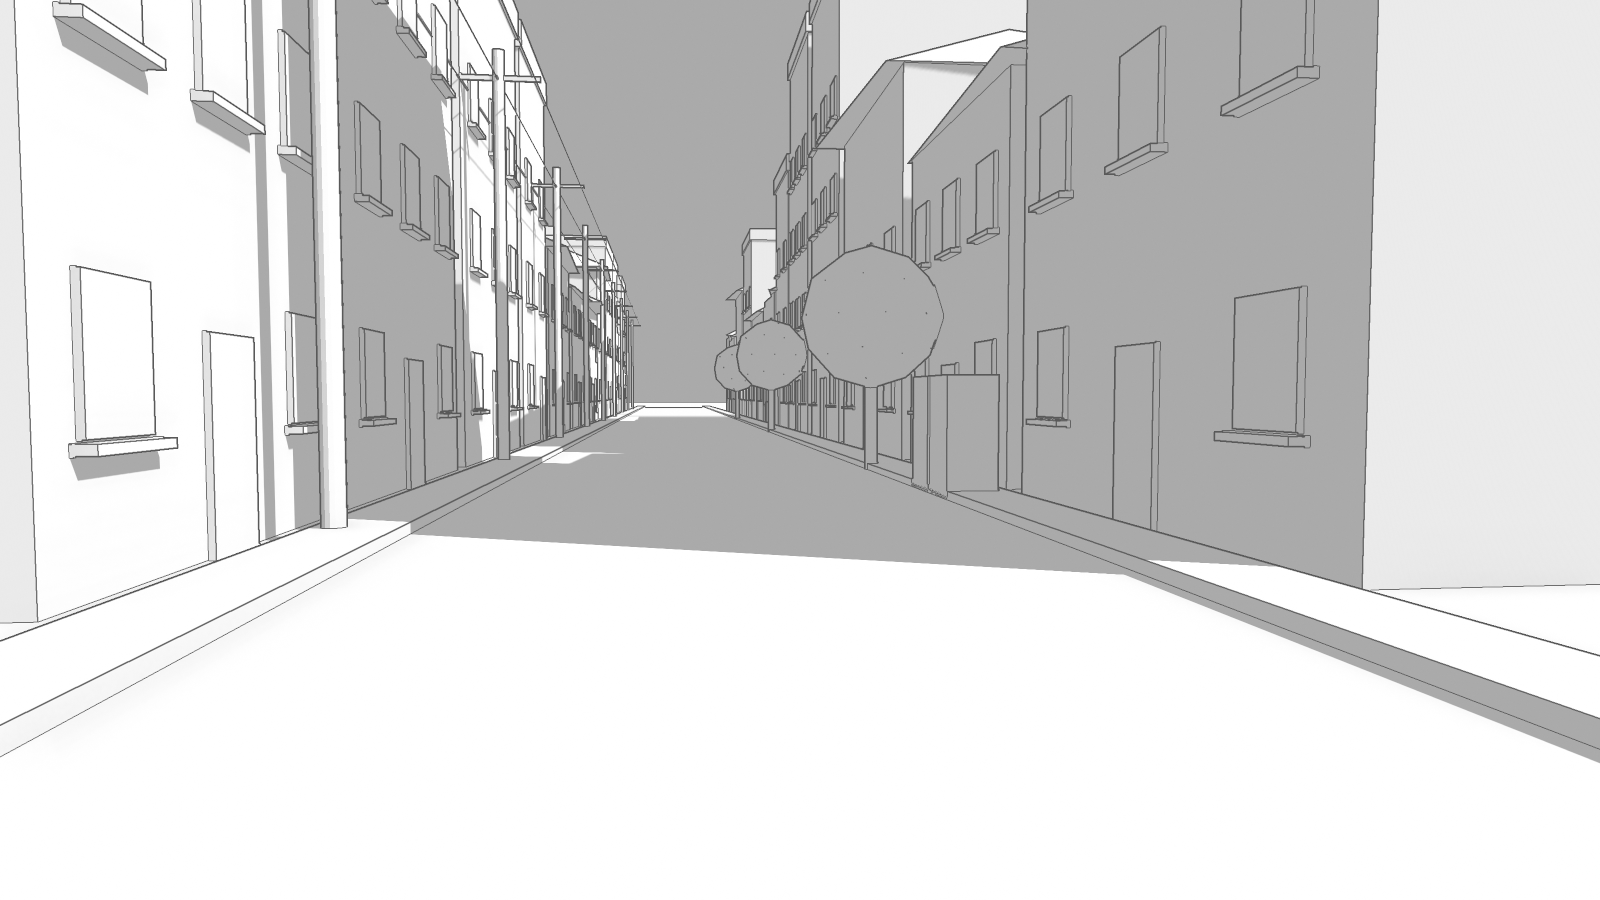
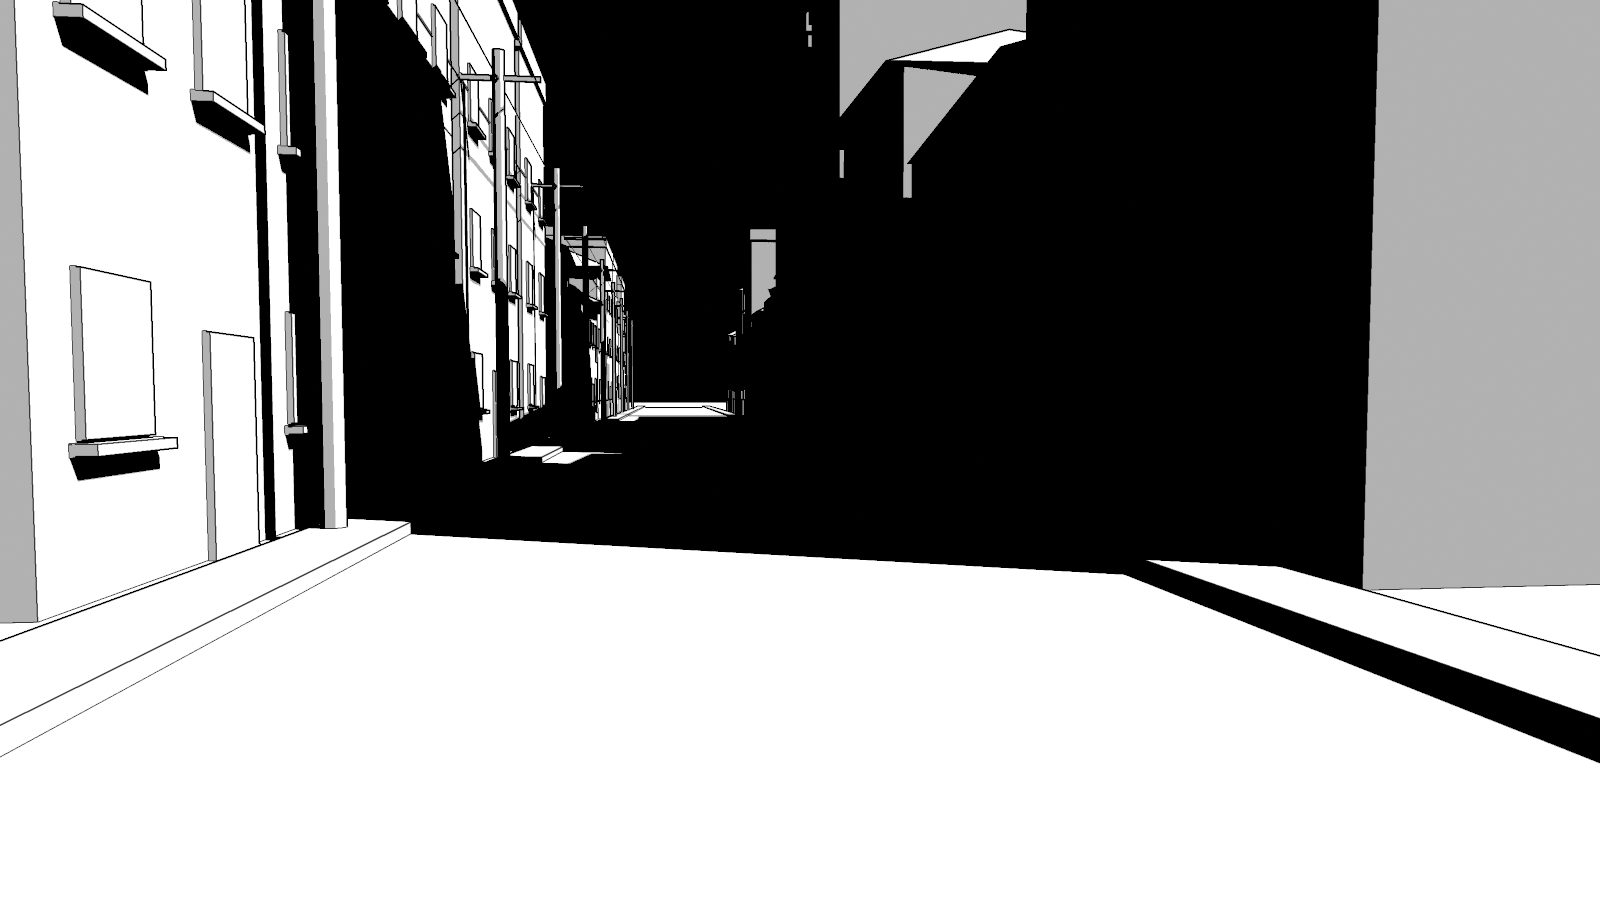
How each face is drawn:
| Face | Sketch Style | Comic Style |
|---|---|---|
| Turned toward the light, within Full Light Angle | Light (white) | Light (white) |
| Turned further away, still lit | Blends from Light to Shade the further it turns | Mid Tone; the most steeply turned faces go black |
| In shade or cast shadow | Shade | Line Color (black) |
| Background | Background Color (grey) | Background Color (black) |
| Lines | Line Color (dark grey) | Line Color (black) |
Settings that matter most here:
- Full Light Angle (Shading, shown with the Greys and Comic Bands surfaces) – Faces turned within this angle of the light get the full Light color. Default 60°. Raise it to make more faces white; lower it for more grey. The light direction matters as much: a low sun leaves the ground grey, a high sun turns it white.
- Shading Steps and Light Threshold – Turn Sketch Style’s grey gradient into a set number of greys, or into two (see Shading). Comic Style keeps its own three bands.
- Colors – The Sketch and Comic color sets (see Colors).
Shading Softness still softens the edge between light and shade. Ambient Occlusion darkens toward the Shade color in Sketch Style; Comic Style has no occlusion. Lines between faces appear only where faces fold sharply enough for Crease; raise it to outline every curb stone. Sketchy Shaded is Sketch Style with sketchy lines.
Sketchy Lines
Set Line Style to Sketchy for lines that look drawn by hand: they wobble off the true edge, are drawn twice, and run past the corners so they cross. It works in every style; the Sketchy Lines, Sketchy Color and Sketchy Shaded styles start with it.
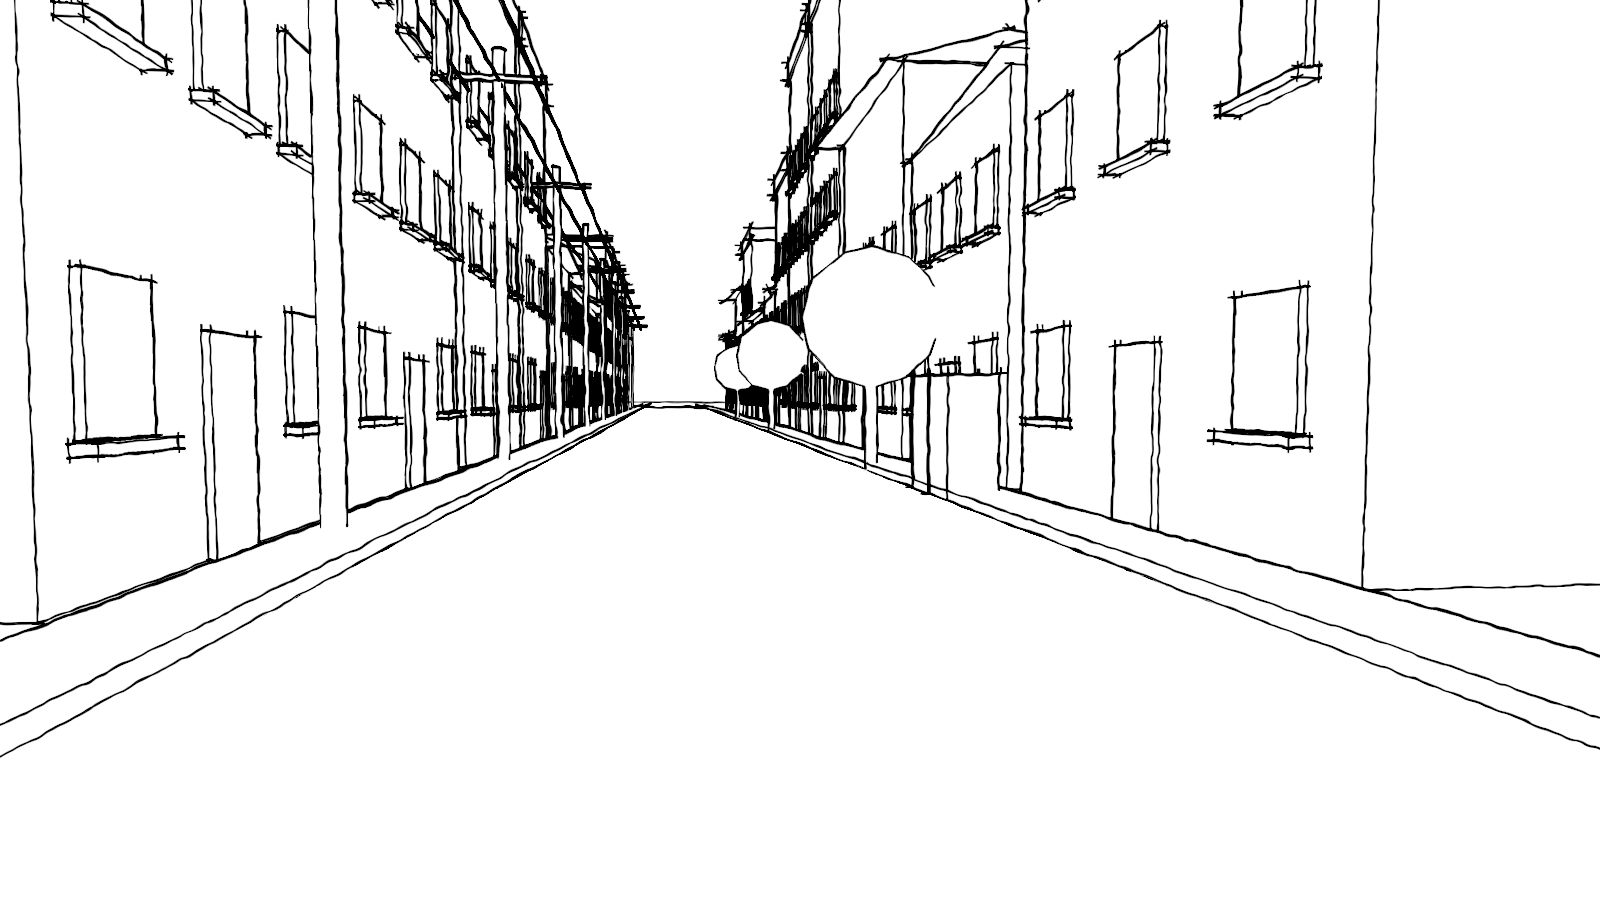
The Sketchy sub-panel appears under Lines:
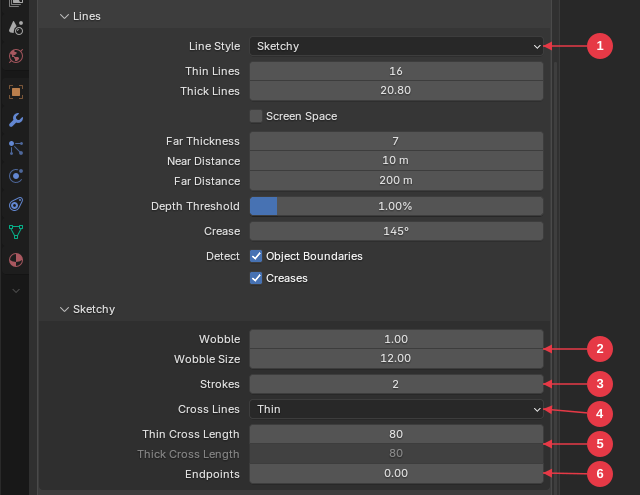
- Line Style – Sketchy. The thickness, distance, crease and detect settings above still apply.
- Wobble / Wobble Size – How far lines wander off the true edge, and the length of one wobble along the line, both in pixels for a 1080-pixel-tall image. Wobble 0 draws straight lines.
- Strokes – Draw each line once or twice. The second stroke is about a pixel off and drifts slightly.
- Cross Lines – Which lines run past the ends of an edge so they cross at corners: Thin (the creases and borders of the mesh, which then replace the Detect lines), Thick (silhouettes, as thick as Thick Lines) or Both.
- Thin Cross Length / Thick Cross Length – How far each kind runs past the ends, on the Thin Lines scale (10 = 1 pixel). 0 draws none.
- Endpoints – How much thicker the ends of lines are, in pixels. Needs a cross length above 0.
Transparent PNGs
Illustration Station renders with an alpha channel, so you can save PNGs (or PNG sequences for animation) with transparency.
Step 1 – Choose what becomes transparent. In Render Properties > Illustration Station > Colors, turn on one of these (see Colors):
- Transparent Paper – With the Paper surface (Line + Tone, Lines Only, Tone, Blueprint, Sketchy Lines), only lines and tone stay. Use it to lay line art over painted backgrounds or other renders.
- Transparent Background – In any style, the objects stay and the empty background goes.
Step 2 – Save with an alpha channel. In Output Properties > Output:
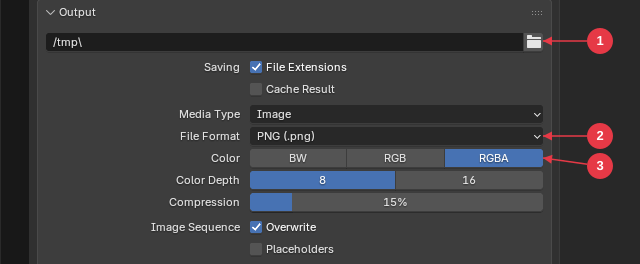
- Output folder – Where Ctrl+F12 animations are saved.
- File Format – PNG.
- Color – RGBA. With RGB, the alpha channel is dropped and the PNG has no transparency.
Step 3 – Render. Press F12 and choose Image > Save, or render the animation with Ctrl+F12.
Line edges keep smooth partial transparency in the true line color, so the result layers cleanly without dark fringes.
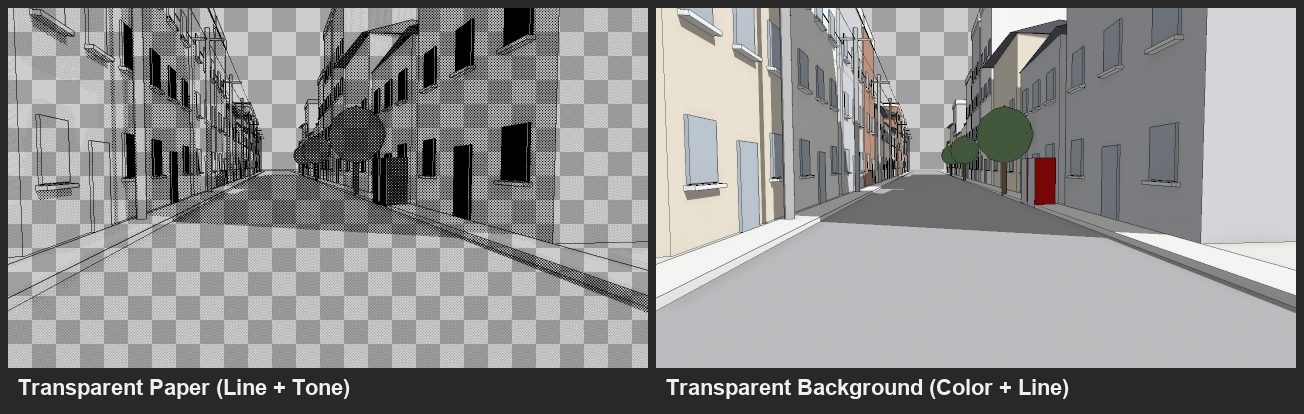
Transparent Paper and Transparent Background are Pro settings.
Material Settings
Material Properties > Illustration Station controls how each material is drawn.
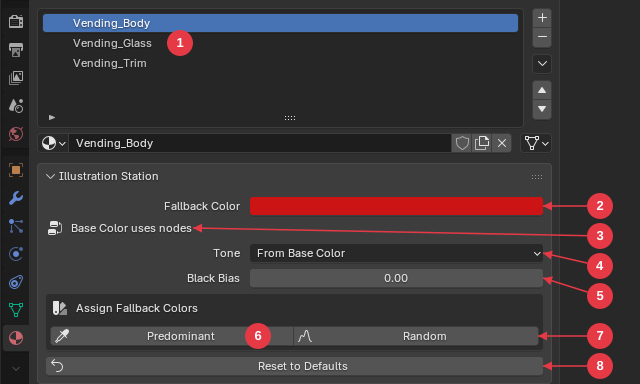
- Material slots – Click a slot to edit that material, as usual.
- Fallback Color – Shown when the Base Color is driven by nodes (an image texture, a node group, a procedural). Illustration Station doesn’t evaluate node trees, so it renders this color, which is the material’s Viewport Display color. For a material with a plain Base Color, this row is Base Color instead and edits the Principled BSDF directly.
- Base Color uses nodes – Tells you the fallback color is in use.
- Tone – From Base Color sets tone density from the color’s darkness. Custom uses a fixed Tone Density.
- Black Bias – Pushes the material toward solid black (positive) or away from it (negative) while a pattern and Solid Black are on. Useful for glass and windows.
- Predominant – Assigns fallback colors from each material’s most common color (see below).
- Random – Assigns random fallback colors (see below).
- Reset to Defaults – Resets this material’s Tone and Black Bias. The color is left alone.
When the object has its own colors from Set Colors from Materials (see Object Colors), the panel shows them at the top:
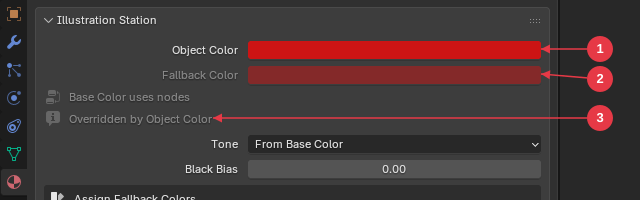
- Object Color – This object’s stored color for the selected slot. It’s what gets rendered.
- Fallback Color – The material’s own color, greyed out because the object color is used instead.
- Overridden by Object Color – Reminder of the above. Use Reset Colors in Object Properties to go back to the material color.
Material colors show as color only on the Flat Color and Shaded Color surfaces; on every surface they set the tone density while a pattern is on. In Illustration Station Free the material and object color tools are locked.
Assign Fallback Colors
Textured and node-based materials need a sensible fallback color. Predominant uses each material’s most common color: when an image texture drives the Base Color (even through Mix, Hue/Saturation or other nodes), the most common color in the image is used, and procedural materials keep their current hue. Random gives each material a random hue and saturation. Both open a dialog first:
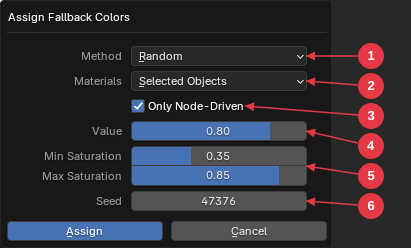
- Method – Predominant or Random.
- Materials – Active Material, every material on the Selected Objects, or All Materials in the file.
- Only Node-Driven – Skip materials with a plain Base Color, whose fallback is never used (on by default).
- Value – Brightness of every assigned color, as in the color picker (default 0.8).
- Min / Max Saturation – Random only: the saturation range.
- Seed – Random only: the same seed gives the same colors. Each click starts with a new seed.
Fallback colors belong to the material, so every object using it changes. Materials linked from other files are skipped.
Object Colors
Object Properties > Illustration Station stores a color per material slot on the object itself. Use it when one object needs different colors from other objects sharing its materials, or to color many textured objects at once.
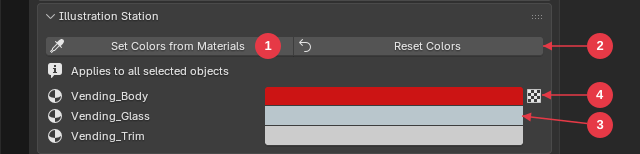
- Set Colors from Materials – For every selected object, stores the most common color of each material slot (from the Base Color or from its image texture). A dialog asks for the Value: the brightness every stored color gets, as in the color picker (default 0.8).
- Reset Colors – Removes the stored colors from the selected objects, so they use their material colors again.
- Slot colors – Each material slot with its stored color. Click a swatch to change it.
- Texture icon – Marks colors sampled from an image.
Stored colors are a snapshot: if you change a texture later, click Set Colors from Materials again.
Viewport Preview
Switch any 3D Viewport to Rendered shading to see Illustration Station live. You can orbit, pan and zoom freely; in camera view (Numpad 0), lines, tone and pattern size match what F12 renders. Local View (/) shows only the local objects, and only they cast shadows and light the scene. Material Preview shading still uses EEVEE.
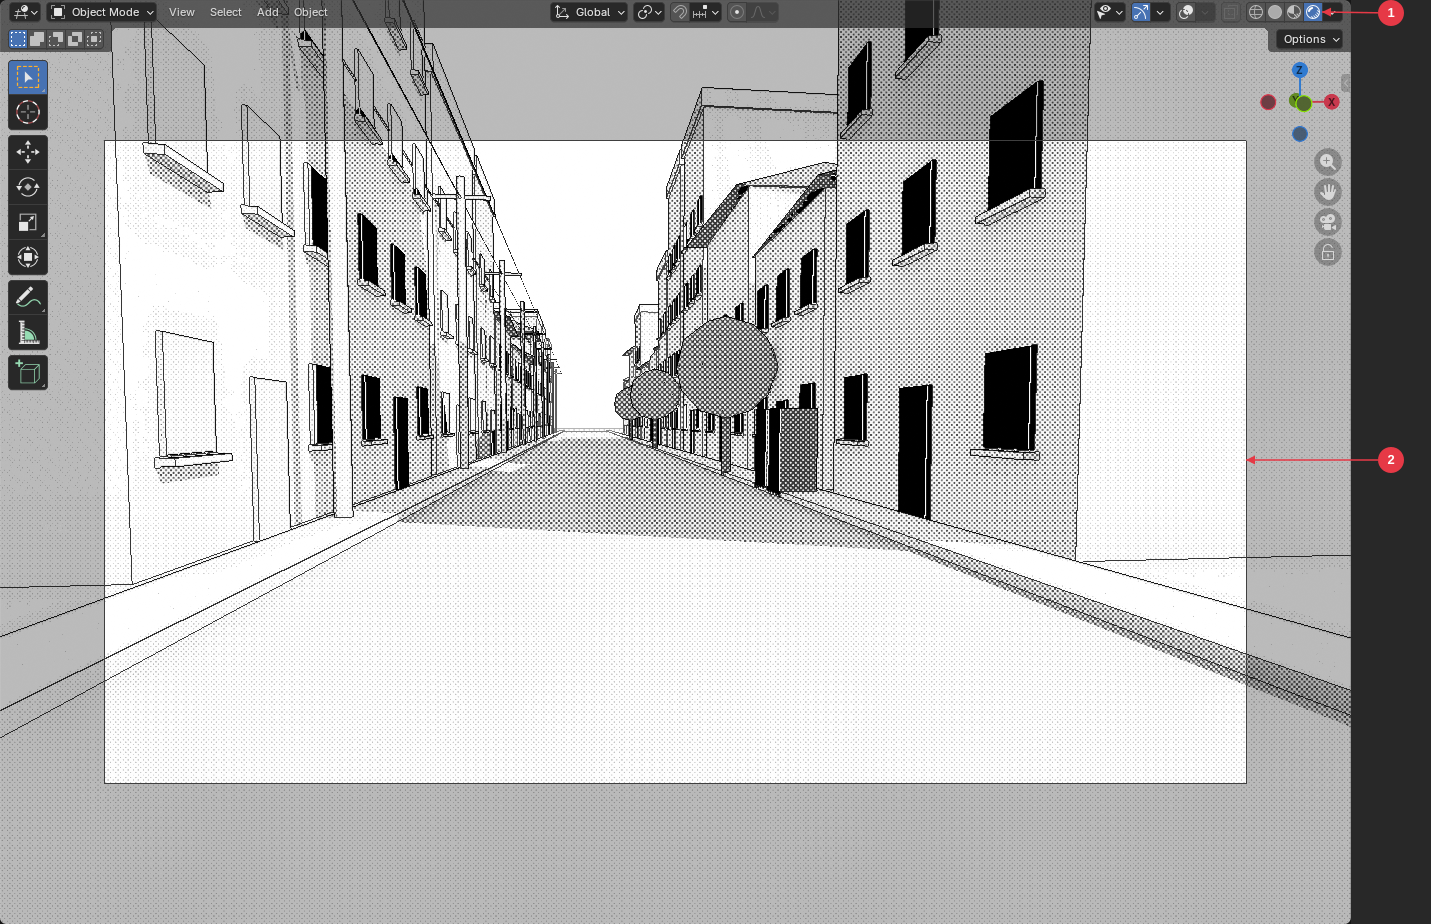
- Rendered shading – Turns on the live Illustration Station preview.
- Camera frame – The area F12 renders. Outside it, the viewport keeps drawing the scene, dimmed.
Rendering Animation
Animations render like any other engine: set the frame range and output in Output Properties and press Ctrl+F12.
- Set Anchor to Object so the tone moves with objects instead of sliding across them.
- Shadow maps are locked to the scene as the camera moves, so shadow edges don’t flicker.
- Keep Supersample Render at 2 or more to steady thin distant lines.
FAQ: What Illustration Station Doesn’t Do
Does it use my image textures and shader nodes?
No. Image textures, procedural textures and shader node trees aren’t evaluated at render time. A textured material renders in one flat fallback color (its Viewport Display color) or in the object’s stored colors. Predominant (see Assign Fallback Colors) and Set Colors from Materials (see Object Colors) pick each material’s most common color for you in one click.
Which objects are drawn?
Meshes, and Curve, Text, Surface and Metaball objects through the surface Blender builds for them; a curve with no bevel or extrusion has no surface, so it isn’t drawn. Hair (Curves objects), volumes, point clouds and Grease Pencil objects aren’t drawn.
Are glass and transparent materials see-through?
No. Every surface is drawn solid, so glass, alpha-blended and transmissive materials render like any other surface. Black Bias helps windows read as glass in the tone styles.
Does it create Grease Pencil strokes or vector lines?
No. Illustration Station renders images, like EEVEE and Cycles. Lines, tone and colors are pixels in the render; there are no Grease Pencil strokes, curves or SVG paths to edit afterward. Use Transparent Paper to get the line work on its own layer.
How many lights does it use?
With Scene Sun or Custom Direction, one: the sun or the chosen direction. With Scene Lights, up to eight lamps, of which one (the Shadow Lamp, or the brightest) casts shadows. Shadows are fully opaque, area lamps cast sharp shadows whatever their size, and a lamp’s color changes only its brightness, not the color of the image.
Does it use Blender’s Line Art settings?
No. The Line Art panel in Material Properties belongs to Blender’s Line Art modifier and has no effect on Illustration Station. Line thickness, crease and detection are in Render Properties > Illustration Station > Lines.
Does it render depth of field, motion blur or render passes?
No. The camera’s depth of field and Blender’s motion blur aren’t applied, and the render has one image (the Combined pass). You can still use the compositor on that image.
Does border (region) rendering work?
The whole frame always renders, even with a render region set.
Does it work on macOS?
Illustration Station draws through Blender’s own GPU drawing, so it runs on the backend Blender uses. It has been tested on Windows with OpenGL and Vulkan; macOS (Metal) hasn’t been tested yet.
Troubleshooting
My blue (or any color) shows only as dots
That’s the Line + Tone look: on the Paper surface colors become tone density. Pick the Color + Line style to see color, Color + Line + Tone to see color under the dots, or set the material’s Tone to Custom to choose its density.
Textured objects render flat grey
Their Base Color is driven by an image, so Illustration Station uses the fallback color. Click Predominant under Assign Fallback Colors, or select the objects and click Set Colors from Materials in Object Properties.
The style name has a * after it
You changed one of the style’s four choices (Line Style, Surface, Pattern or Color Set). Pick the style again in the Style menu or picker to go back to its own choices.
Shadows are missing or don’t match my light
With Light set to Scene Sun, the scene needs a Sun lamp; without one, the Azimuth and Elevation values are used, and the default (135°, 45°) lights the faces seen from Blender’s default camera evenly with the shadows behind the objects. Click Add Sun in the Shading panel and rotate the new sun with R; this is the only way to move the light in Illustration Station Free. Click Select Sun to see which sun lamp is lighting the render. To light from Point, Spot or Area lamps, set Light to Scene Lights and keep Cast Shadows on. If the shadow jumps to another lamp while you move or rotate lamps, pick the lamp you want in Shadow Lamp. Lines Only, Blueprint, Sketchy Lines and Sketchy Color are unlit, so they have no shadows.
Shadows look soft or blocky
Lower Shadow Distance to the depth that matters in your shot, raise Shadow Map to 8192, and set Shadow Softness to 0 or 1.
The background isn’t pure white
Click Use Standard View Transform in the main Illustration Station panel.
The first render takes a few seconds
The first render after starting Blender prepares the GPU shaders. Later renders take a fraction of a second.
A style or setting is locked, or the panel says it is rendering as Sketch Style
You have Illustration Station Free, which has one style, Sketch Style, and changes only a few settings. Click Upgrade in the panel to get Illustration Station Pro, and install it over Free (see Free and Pro Editions); your settings and files are kept.
My PNG has no transparency
Check both halves: Transparent Paper or Transparent Background must be on in Colors, and Output Properties > Output > Color must be RGBA (with PNG as the file format). Transparent Paper works only with the Paper surface; use Transparent Background with the others.
Blueprint colors don’t match Simple Sketch Pro
Click Use Standard View Transform in the main Illustration Station panel; the defaults are set for the Standard view transform. If you changed the blueprint colors, Reset All to Defaults restores them (along with every other render setting).
My older file opens in a different style name
Mode is now called Style, and three styles were renamed: Line is Lines Only, Sketch is Sketch Style and Comic is Comic Style. Every saved file opens in the equivalent style with the same look.