KIT OPS 4 User Manual By Chipp Walters
The docs do not always reflect the most current iteration of features in KIT OPS. For that reason, we recommend you reference the video guides at the top of the documentation first to learn more about KIT OPS PRO and KIT OPS FREE.
KIT OPS Video Guide
KIT OPS 4 supports Blender 4.2 and newer, and is tested through Blender 5.0.
New thumbnail generator and editor:
How do I…?
Jump straight to the task you’re here for:
- Install KIT OPS → How to install KIT OPS?
- Place my first INSERT → Quick Start
- Understand INSERTS, KPACKS and Masterfolders → Core concepts
- Look up a placement shortcut → Placement shortcuts
- Snap to faces, edges, vertices or hardpoints → Snapping · Hardpoints
- Mirror, array, align or stretch a placed INSERT → SMART mode vs REGULAR mode
- Create my own INSERT → Creating INSERTS
- Author an INSERT that cuts (PRO) → INSERT FACTORY
- Turn a folder of models into a library (PRO) → KIT OPS BATCH
- Follow a step-by-step recipe → Common workflows
- Know what’s FREE and what’s PRO → KIT OPS FREE vs KIT OPS PRO
- Fix missing thumbnails → Thumbnail naming
- Sell what I make → Troubleshooting & FAQ
What’s new in KIT OPS 4
KIT OPS 4 builds on the KIT OPS 3 engine — the fast architecture that eliminated the Depsgraph dependence (see the Appendix for why that matters) — and unifies the whole KIT OPS toolset into a single addon.
KIT OPS BATCH is now built in (PRO)
The batch authoring toolkit that used to be a separate addon now ships inside KIT OPS PRO. Enable Use KIT OPS BATCH in the addon preferences and a ♥BA tab appears in the sidebar, with tools to convert whole folders of objects, materials, node groups and PNG decals into INSERT libraries — and to batch-render thumbnails for entire KPACKS. See the KIT OPS BATCH chapter for details.
One unified engine
KIT OPS PRO and KIT OPS BATCH now share a single common core. INSERTS created by either tool behave identically, and fixes land in both at once.
Smarter texture handling
Re-adding an INSERT now reuses materials and their image textures already in the scene — ten copies of the same INSERT share one set of texture maps instead of ten. Hold Ctrl while adding an INSERT to force a unique, fully independent copy with its own materials and images.
Stability and Blender 4.x / 5.0 fixes
Crash fixes across Replace INSERT, SMART-mode Mirror + Array combinations, hardpoint tag previews, Convert to Mesh, decal creation, and Material INSERT saving. KIT OPS 4 is tested through Blender 5.0.
KIT OPS FREE improvements
KIT OPS FREE is more capable than you may remember. Snapping — Face, Edge, Center-Edge, Vertex, and Hardpoint — is a FREE feature; only Place-on-INSERT and Flip Placement are PRO placement helpers. FREE can also quick-create basic INSERTS (Object, GEO NODES, SHADER NODES, MATERIAL) straight from the right-click menu, with the thumbnail rendered automatically. And FREE’s panels are more stable in 4.0 across the board. See KIT OPS FREE vs KIT OPS PRO for the full comparison.
KIT OPS EXTRA UTILITIES — bundled with PRO
KIT OPS EXTRA UTILITIES is a separate companion add-on — 2D booleans, DeFillet tools, origin-to-bottom, image and material cleanup, vertex align and more — that comes bundled with KIT OPS PRO and has its own user manual: https://cw1.me/extra-utils
What is KIT OPS?
KIT OPS is a Blender addon built for kitbashing — building detailed models fast by combining reusable parts instead of modeling everything from scratch. Those parts are special .blend files called INSERTS. Pick one from a thumbnail browser, drop it on a target object, and KIT OPS handles the placement, scaling, snapping, and boolean cutting automatically. It is designed to keep you exploring designs instead of managing modifiers.
Kitbashing with booleans
Most kitbashing tools only let you pile parts on top of a surface. KIT OPS INSERTS can also cut — an INSERT can carve a hole and fill it with a fitted part in a single drop, because KIT OPS adds and sorts the boolean modifiers on the target for you. Windows into walls, ports into panels, greebles into hulls: the boolean work happens as you place the part, non-destructively.
An asset browser that works the way you do
KIT OPS doubles as a practical asset browser. Your INSERTS live in KPACK folders, organized under one or more Masterfolders anywhere on disk or cloud storage, and show up as thumbnails in the KIT OPS panel. Unlike drag-and-drop browsers, KIT OPS lets you scale, rotate, and snap an INSERT while you position it — before you commit. PRO adds Search across all your KPACKS, favorites and recently-used lists, and one-click Replace of placed INSERTS.
Create your own INSERTS
Both editions can create INSERTS. Right-click any object and quick-create an Object, GEO NODES, SHADER NODES, or MATERIAL INSERT — the thumbnail renders automatically. PRO adds the full authoring engine: boolean-cutting INSERTS, the INSERT FACTORY for editing and fine-tuning existing INSERTS, decal creation from any PNG, and KIT OPS BATCH for converting whole folders of assets into INSERT libraries in one pass.
Materials and decals
Material INSERTS apply a stored material to any mesh — including directly to individual material slots. Decal INSERTS wrap PNG-based decals around your objects with the texture setup already handled. Here are 9 reasons to manage your materials with KIT OPS PRO:
A KPACK ecosystem
INSERTS are distributed in KPACKS, and there are hundreds of KPACKS for sale from third-party artists as well as our own — browse the KPACK repository at https://cw1.me/kpacks. With PRO you can author and sell your own. And everything you make with KIT OPS — models, products, renders — is yours to ship and sell; you just may not resell or redistribute the INSERTS or KPACKS themselves as assets.
Quick Start — your first INSERT
Ten steps from a fresh install to placing — and creating — your first INSERT. No prior KIT OPS experience needed. Every step works in KIT OPS FREE and KIT OPS PRO.
1. Install KIT OPS
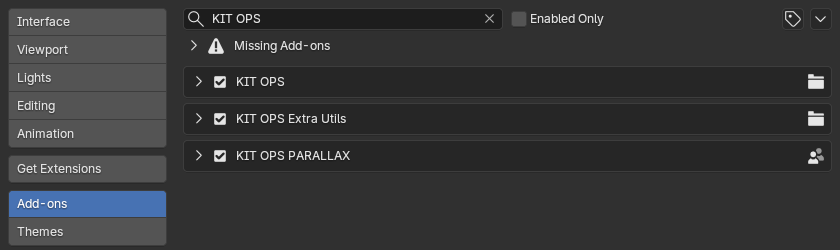
KIT OPS is a single zip file. Don’t unzip it. In Blender 4.2 or newer, drag the zip onto the 3D viewport and confirm the install dialog. If Blender asks, enable the addon. (Full details, including how to keep your settings across upgrades, are in the Installation chapter; install help: http://cw1.me/installkitops.) Once installed, KIT OPS shows up enabled under Edit > Preferences > Add-ons:
2. Open the KIT OPS panel
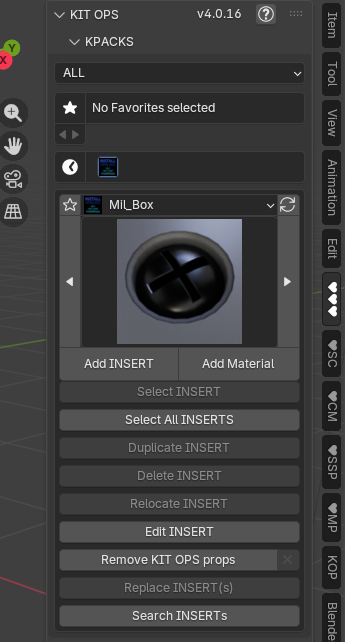
In the 3D viewport, press N to open the sidebar and click the ♥♥♥ tab. This is the KIT OPS panel. The default KPACK, Mil_Box, is already loaded — a set of military-style hard-surface parts you can use right away.
3. Select a target
Every INSERT is placed onto a target object. Blender’s startup scene already has one: click the default cube to select it.
4. Choose an INSERT
In the panel’s thumbnail browser, use the arrows to flip through the Mil_Box INSERTS. Pick screw-hole — it’s a two-part INSERT that cuts a countersunk hole and drops a screw head into it, so you’ll see booleans working on your very first placement.
5. Add it
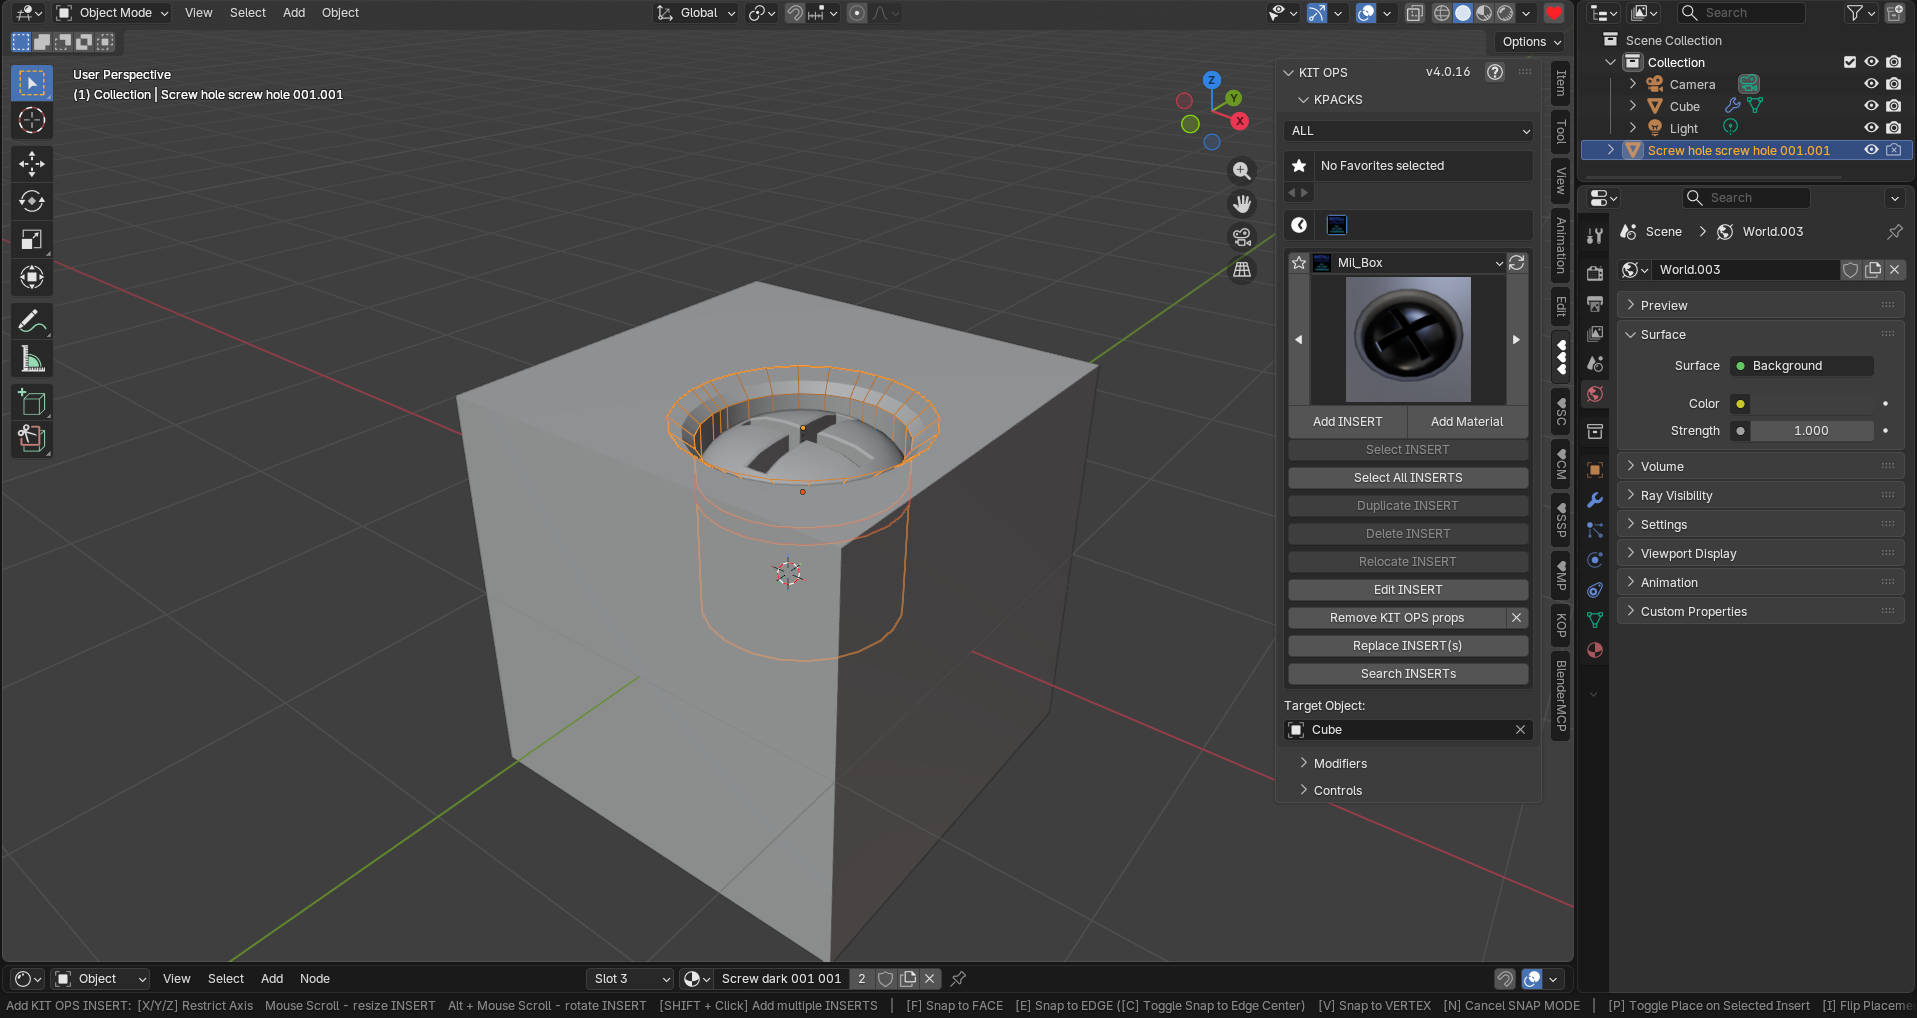
Press Add INSERT. The INSERT now rides your mouse across the surface of the cube — move the mouse and it glides over faces, always oriented to the surface. (If nothing is selected, the INSERT is placed at the 3D cursor instead.)
6. Scale and rotate before you drop
While the INSERT is following your mouse:
- Mouse scroll — resize the INSERT
- Alt + mouse scroll — rotate the INSERT
This is why KIT OPS doesn’t use drag-and-drop: you get full control of size and rotation while positioning, before anything is committed.
7. Snap it
Still in placement, tap a key to turn on snapping:
- F — snap to Face
- E — snap to Edge (C toggles Center-Edge snapping)
- V — snap to Vertex
- N — cancel snapping
The status bar at the bottom of the Blender window lists all of these while you place. (There’s also Hardpoint snapping — INSERTS that click into designated mount points. That mode is chosen in the panel before you press Add INSERT; see the Placing INSERTS chapter.)
8. Drop it
Click to place the INSERT. Done — look at the cube: the hole is cut and the screw head sits in it. Open the cube’s modifier stack and you’ll see the boolean modifier KIT OPS added and sorted for you. Everything stays live and non-destructive — move the INSERT and the cut follows.
Want more than one? Shift + click drops a copy and keeps placing. Esc or right-click cancels a placement.
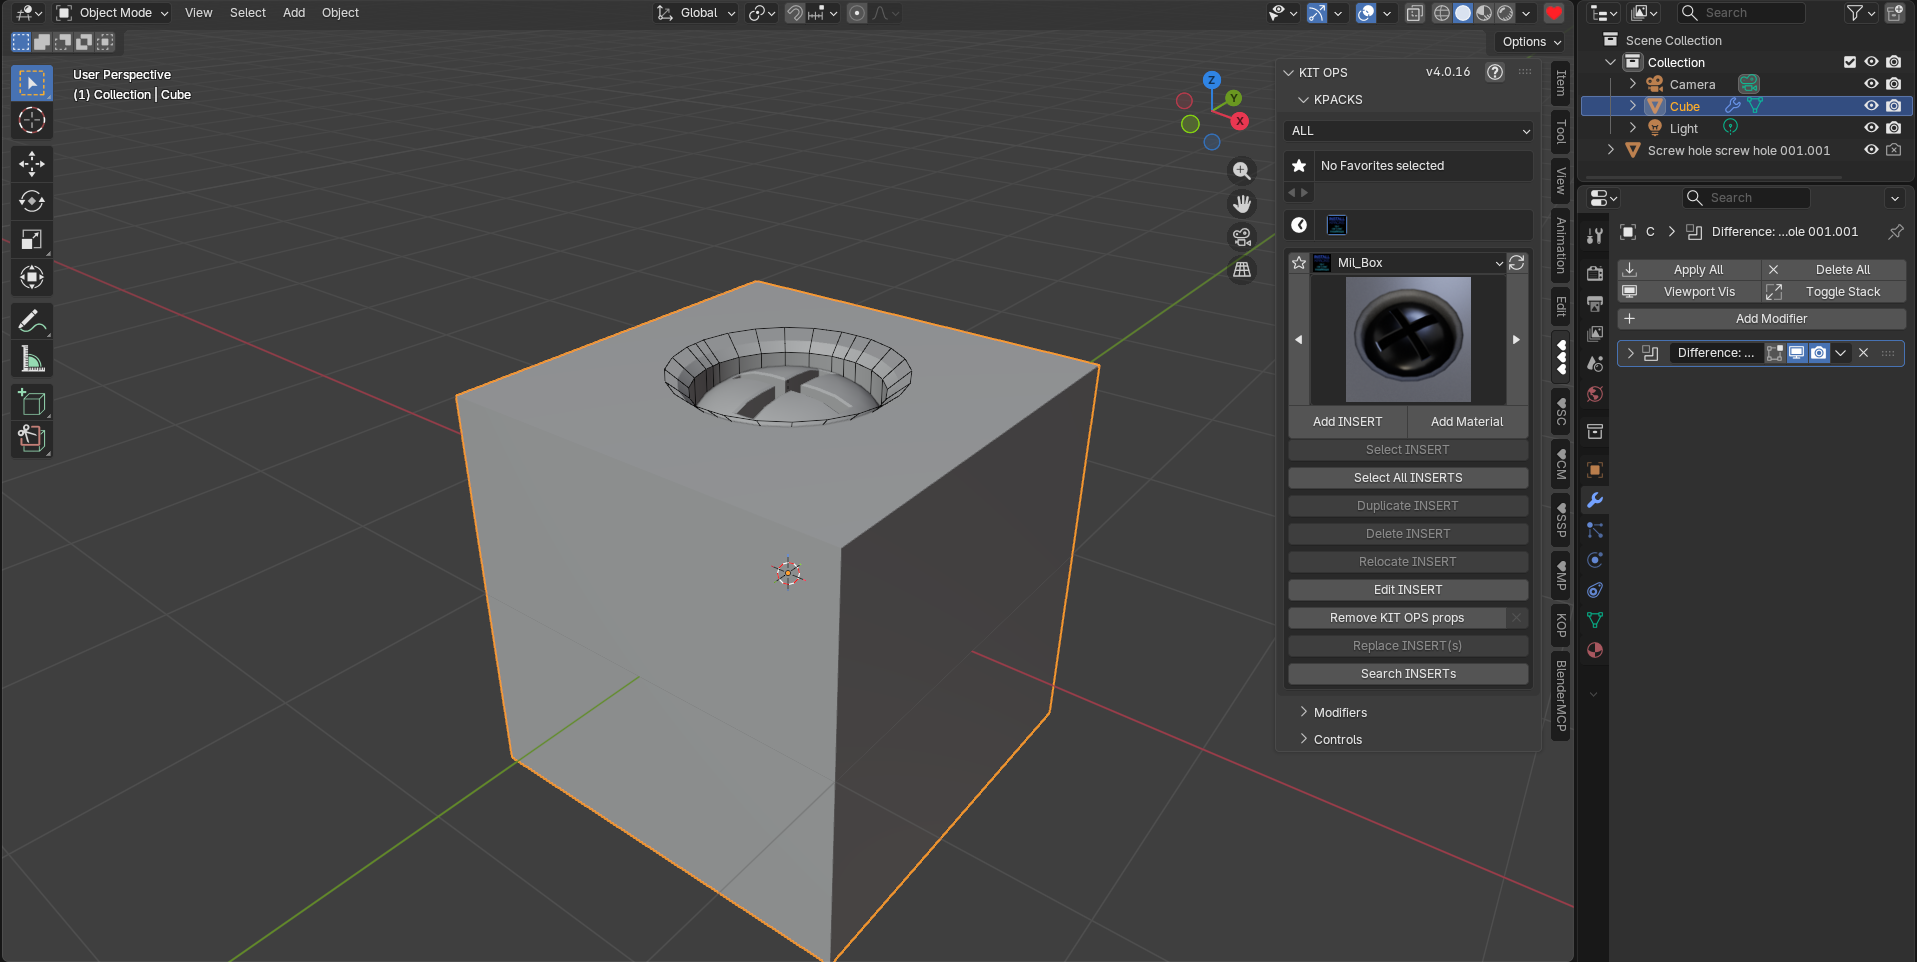
9. Create your own INSERT
Now make one. Model any simple object (or use one you have), then:
- Make sure the object has no parent, and apply its scale and rotation (Ctrl+A) — this avoids surprises later.
- Right-click the object in Object Mode and open the KIT OPS submenu.
- Choose Create Object INSERT - Use Object Origin (or Use Bottom of Object as Origin, handy for parts that sit on surfaces).
KIT OPS saves the object as an INSERT into the currently selected KPACK and renders its thumbnail automatically. The same menu can create GEO NODES, SHADER NODES, and MATERIAL INSERTS from the active object.
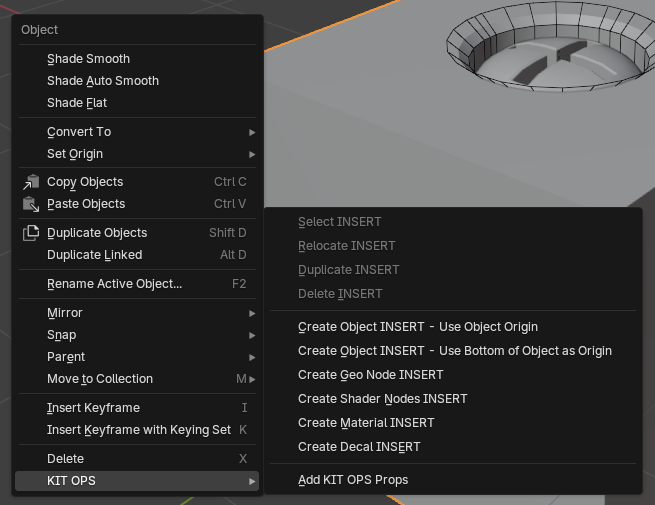
10. Place your own INSERT
Your new INSERT now appears in the thumbnail browser. Select it, press Add INSERT, and place it — same moves as steps 5-8. You’ve completed the full KIT OPS loop: place, adjust, drop, create.
Where to go next:
- Placing INSERTS — the complete placement reference: shortcuts, snapping, SMART mode, managing placed INSERTS.
- Creating INSERTS — the full authoring guide, from quick-create to the INSERT FACTORY (PRO).
- Tip: quick-created INSERTS are saved into whatever KPACK is currently shown. Set up your own Masterfolder (see the Installation chapter) to keep your personal INSERTS organized in their own KPACKS.
Core concepts
Five terms carry you through everything else in this manual: INSERT, target, KPACK, Masterfolder, and Set. Learn these and the rest of KIT OPS reads itself.
INSERT — the building block
A KIT OPS INSERT is a specially prepared .blend file that KIT OPS can place, track, and manage as a single unit. An INSERT can be any of five types:
- Object — a mesh part, or a group of related parts (with or without boolean cutters)
- Material — a stored material, applicable to any mesh or material slot
- Geometry Nodes — a geometry node group, applied as a modifier
- Shader Nodes — a shader node group
- Decal — a PNG-based decal that wraps onto surfaces
An object INSERT can contain multiple objects, and each object inside it plays one of three roles:
- SOLID — normal renderable geometry (the default).
- CUTTER — geometry that performs a boolean operation on the target (Difference, Union, or Intersect). Cutters display as wireframe and don’t render; their effect appears on the target.
- WIRE — non-rendering helper geometry. A common trick: since an INSERT’s main object cannot be an empty, a small WIRE cube serves as a handle for moving and snapping a multi-object INSERT.
One object in every multi-object INSERT is designated the main object — it’s the INSERT’s origin and handle. Main-object rules and the authoring details live in the Creating INSERTS chapter.
The target
INSERTS are placed onto a target object — the mesh you had selected when you pressed Add INSERT. KIT OPS remembers each INSERT’s target: cutters put their boolean modifiers on it, Mirror and Array work about it, and deleting the INSERT cleans its modifiers off of it. If nothing is selected when you add, the INSERT is placed at the 3D cursor with no target, ready to become the base of a new build.
Booleans, automatically
This is the heart of KIT OPS. When you place an INSERT containing a CUTTER, KIT OPS adds a boolean modifier (Difference, Union, or Intersect) to the target, points it at the cutter, and sorts it into the target’s modifier stack. Nothing is applied — the cut is live. Move, scale, or delete the INSERT and the target updates in real time.
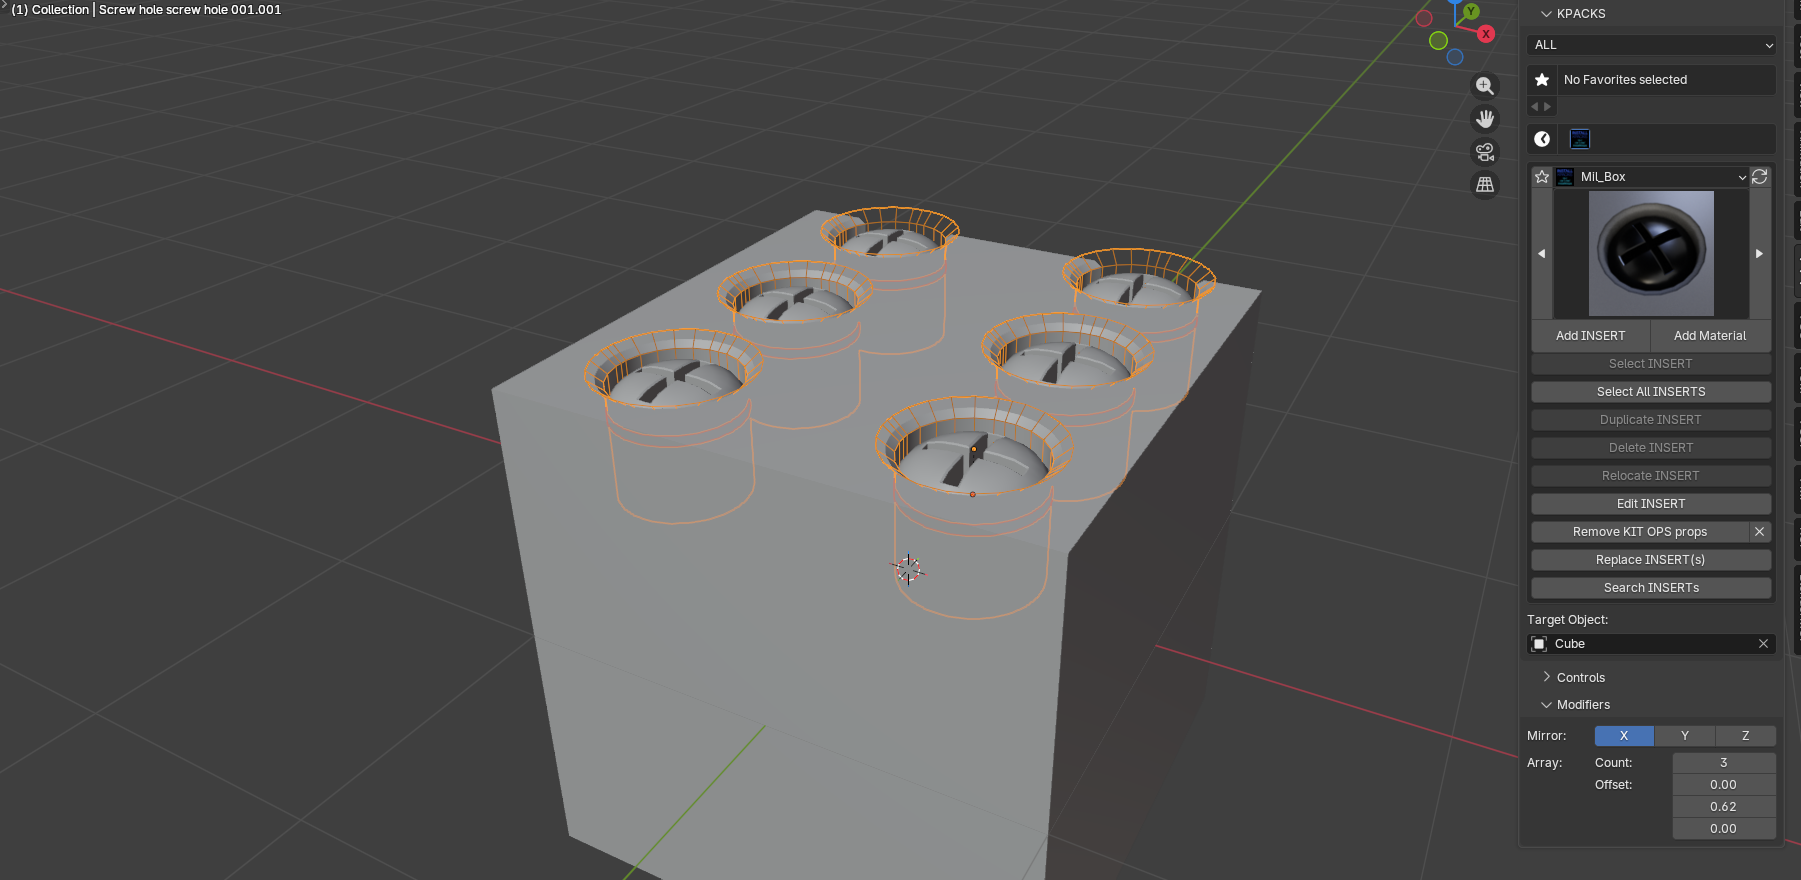
Because an INSERT can hold several objects, one INSERT can cut and fill in a single drop — a screw hole with a screw already in it:
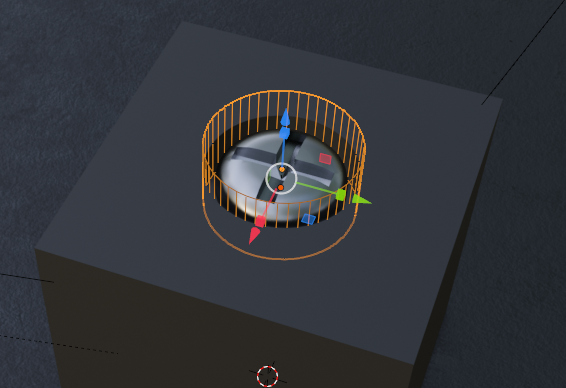
Which boolean engine does the cutting is up to you: the Boolean Solver preference offers Float (fastest), Exact (most accurate), and Manifold (newer Blender versions; fast and robust on closed meshes). See Preferences.
KPACK — a folder of INSERTS
A KPACK is simply a folder containing INSERT .blend files, each with a thumbnail PNG beside it. The folder’s name is what you see in the KPACK selector; each thumbnail is named after its .blend file plus a type suffix (below). That’s the whole format — a KPACK is portable, versionable, and easy to share or sell.
Masterfolder — a folder of KPACKS
A Masterfolder groups KPACKS. It can live anywhere — a local drive, GDrive, Dropbox — and you register it once in KIT OPS Preferences (File Paths tab); every KPACK inside becomes available in the panel. You can register as many Masterfolders as you like, and purchased KPACKS typically arrive already grouped in one: unzip, register, done. The Masterfolder’s own name never appears in the browser — only its KPACKS do.
Masterfolder            (any name, any location)
├── KPACK 1 folder      (any name)
│   ├── INSERT 1.blend
│   ├── INSERT 1-0.png  (256x256 PNG thumbnail)
│   ├── INSERT 2.blend
│   └── INSERT 2-0.png
├── KPACK 2 folder
│   ├── etc..blend
│   └── etc..png
└── KPACK 3 folder
    ├── etc..blend
    └── etc..png
Sets — show only what you need
A Set is a named view of your KPACKS — for example a “Materials” Set showing only material KPACKS, or a “Sci-Fi” Set for one project. You create Sets in the Preferences File Paths tab by toggling which KPACKS each Set displays, then switch between them as you work. The quick Sets menu at the top of the Main panel is a PRO convenience; Sets themselves are managed in Preferences.
Thumbnails
Every INSERT’s thumbnail is a PNG saved next to its .blend, named after the .blend plus a suffix that encodes the INSERT type:
| INSERT type | Thumbnail name |
|---|---|
| Object | name-0.png |
| Material | name-1.png |
| Geometry Nodes | name-2.png |
| Shader Nodes | name-3.png |
| Decal | name-4.png |
A plain name.png (the KIT OPS 3 convention) still loads as a legacy fallback. Quick-created INSERTS render their thumbnails automatically; PRO’s FACTORY and BATCH tools give you full control over thumbnail rendering. If thumbnails aren’t showing up, see Thumbnail naming in the FAQ.
KIT OPS FREE vs KIT OPS PRO
What is KIT OPS FREE?
KIT OPS FREE is the complete placement engine, free. You can browse and use unlimited KPACK libraries — the built-in starter INSERTS, KPACKS you make, and any third-party KPACKS you own — and place INSERTS of every type, including boolean-cutting INSERTS that carve into your model. Full snapping (Face, Edge, Center-Edge, Vertex, Hardpoint), SMART mode (mirror, array, align, stretch), modifier sorting, and boolean cleanup are all FREE. FREE can even create your own basic INSERTS — Object, GEO NODES, SHADER NODES, and MATERIAL — from the right-click menu, thumbnails rendered automatically.
What FREE cannot do: author INSERTS that cut (boolean CUTTERS), create DECALS, or edit INSERTS in the FACTORY — those are PRO.
What is KIT OPS PRO?
KIT OPS PRO adds the professional authoring engine and the productivity layer. The flagship: boolean-cutting INSERTS — author parts that carve the hole and add the geometry in one drop. PRO includes the full INSERT FACTORY (edit INSERTS in place, control thumbnails, author hardpoints, cutters, and wires), Create DECAL (turn any PNG into a decal INSERT), favorites and recently-used, Search INSERTS, Replace INSERT(s), Convert Assets to KIT OPS (turn a Blender asset library into INSERTS), and the Place-on-INSERT and Flip Placement helpers. PRO also ships with KIT OPS BATCH built in (see the KIT OPS BATCH chapter) and the bundled KIT OPS EXTRA UTILITIES add-on (its manual).
Side by side
| Capability | KIT OPS FREE | KIT OPS PRO |
|---|---|---|
| Place and use INSERTS — all five types | ✓ | ✓ |
| Boolean cutting with ready-made INSERTS | ✓ | ✓ |
| Snapping — Face / Edge / Center-Edge / Vertex / Hardpoint | ✓ | ✓ |
| SMART mode — mirror, array, align, stretch | ✓ | ✓ |
| Modifier sorting and boolean cleanup | ✓ | ✓ |
| Built-in starter INSERTS | ✓ | ✓ |
| Use unlimited KPACK libraries (yours or third-party) | ✓ | ✓ |
| Quick-create basic INSERTS (right-click menu) | ✓ | ✓ |
| Author boolean-cutting INSERTS (parts that carve the model) | — | ✓ |
| INSERT FACTORY — edit, re-thumbnail, and fine-tune INSERTS | — | ✓ |
| Author hardpoints, cutters, and wires | — | ✓ |
| Turn a PNG into a decal INSERT | — | ✓ |
| Favorites and recently-used | — | ✓ |
| Search INSERTS across your KPACKS | — | ✓ |
| Replace INSERT(s) in one click | — | ✓ |
| Convert a Blender asset library to INSERTS | — | ✓ |
| Place-on-INSERT (P) and Flip Placement (I) | — | ✓ |
| KIT OPS BATCH built in (bulk-build whole libraries) | — | ✓ |
| KIT OPS EXTRA UTILITIES add-on bundled | — | ✓ |
| One year of free updates and support included | — | ✓ |
In one line: FREE lets you build with parts and make simple ones. PRO lets you make cutting parts, edit them in the FACTORY, batch-build whole libraries, and adds the EXTRA UTILITIES toolkit.
Get KIT OPS PRO: https://chippwalters.com/kit-ops.html
If you’re using KIT OPS FREE
Everything in the FREE column above is fully yours — this manual covers it all. Two things to know as you read:
- The screenshots show KIT OPS PRO. Your panels will have fewer buttons: FREE hides Favorites, Recents, the Sets menu, Search, Edit INSERT, Replace INSERT(s), Place-on-INSERT, Flip Placement, Convert Assets, and the Tools panel’s Create row. Nothing is broken — those are the PRO features, and they’re marked (PRO) throughout.
- You still create INSERTS — just from the right-click menu instead of the Tools panel. See Quick-create from the right-click menu.
Recommended reading paths:
- New FREE user: Quick Start → Core concepts → How to install KIT OPS? → Placing INSERTS → quick-create in Creating INSERTS → FAQ.
- New PRO user: the FREE path, then the rest of Creating INSERTS (FACTORY), KIT OPS BATCH, and KIT OPS EXTRA UTILITIES.
- Upgrading from KIT OPS 3: How to install KIT OPS? (Export Settings first!) → What’s new in KIT OPS 4 → carry on as before — your KPACKS work unchanged.
- Building libraries for a team or store: Core concepts → Creating INSERTS → Hardpoints → KIT OPS BATCH.
How to install KIT OPS?
KIT OPS 4 is a single addon: kitops-v4.x.x.zip. KIT OPS BATCH is built in — there is no separate BATCH install (see the KIT OPS BATCH chapter). KIT OPS PRO also comes bundled with the KIT OPS EXTRA UTILITIES addon, which installs separately and has its own manual.
To install the addon
- If you already own KIT OPS, open the KIT OPS addon preferences and Export your settings.
- Disable and remove any old KIT OPS addon from Blender (and the old standalone KIT OPS BATCH addon if you had it — KIT OPS 4 replaces it). Restart Blender.
- Drag and drop the kitops-v4.x.x.zip file onto the 3D viewport — it installs correctly. Do not unzip it first.
- Enable the addon if Blender asks, then Import your settings, save your preferences, and restart Blender.
- (PRO, optional) To use the batch authoring tools, enable Use KIT OPS BATCH in the KIT OPS addon preferences — a ♥BA tab appears in the sidebar.
KIT OPS 4 supports Blender 4.2 and newer, and is tested through Blender 5.0.
To install KPACKS
Included with KIT OPS 4 is a collection of assets (special .blend files we call INSERTS) organized into KPACK folders, which are in turn organized into Masterfolders. To use these you need either KIT OPS 4 FREE or KIT OPS 4 PRO.
First, unzip each of the Masterfolder .zip files.
After unzipping, add the Masterfolders to KIT OPS in the KIT OPS preferences pane (see preferences). Once added, all of the KPACKS become visible in the KIT OPS interface. For more info on how to install KPACKS: http://cw1.me/installkitops
If you need help with the addon, we first ask you to Help Us Help You: http://cw1.me/helpushelpyou
One common issue causing KPACKS not to show up is the presence of unnecessary additional folders inside the Masterfolder.
Below is a good visual representation of the folder structure:
Masterfolder  (any name, any location, Default or Custom)
├── KPACK 1 folder (any name)
│   ├── INSERT 1.blend
│   ├── INSERT 1-0.png (256x256 PNG thumbnail)
│   ├── INSERT 2.blend
│   ├── INSERT 2-0.png
│   ├── etc..blend
│   └── etc..png
├── KPACK 2 folder
│   ├── etc..blend
│   └── etc..png
└── KPACK 3 folder
    ├── etc..blend
    └── etc..blend
The default KPACK that ships with KIT OPS lives inside the addon’s own install folder — see Default KPACK Location in the Appendix if you want to find it on disk.
Export your KPACK preferences
In the KIT OPS prefs General tab, at the bottom, is an Export Settings button which exports your existing settings as a json file. If Blender or KIT OPS is ever reset, Import Settings brings you back to the state you last saved — including your Masterfolder paths and favorites.
KIT OPS 4 PREFERENCES
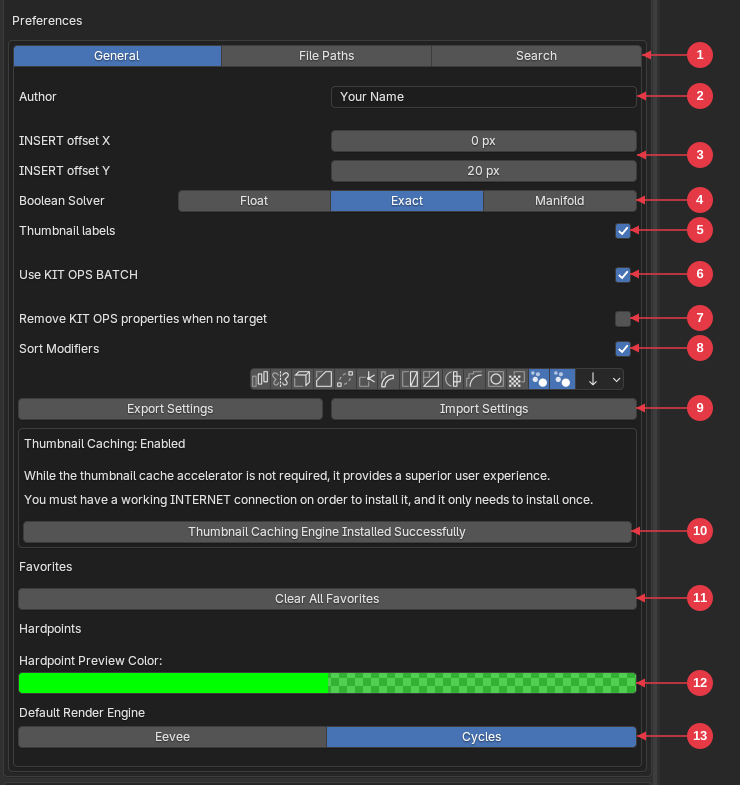
The General Tab
-
General, File Paths and Search Tabs
The three tabs. General holds the set-once settings. File Paths is where you load your KIT OPS Masterfolders. Search lets you find any INSERT in any Masterfolder you have registered (note: the Masterfolders do not need to be loaded, just registered).
-
Author
With the KIT OPS addon you can create your own KIT OPS INSERTS and KPACKS. Enter your name here and the metadata for your INSERTS and KPACKS is automatically stamped with your information.
-
INSERT offset X & INSERT offset Y
Horizontal and vertical offset distance used for INSERTS when using the thumbnail panel. Leave at the defaults unless you have a hard time placing INSERTS after picking them from the panel.
-
Boolean Solver
Sets which Boolean modifier solver KIT OPS uses. Every time an INSERT adds a boolean modifier, it is configured with the solver you choose here. The options depend on your Blender version: Float is the fastest, Exact is the most accurate, and Manifold (newer Blender versions) is both fast and robust as long as the meshes are closed (manifold).
-
Thumbnail Labels
When enabled, displays the names of INSERTS under the thumbnails in the addon’s preview browser.
-
Use KIT OPS BATCH (PRO)
Enables the built-in KIT OPS BATCH batch-authoring tools. When on, a ♥BA tab appears in the 3D View sidebar. Off by default; the setting persists across sessions. If the old standalone KIT OPS BATCH addon is still installed, this toggle defers to it — remove the standalone copy first. See the KIT OPS BATCH chapter.
-
Remove KIT OPS Props
Removes the KIT OPS properties of an INSERT when you add it to a scene with no target selected. On by default, so you can keep adding KIT OPS INSERTS to the INSERT you just added. An INSERT always adds itself to the selected target; if you add an INSERT to an INSERT that has a target, the new INSERT is added to the same target.
This pref comes in handy when you want to start building an object using an INSERT as the base object.
-
Sort Modifiers
When enabled, lets you select which modifiers are always placed AFTER any modifiers KIT OPS inserts. Leave unchecked unless you are sure about what you want. The defaults shown are the weighted normal modifier — which always helps a model after many boolean modifiers — and the last bevel modifier, good for adding that final bevel on an object full of KIT OPS INSERTS. Of note: this does NOT add modifiers, it only sorts existing ones.
Advanced — control sorting per modifier by name. Two name prefixes give you exact control over what the sorter may touch:
-
Start a modifier’s name with an underscore (
_Bevel) and sorting stops at that modifier — it and everything below it stay exactly where you put them. -
Start a modifier’s name with a space (
Bevel) and the sorter ignores that modifier, sorting around it while it holds its position.
Use these when you’ve hand-built a modifier stack (say, a bevel that must sit between two specific booleans) and don’t want KIT OPS re-ordering it as you add more INSERTS.
 NOTE: Blender 4.1 added two new normal modifiers for different types of auto-smoothing. We recommend you keep them in the default selected mode as shown, so the auto-smooth modifiers move to the bottom of the modifier stack. They will not show up in older versions of Blender.
-
Export Settings & Import Settings
Save and restore your custom preferences with ease, ensuring a seamless experience when reinstalling the addon. They save your favorites as well as all your Masterfolder settings. Import Settings skips any Masterfolder paths that no longer exist on disk.
-
Thumbnail Caching
Gives you INSTANT thumbnail viewing for your KIT OPS INSERTS. Click the button once to install the thumbnail caching engine. See the FAQ for how to uninstall the caching engine.
-
Favorites
Clears all Favorites you have set within KIT OPS.
-
Hardpoints Preview Color
Sets your preferred display color for hardpoints — snap points that let INSERTS click onto other INSERTS like building blocks. See Hardpoints for the full workflow.
-
Default Render Engine
Chooses which render engine (Eevee or Cycles) KIT OPS uses by default when rendering INSERT thumbnails.
Note: the old Check for Updates button is deprecated. To update KIT OPS, Export your Settings, then install the newest zip by dragging it onto the 3D viewport.
FILE PATH Tab
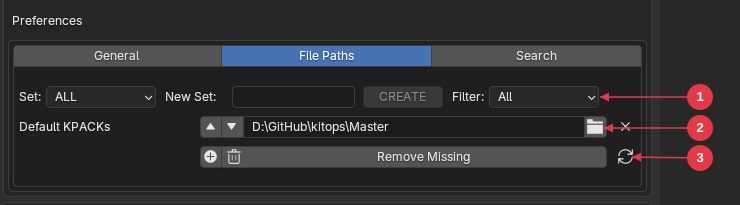
- Sets bar — the Set selector switches between your KPACK Sets; type a name in New Set and press CREATE to make one; Filter narrows which KPACKS are listed.
- Masterfolder path — one row per registered Masterfolder: reorder arrows, the folder path, a browse button, and an X to remove the entry.
- Path management row — + adds a new Masterfolder path, the trash button removes the selected one, Remove Missing cleans up entries whose folders no longer exist on disk, and the refresh button reloads all paths.
This section connects your Masterfolders and KPACK folders to the addon. If any of this is unfamiliar, review the “To install KPACKS” section above, which explains how Masterfolders and KPACKS fit together.
You can also create Sets for KPACKS, letting you selectively view or hide specific items. To create a Set, enter a name of your choice in the New Set field and toggle the view button  for the items you want to display or hide. For example, create a Set named “Materials” and toggle on all Material KPACKS while toggling off everything else.
Once your Sets exist, you can switch between them at any time, making it quick to reach exactly the KPACKS you need.
SEARCH TAB

The Search tab can be opened from the main KIT OPS panel and lets you search for a named INSERT in any KPACK, whether it is loaded or not. It searches all registered Masterfolders for a fuzzy match to the name you type and presents a list of all hits. Clicking an INSERT automatically loads that KPACK into the KIT OPS panel, ready for INSERTion.
We have prepared a comprehensive video tutorial that covers these features in detail:
Placing INSERTS
Placing INSERTS is the heart of KIT OPS: pick a target, pick an INSERT, drop it exactly where you want it — scaled, rotated, and snapped — and any boolean cutters in the INSERT go to work on the target immediately. Everything in this chapter works in both KIT OPS FREE and KIT OPS PRO except where marked (PRO).
The Add INSERT workflow
- Select a target. Click the mesh object you want the INSERT applied to.
- Choose an INSERT. Pick a KPACK from the dropdown and browse its thumbnails. The big button under the thumbnail matches the INSERT type: Add INSERT, Add DECAL, Add Material INSERT, Add Geo Node INSERT, or Add Shader Node INSERT.
- Press the Add button. The INSERT appears under your mouse and glides across the target’s surface as you move.
- Adjust while you place. Scroll to resize, Alt-scroll to rotate, tap a snap key to lock onto faces, edges, or vertices — the full list is in the shortcut table below. Blender’s status bar (bottom of the window) shows the available keys the whole time you’re placing.
- Click to drop it. Left-click (or Enter) places the INSERT. Any cutters in the INSERT add their boolean modifiers to the target the moment it lands. Esc or right-click cancels and removes the INSERT.
No target selected? The INSERT is placed at the 3D cursor instead. By default KIT OPS then removes its INSERT properties (the Remove KIT OPS Props preference), so the new object can itself become a target — the standard way to start building a model from an INSERT.
Adding onto a placed INSERT. Add an INSERT while another INSERT is selected and the new one is applied to the same target as the existing one — so you can stack details without re-selecting the base object. An INSERT that has no target can’t receive INSERTS; KIT OPS warns you if you try.
Materials are reused. When an INSERT’s materials and textures already exist in the scene, KIT OPS reuses them — ten copies of the same INSERT share one set of texture maps. Hold Ctrl while clicking the Add button to force a unique, fully independent copy with its own materials and images.
Apply your target’s scale. If the target object has a non-applied scale, KIT OPS warns you after placement. Booleans and snapping behave best on targets with a scale of 1,1,1 — use Object > Apply > Scale on the target first.
NOTE: We deliberately do not use a drag-and-drop action. Rotating and scaling the INSERT while dragging it around the target requires the mouse buttons — impossible if the mouse is busy dragging the thumbnail out of a panel.
Because an INSERT can include multiple objects, you can cut a hole and fill it in one drop. For instance, a screw INSERT can carve the screw hole and place the screw in it, in a single click.
Placement shortcuts
All of these work while the INSERT is live under your mouse (after pressing Add INSERT, and also during Relocate INSERT and Duplicate INSERT):
| Input | Action |
|---|---|
| Move mouse | Slide the INSERT across the target surface |
| Left-click or Enter | Place the INSERT |
| Shift + click | Place the INSERT and immediately start placing another copy (multi-add) |
| Esc or right-click | Cancel — the INSERT is removed |
| Mouse scroll | Resize the INSERT. With Auto scale INSERT on (the default) this steps through the Large / Medium / Small preset sizes; with it off, each step scales by 10% |
| Shift + scroll | Fine resize — 1% steps (Auto scale off) |
| Alt + scroll | Rotate the INSERT 15° about its vertical axis |
| Shift + Alt + scroll | Fine rotate — 1° steps |
| F | Snap to FACE |
| E | Snap to EDGE |
| C | While in Edge snap: toggle between nearest point and edge CENTER |
| V | Snap to VERTEX |
| N | Cancel snap mode |
| X / Y / Z | Restrict movement to that axis (press the same key again to release; the restriction resets each time you start a new placement) |
| P | Toggle Place on selected INSERT (PRO) |
| I | Toggle Flip Placement — place the INSERT on the inside of the target (PRO) |
| G / R / S | Drop the INSERT where it is and hand off to Blender’s native Grab / Rotate / Scale |
| Ctrl + Add button | Force a unique copy with its own materials and images (hold Ctrl when you click Add INSERT or Add Material) |
Hardpoint snapping is the one snap mode you choose before placing: set Snap Mode to Hardpoints in the Controls panel, then press Add INSERT — see Hardpoints. It cannot be switched on mid-placement.
Place on selected INSERT (PRO) places the new INSERT on the surface of a selected INSERT rather than on the target — ideal for layering greebles on greebles. The new INSERT is still associated with the underlying target object. Flip Placement (PRO) flips the placement in Z so the INSERT is added to the inside face of the target — handy for interiors and recessed details.
Snapping
Snapping is a KIT OPS FREE feature — every mode below works in both editions.
The Snap Mode row in the Controls panel offers five modes: None, Vertex, Edge, Face, and Hardpoints. While an INSERT is live under your mouse you can switch between Face, Edge, and Vertex instantly with F, E, and V, and drop back to free placement with N — no need to touch the panel.
- Face — the INSERT snaps to the center of the face under the mouse and aligns to it. The fastest way to get clean, centered placement on paneling.
- Edge — the INSERT snaps along the nearest edge. Press C to toggle between the nearest point on the edge and the edge center; the same choice appears in the panel as a Nearest / Center option while Edge mode is active.
- Vertex — the INSERT snaps to the nearest vertex. Precise corner placement.
- Hardpoints — the INSERT snaps to designated hardpoint markers; see the next section. Choose this mode in the panel before pressing Add INSERT.
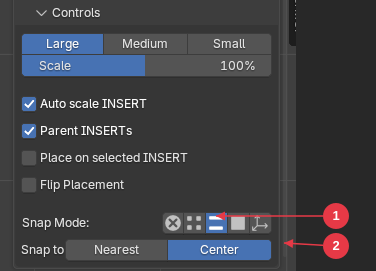
- Snap Mode row — Edge mode active
- Nearest / Center — the edge-snap option that appears while Edge mode is active (toggled with C during placement)
Snap mode persists between placements, so a modeling session of repeated edge-snapped INSERTS only needs the mode set once.
SMART mode vs REGULAR mode
KIT OPS keeps placed INSERTS live: as long as an INSERT knows its target, the Modifiers and Controls panels operate on it in real time.
- Mirror X / Y / Z — mirrors the selected INSERT about the target’s origin. Toggling an axis adds or removes a real mirror modifier immediately, and any boolean cutters mirror with it, so the cut updates live on the target.
- Array Count and Offset — arrays the INSERT with a constant offset. Change the count or offset and the array (and its booleans) update as you type.
- Align and Stretch — the eight buttons in the Controls panel align the selected INSERT to the target’s bounds (top, bottom, left, right, horizontal center, vertical center) or stretch it to the target’s width or height.
The Mode setting controls how much of this live behavior applies to INSERTS you have already placed:
- REGULAR (the default) treats placed INSERTS as finished work. KIT OPS stops creating modifiers for existing INSERT objects — only the INSERT you are currently adding is fully live. KIT OPS still remembers each INSERT’s target behind the scenes, which is how a new INSERT added on top of a placed one finds its way to the same target.
- SMART keeps INSERTS in play. KIT OPS continues creating and updating modifiers as you keep working an INSERT against its target — use it while you are still iterating on a design and expect to keep re-mirroring, re-arraying, and re-targeting pieces. Switching to SMART also selects every INSERT in the scene, so you can see at a glance what is live.
Switch between the two with the Toggle Mode command — press F3 (Blender’s operator search) and run Toggle Mode. KIT OPS switches itself back to REGULAR automatically when you enter a FACTORY authoring scene.
When in doubt, stay in REGULAR: it is the default for a reason, and everything in this chapter — including live Mirror, Array, Align, and Stretch on the currently selected INSERT — works there.
Changing an INSERT’s target. Select the INSERT and use the Target Object field at the bottom of the KPACKS panel (delete the entry, then use the eyedropper to pick a new object). KIT OPS moves the INSERT’s boolean modifiers from the old target to the new one for you.
Hardpoints
Hardpoints are named snap points authored into an INSERT — think of them as mounting sockets. An INSERT placed in hardpoint snap mode clicks precisely onto a hardpoint, the way a building-block stud accepts a brick. Classic use: a mech torso with hardpoints at the shoulders and hips, and arm/leg INSERTS that snap onto them — swap limbs endlessly with zero manual alignment.
Watch hardpoints in action:
Snapping to hardpoints (FREE):
- Have an object with hardpoints in the scene (many KPACKS include them; authoring your own is PRO — see the FACTORY section of Creating INSERTS).
- In the Controls panel, set Snap Mode to Hardpoints (the arrows icon). Do this before adding — hardpoint snapping cannot be enabled mid-placement.
- Press Add INSERT. The INSERT now snaps from hardpoint to hardpoint as you move the mouse. Click to lock it on.
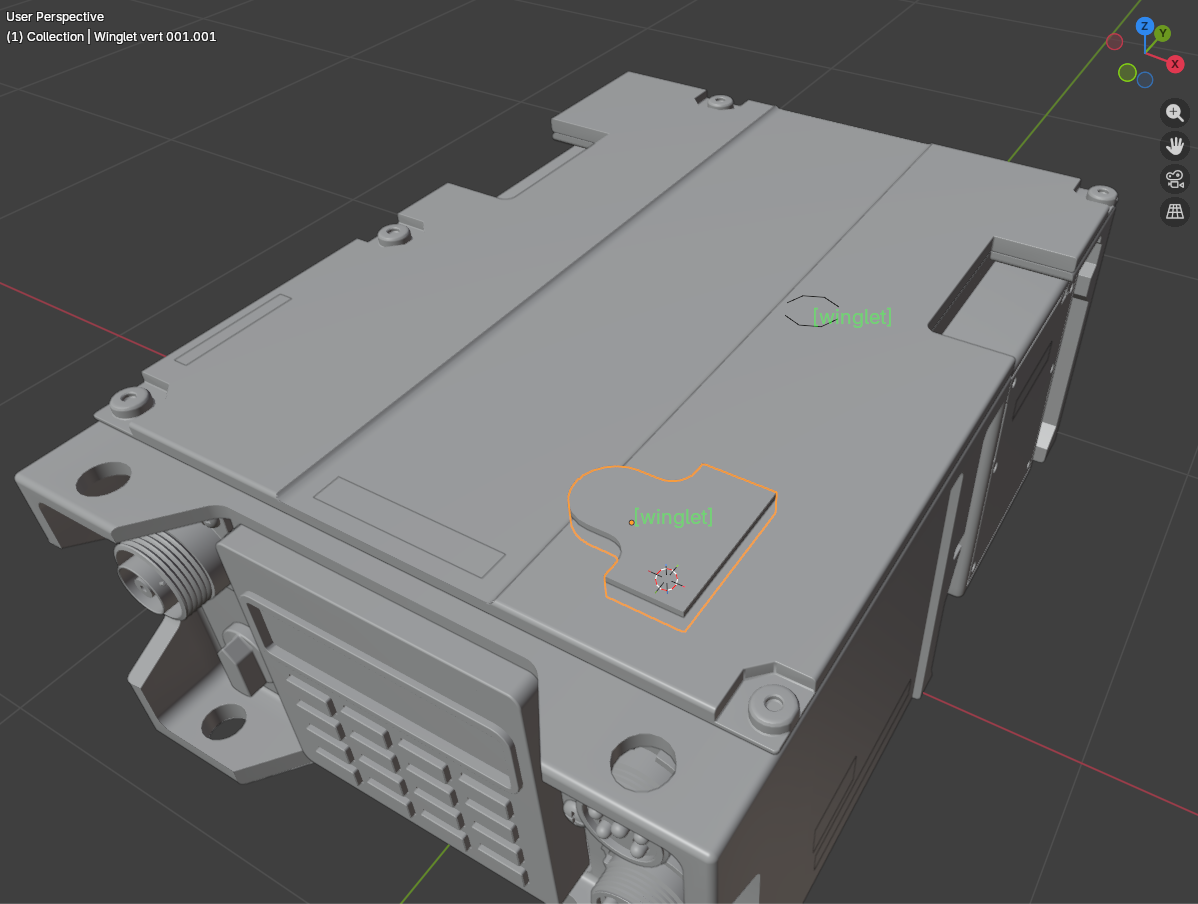
Two options appear in the Controls panel while Hardpoints mode is active:
- Only Snap to Empty Hardpoints (on by default) — hardpoints that already have an INSERT snapped to them are skipped, so you can’t double-book a socket.
-
Only Use Tags Matching — hardpoints can carry tags (e.g.
arm,weapon). Enter tags here and only matching hardpoints are offered — so an arm INSERT only ever snaps to arm sockets.
Hardpoints display in the viewport in the color set by Hardpoints Preview Color in the preferences (green by default).
Authoring hardpoints — adding them to your own INSERTS and tagging them — is a PRO FACTORY feature; see the Creating INSERTS chapter.
Managing placed INSERTS
An INSERT is often several objects. These tools treat it as one thing. Most of them are also available by right-clicking in the viewport — the KIT OPS submenu of the object context menu.
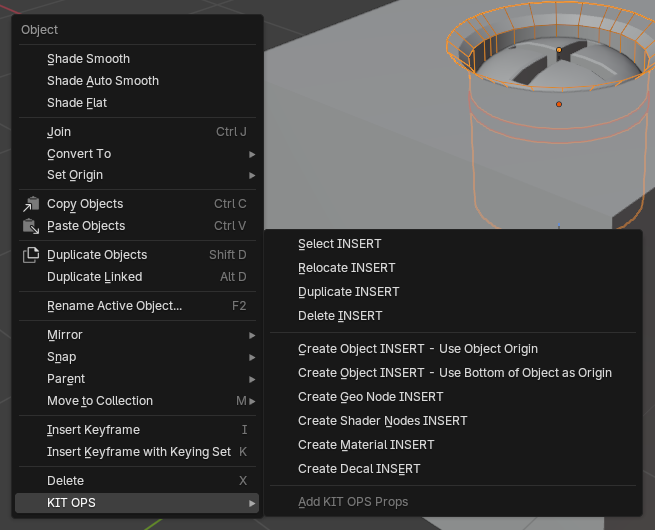
Select INSERT
Selects every object belonging to the active INSERT. Use it before moving or deleting an INSERT that has multiple objects, so nothing gets left behind.
Select All INSERTS
Selects all INSERTS in the scene at once — useful before a mass delete, move, or Replace.
Filter by role: right after clicking, open the operator panel in the bottom-left corner of the viewport (or press F9) — checkboxes let you limit the selection to Solid, Cutter, and/or Wire INSERT objects. “Select all cutters” is one click away.
Select Similar INSERTs
Selects every INSERT in the scene that came from the same source INSERT as the selected one. Perfect for grabbing all twelve copies of the same bolt.
Duplicate INSERT
Copies the selected INSERT — all its objects, with fresh boolean modifiers on the target — and immediately lets you place the copy. All the placement shortcuts apply, including X / Y / Z to restrict movement to one axis.
Delete INSERT
Deletes the selected INSERTS and removes their boolean modifiers from the target object — no leftover modifiers pointing at missing objects.
Blender’s own Delete (X) now clears up after itself the same way. Delete an INSERT from the viewport and KIT OPS removes its boolean modifier, drops the cut, and frees the objects for you.
Relocate INSERT
Picks the selected INSERT back up and lets you re-place it with the full placement controls — scroll to resize, Alt-scroll to rotate, snapping and axis restriction included. The INSERT’s boolean is suspended while it moves and restored when you drop it.
Replace INSERT(s) (PRO)
Replaces every selected INSERT with the INSERT currently shown in the thumbnail browser. Select all the placeholder bolts, browse to the fancy bolt, press Replace — done.
Convert to mesh
Applies the INSERT’s modifiers and strips its KIT OPS properties, leaving a plain mesh. Use it when a piece of the design is final and you want to edit the raw geometry, or before exporting.
Remove Unused Wire INSERTS
Removes wire helper objects that no longer serve any INSERT, keeping the transforms of their child objects intact. Good housekeeping on long-running scenes.
Clean Boolean Modifiers (PRO)
Removes boolean modifiers whose cutter object is missing from the scene. KIT OPS clears its own booleans when you delete an INSERT, so reach for this when the leftovers came from somewhere else — a boolean you built by hand, or one another add-on left behind.
Remove KIT OPS props / Add KIT OPS Props
Remove KIT OPS props strips the KIT OPS metadata from the selected objects — used when you want to add an INSERT to an existing INSERT that has no target (this is what the Remove KIT OPS Props preference automates). Add KIT OPS Props (right-click menu) does the reverse, making a plain object eligible as a managed KIT OPS object.
Working with material INSERTS
Add Material applies the chosen material INSERT to every selected object, into each object’s active material slot — so you can retexture one face group of a multi-material object by selecting the right slot first. If an object has no slots, the material is added as its first. With nothing selected, the material is imported into the scene ready to assign anywhere. Materials already in the scene are reused by default; hold Ctrl to force an independent copy.
We’ve created a video highlighting 9 reasons to use KIT OPS to manage your materials in Blender:
Working with decals
Decal INSERTS place like any other INSERT — same placement controls, same snapping — and wrap around the target’s surface. Creating your own decals from PNG files is a PRO feature; see the Creating INSERTS chapter.
KIT OPS Interface
Screenshots in this chapter show KIT OPS PRO. In KIT OPS FREE the panels are the same but PRO-only controls — marked (PRO) in the legends — do not appear.
Note: You can right-click on an INSERT or right-click in the viewport to access many of the same features listed below in the panel description.
Main
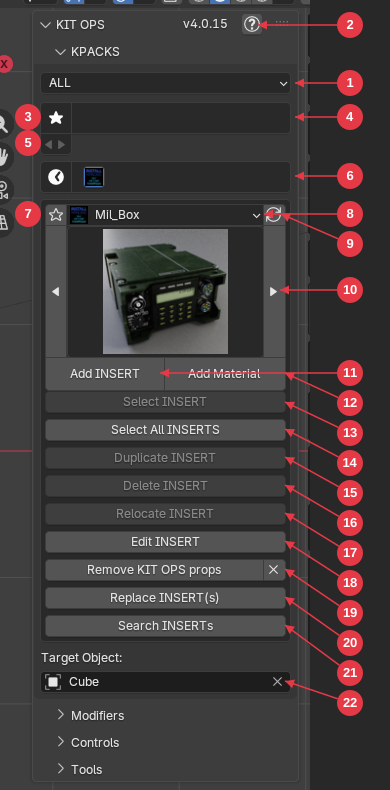
- KPACK Sets menu (PRO) — loads different Sets of KPACKS (see Preferences for more details).
- Documentation link — opens this documentation.
- Favorites toggle (PRO) — shows and hides the favorites list.
- Favorites list (PRO) — shows up to 3 rows of favorite KPACKS for quick access.
- Favorites reorder (PRO) — moves favorites up and down the favorites list.
- Recently used KPACKS (PRO) — quick access to your most recent KPACKS.
- Favorite star (PRO) — press the star (it turns blue) to add the current KPACK to the favorites list.
- KPACK name — the selected KPACK; use the dropdown to switch KPACKS.
- Refresh — reloads all KPACKS in case files have changed.
- Thumbnail browser — the current INSERT, with arrows to select a different INSERT in the current KPACK (Ctrl-click an arrow to jump to the next KPACK).
- Add INSERT — adds the chosen INSERT to the target, or if no target is selected, places the INSERT at the cursor location. Hold Ctrl to force a unique copy with its own materials and textures. See Placing INSERTS for all placement shortcuts.
- Add Material — adds the chosen INSERT’s material to the active material slot of all selected objects, or if no target is selected, imports the material ready to be applied to any object(s).
- Select INSERT — selects the whole INSERT including all of its objects. Useful for moving an INSERT that has multiple objects.
- Select All INSERTS — selects all INSERTS. Useful for deleting, moving or replacing with a different INSERT.
- Duplicate INSERT — duplicates the selected INSERT; constrain movement to X, Y or Z by pressing the X, Y or Z keys.
- Delete INSERT — deletes the selected INSERTS and also removes their boolean modifiers from the target object. Blender’s own Delete (X) does the same clean-up.
- Relocate INSERT — re-places the INSERT with the full placement controls: scrollwheel to scale, Alt-scrollwheel to rotate, snapping included.
- Edit INSERT (PRO) — edits the INSERT shown in the thumbnail by launching a separate instance of Blender and loading the INSERT into it (the INSERT FACTORY).
- Remove KIT OPS Props — used when trying to add an INSERT to an existing INSERT without any target.
- Replace INSERT(s) (PRO) — replaces the selected INSERTS with the thumbnail INSERT.
- Search INSERTs (PRO) — opens the Blender Preferences window to use the INSERT search feature.
- Target Object — the name of the target object for the selected INSERT. Change it by deleting the entry and using the eyedropper to select a new target — KIT OPS re-wires the boolean modifiers for you.
Modifiers and Controls
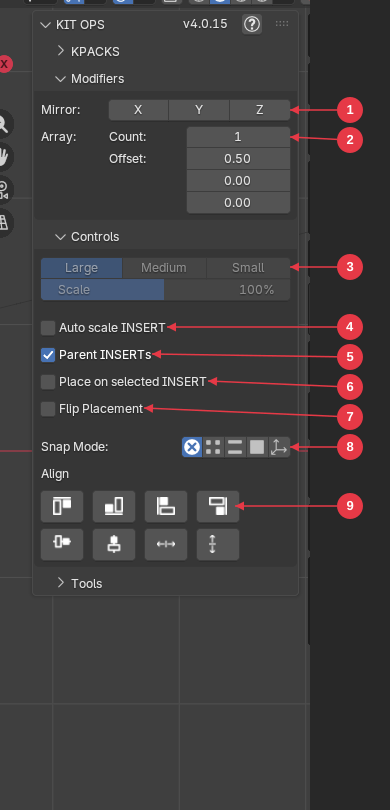
- Mirror — mirrors the INSERT about the X, Y or Z of the target object using its origin. Booleans mirror with it, live.
- Array — arrays the INSERT based on count and offset settings, updating live as you type.
- INSERT scale — same or custom scaling presets (Large / Medium / Small) for INSERTS. Handy when you know you want an INSERT applied at 50% scale (or other). Requires Auto Scale INSERT to be on.
- Auto scale INSERT — turns on Auto Scale INSERT for the above controls.
- Parent INSERTs — parents the INSERT to the target object when applied.
- Place on selected INSERT (PRO) — places an INSERT on a selected INSERT when no target is available. Shortcut during placement: P.
- Flip Placement (PRO) — flips the direction of an INSERT in the Z direction when placing on target. Shortcut during placement: I.
- Snap Mode — none, vertex, edge, face, or hardpoints. See Snapping — Face/Edge/Vertex can also be switched with F/E/V while placing, and Edge mode offers a Nearest/Center choice (C).
- Align — alignment and stretch options for the selected INSERT on its target: top, bottom, left, right, horizontal center, vertical center, stretch wide, stretch tall.
Tools
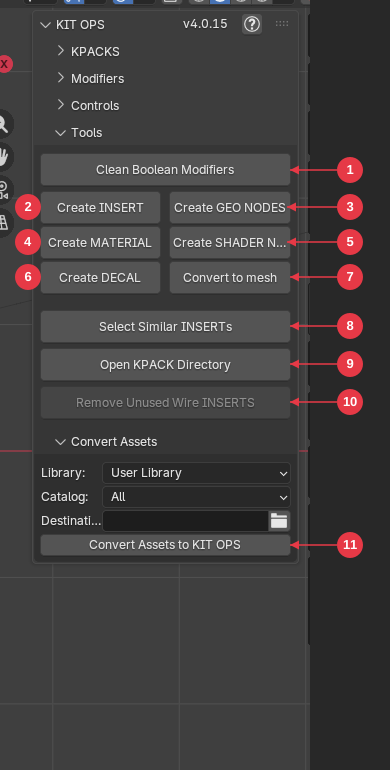
Items 1–6 are PRO. In KIT OPS FREE you create INSERTS from the right-click Object context menu instead — see the Creating INSERTS chapter.
- Clean Boolean Modifiers (PRO) — removes any boolean modifiers whose cutter object is missing from the scene. KIT OPS clears its own automatically when you delete an INSERT, in FREE and PRO alike.
- Create INSERT (PRO) — creates an INSERT from the selected object in the current KPACK directory (including thumbnail). Note: you can also right-click the object and choose Create INSERT from the KIT OPS menu (FREE + PRO).
- Create GEO NODES (PRO) — creates a Geometry Nodes INSERT from the selected object’s geometry node group.
- Create MATERIAL (PRO) — creates a material INSERT from the selected object.
- Create SHADER NODES (PRO) — creates a Shader Nodes INSERT from the selected object’s material node group.
- Create DECAL (PRO) — opens a file window so you can select a PNG file to create a decal with — then creates an INSERT in the selected KPACK directory.
- Convert to mesh — converts the selected INSERT to a plain mesh (applies modifiers, removes KIT OPS properties).
- Select Similar INSERTs — selects all INSERTS in the scene that match the selected one.
- Open KPACK Directory — opens the current KPACK directory in your file browser.
- Remove Unused Wire INSERTS — removes wire INSERTS that are not used by KIT OPS anymore.
- Convert Assets to KIT OPS (PRO) — converts Blender Asset Browser assets to KIT OPS KPACKS. Choose the asset Library and Catalog, set a destination Masterfolder, then press the button.
Creating INSERTS
Every INSERT you use came from someone making it — and making your own is fast. KIT OPS gives you four ways to create INSERTS, from a two-click menu command to a full authoring environment:
- Quick-create from the right-click menu (FREE + PRO) — the fastest path. Select an object, right-click, pick an INSERT type. Done, thumbnail included.
- In-scene creation buttons (PRO) — the same quick-create engine, plus DECAL creation, as buttons in the Tools panel.
- INSERT FACTORY (PRO) — the full authoring environment: edit existing INSERTS, build multi-object INSERTS with cutters, wires and hardpoints, and control thumbnail rendering.
- Convert Assets to KIT OPS (PRO) — turn a whole Blender Asset Library into INSERTS in one pass.
Creating many INSERTS at once from folders of files? See the KIT OPS BATCH chapter.
Quick-create from the right-click menu (FREE + PRO)
The simplest way to create an INSERT works in both KIT OPS FREE and KIT OPS PRO. The INSERT is saved into the current KPACK — the one shown in the thumbnail browser — so pick the KPACK you want first.
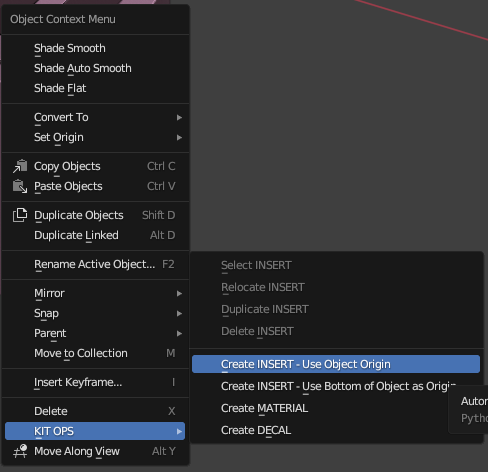
- In Object Mode, select the object you want to turn into an INSERT.
- Right-click in the viewport and open the KIT OPS submenu.
- Choose the INSERT type to create:
| Menu entry | What it creates |
|---|---|
| Create Object INSERT — Use Object Origin | An object INSERT, keeping the object’s own origin |
| Create Object INSERT — Use Bottom of Object as Origin | An object INSERT with the origin moved to the bottom of its bounding box — ideal for INSERTS that sit on surfaces |
| Create Geo Node INSERT | A Geometry Nodes INSERT from the object’s geometry node group |
| Create Shader Nodes INSERT | A Shader Nodes INSERT from the object’s material node group (shown only when the object has an active material) |
| Create Material INSERT | A material INSERT from the object’s active material (shown only when the object has an active material) |
KIT OPS saves the .blend into the current KPACK, automatically renders the thumbnail, and refreshes the KPACK browser — your new INSERT is immediately ready to place. If an INSERT with the same name already exists in the KPACK, KIT OPS asks Overwrite existing file? before replacing it.
(The same right-click KIT OPS submenu also carries Select, Relocate, Duplicate and Delete INSERT — handy shortcuts to the panel buttons.)
Rules for quick-create
- Apply scale and rotation first (Object > Apply > Rotation & Scale) or you may get unexpected results when the INSERT is placed. The INSERT always points up in the Z direction.
- The selected object must not have a parent — if it does, the parent (and everything attached to it) is added to the INSERT too. For a multi-object INSERT, select the top-level parent object; all of its children are included automatically.
- The origin of the INSERT is the origin of the selected object (or the bottom of its bounding box, if you chose that entry).
Cutters are a PRO feature
Quick-create in KIT OPS FREE produces additive INSERTS — objects, geo nodes, shader nodes and materials. It does not create boolean CUTTERS; the menu shows the note “Automatically Create Cutters in KIT OPS PRO”. In KIT OPS PRO, an object marked as a cutter is saved as a cutter, so the INSERT carves its target as it is placed. Marking objects as cutters is done in the INSERT FACTORY.
In-scene creation buttons (PRO)

KIT OPS PRO puts the same quick-create actions in the Tools panel, plus one more: select the object and press the button for the INSERT type you want — Create INSERT, Create GEO NODES, Create MATERIAL, Create SHADER NODES, or Create DECAL. The MATERIAL and SHADER NODES buttons appear when the object has an active material.
Create DECAL opens a file browser so you can choose any PNG file — KIT OPS builds a ready-to-use decal INSERT from it in the current KPACK, complete with the material setup that lets the decal wrap around objects. PNGs with alpha transparency work best.
As with quick-create, the object is saved in the current KPACK with an auto-rendered thumbnail, the origin comes from the selected (parent) object, and the INSERT points up in Z — so apply scale and rotation first.
Open INSERT FACTORY mode
The INSERT FACTORY (PRO) is where you edit and fine-tune INSERTS: designate the main object, mark cutters and wires, add hardpoints, and control exactly how the thumbnail is rendered.
You can edit any INSERT by selecting it in the KIT OPS panel and pressing the Edit INSERT button. This launches a separate instance of Blender and loads the INSERT into it. FACTORY mode has its own KIT OPS panel interface, shown below.
Once you are finished editing the INSERT, save it with Save INSERT, close Blender, then refresh the KIT OPS panel and re-add the INSERT (or select the original INSERT objects in your scene and use the Replace INSERT(s) button).
Main object rules
INSERTS can be made up of multiple objects. One of the objects must be designated the main object. Typically, if you have a boolean cutter that subtracts from the target object, you may want to make it the main object.
You cannot use an empty as the main object!
But you can create any object, like a cube, set its Object type to Wire, and make it the main object — it will not render or display, and you can use it for moving and snapping the entire INSERT.
The FACTORY panel
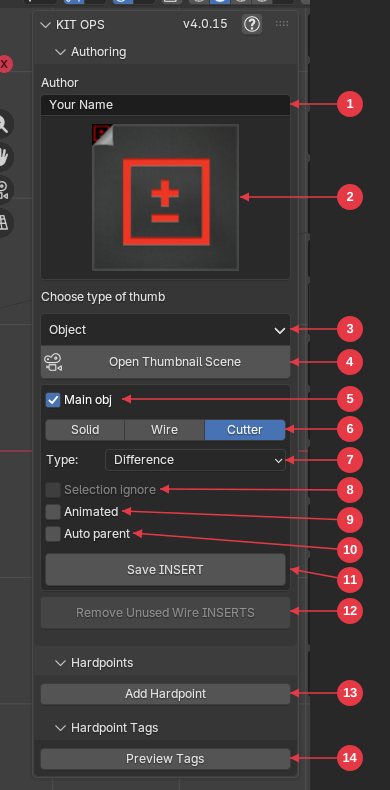
- Author — author name for the INSERT.
- Thumbnail preview — the INSERT’s current thumbnail.
- Thumbnail type — choose the type of thumbnail to render (Object, Material, Shader Node, Geo Node, Decal).
- Open Thumbnail Scene — loads the Render Scene where you can create the thumbnail.
- Main obj — if more than one object is part of an INSERT, then a Main object needs to be designated.
- Object type — type of object for the INSERT: Solid (default), Wire (displays as wireframe and will not render — useful for top level objects where you might use an empty), or Cutter.
- Cutter type — if a cutter is selected: Boolean Union, Difference, Intersect, or Insert*.
- Selection ignore — the object is skipped when KIT OPS selects the INSERT in the scene.
- Animated — set if the INSERT has animation associated with it.
- Auto parent — when on, KIT OPS tries to figure out what objects are best to be parented. Best left off.
- Save INSERT — saves the INSERT. DO NOT USE Blender > File > Save as this function does much more to correctly store the INSERT and its settings.
- Remove Unused Wire INSERTS — removes unused wire objects.
- Add Hardpoint — adds Hardpoints to the INSERT (see Hardpoints video)**.
- Preview Tags — previews Hardpoint tags in the viewport.
Cutter types — and the INSERT cutter
*An INSERT can have cutters that cut into the target object, and these are designated as Union, Difference or Intersection Booleans. But, if an INSERT has boolean cutters within itself, then they should be designated an INSERT cutter.
For example, take this INSERT:
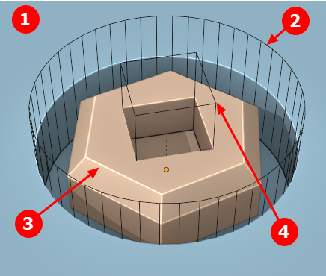 |
Blue is the target object (not a parent) The cutter is marked in FACTORY as Difference The bolt head is marked as SOLID The cube cutter is marked as INSERT because it only affects the INSERT and not the Target. |
|---|

Cube cutter in FACTORY mode marked as Insert
**Hardpoints video:
The thumbnail scene
The FACTORY gives you full control over the INSERT’s thumbnail:
- Choose the Thumbnail type (Object, Material, Shader Node, Geo Node, Decal) in the panel.
- Press Open Thumbnail Scene — KIT OPS loads a render scene with a template camera and lighting, with your INSERT staged in it.
- Compose the shot. Move Camera to INSERT frames the INSERT for you; adjust the camera or lighting further if you like.
- Pick the render engine — CYCLES, EEVEE, or Viewport (a fast snapshot of the active viewport).
- Press Render Thumbnail. The result is saved next to the INSERT’s .blend with the correct type suffix (see Thumbnail naming).
- Press Close Thumbnail Scene to return to the FACTORY scene.
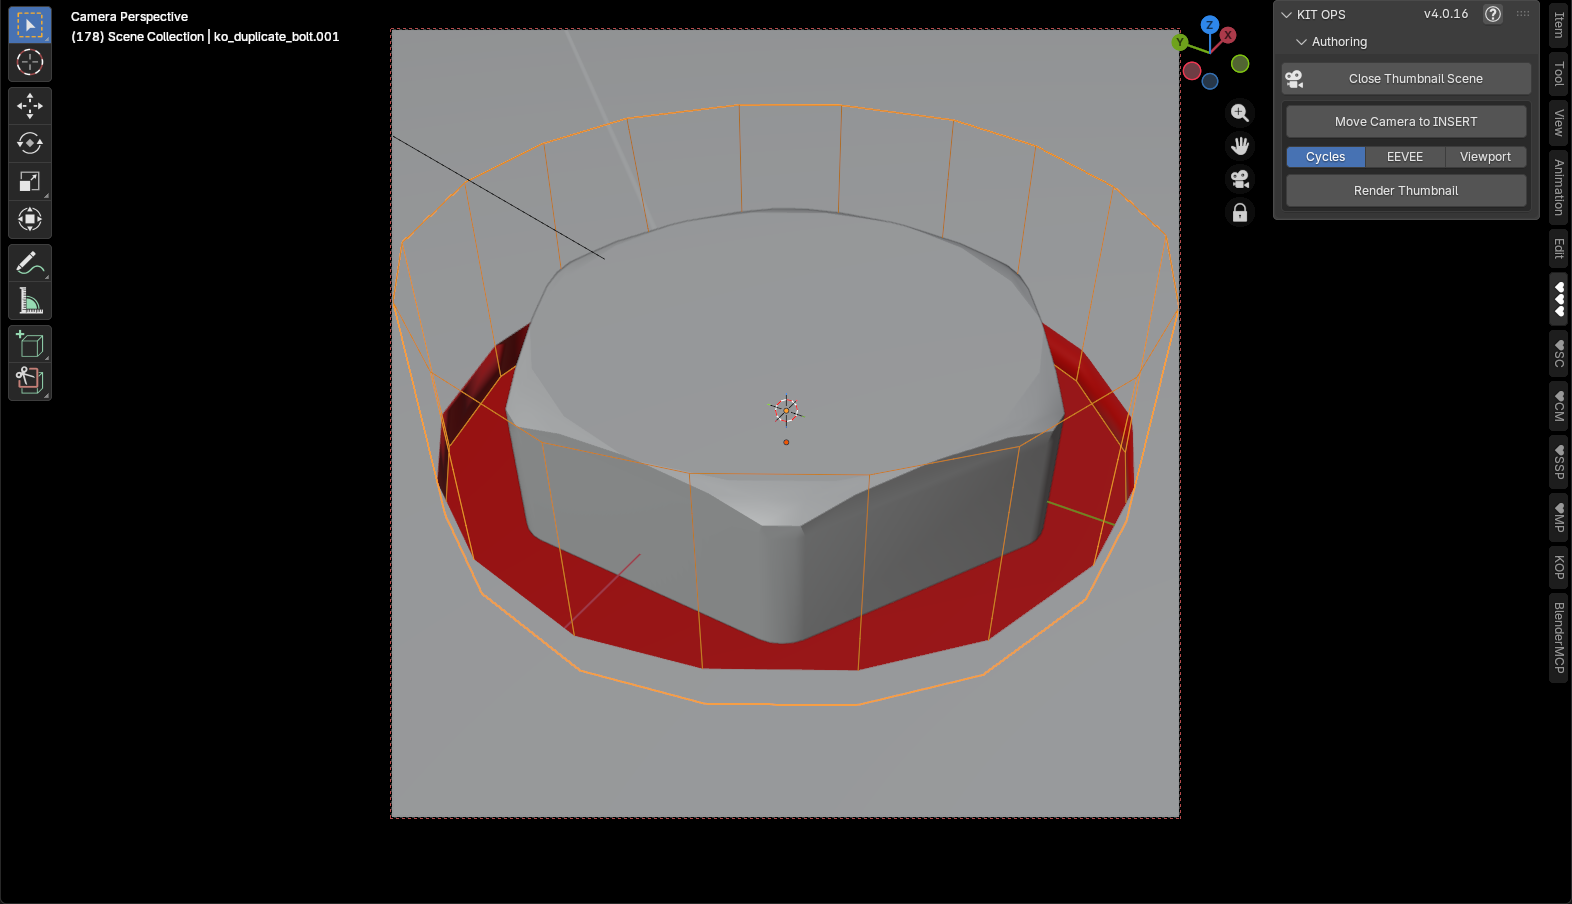
You can also customize the thumbnail scene template itself — see Editing the thumbnail generator scene in the Appendix.
Save INSERT — always
When your INSERT is ready, press Save INSERT — never Blender’s File > Save. Save INSERT does much more than write the file: it correctly stores the INSERT’s objects, properties and settings so the INSERT behaves properly when placed.
Save under a new name. In the FACTORY editing scene, hold Ctrl while clicking Save INSERT and a file dialog opens so you can save the INSERT under a new name or into a different KPACK — the original stays untouched. This is how you make a variant of an existing INSERT. (KIT OPS also opens the dialog automatically the first time an INSERT that has never been saved is stored.)
New file FACTORY mode
If you start Blender and want to immediately start creating an INSERT, you will see the KIT OPS panel is not set to FACTORY mode. Save the .blend file into a KPACK folder registered in Preferences, and when you open it again KIT OPS will be in FACTORY mode. Then you can continue to build the INSERT as you like. Remember to use the Save INSERT button for your final save.
Authoring hardpoints
Hardpoints are snap points that let INSERTS click onto designated mounts on other INSERTS — think LEGO studs. Placing onto hardpoints works in FREE and PRO; authoring them is a FACTORY (PRO) feature:
- In FACTORY mode, open the Hardpoints panel and press Add Hardpoint. Position the hardpoint where INSERTS should attach.
- With the hardpoint selected, set its Hardpoint tags in the panel. Tags control which INSERTS may snap to which hardpoints (a “bolt” hardpoint only accepts “bolt”-tagged INSERTS).
- Press Preview Tags to display the tags in the viewport while you work. The preview color can be changed in Preferences.
- Save INSERT as usual.
See the hardpoints video above for a full walkthrough.
Convert Assets to KIT OPS (PRO)
Already have a Blender Asset Library? KIT OPS PRO can convert its object and material assets into INSERTS in one pass — no re-saving files by hand.
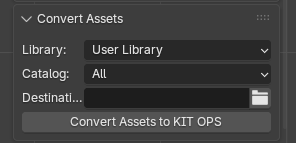
- Open the Tools panel and expand the Convert Assets sub-panel.
- Choose the asset Library — any library registered in Blender’s Preferences > File Paths > Asset Libraries.
- Choose the Catalog to convert (or all of them).
- Set the Destination — the Masterfolder where the new INSERTS should be saved.
- Press Convert Assets to KIT OPS.
KIT OPS works through the library’s .blend files, converting each object asset into an object INSERT and each material asset into a material INSERT, thumbnails included. A progress bar shows which asset is being processed; large libraries take a while, so let it run.
KIT OPS BATCH (PRO)
KIT OPS BATCH is the batch authoring toolkit built into KIT OPS PRO. Where the FACTORY tools create one INSERT at a time, BATCH converts existing content in bulk: whole scenes, folders of .blend files, material collections, node groups and PNG decal sets become INSERT libraries in one pass — and it batch-renders the thumbnails too.
Enabling BATCH
- Open Edit > Preferences > Add-ons > KIT OPS.
- Enable the Use KIT OPS BATCH toggle.
The ♥BA tab appears in the 3D View sidebar immediately (press N if the sidebar is hidden). The setting persists across sessions.
Note: if the old standalone KIT OPS BATCH addon is still installed, the embedded version steps aside and the standalone copy keeps ownership. Remove the standalone addon to use the built-in one.
The BATCH panel
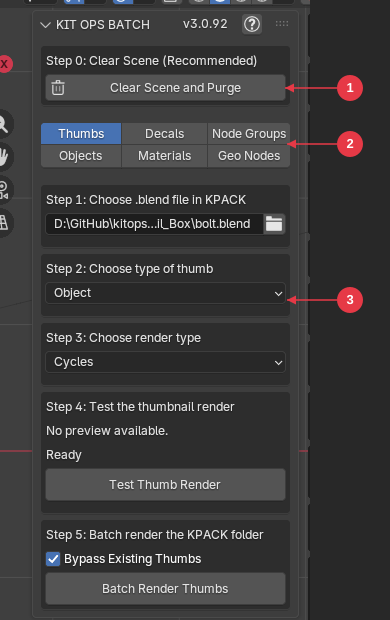
The panel is organized as a short pipeline:
- Step 0 — Clear Scene and Purge. BATCH works best in an empty scene. This button deletes all objects and purges all orphaned data. This cannot be undone — save your work first.
- Mode tabs — six modes: THUMBS, DECALS, NODE GROUPS, OBJECTS, MATERIALS, GEO NODES.
- Content area — the numbered steps and Create button for the selected mode.
Every batch operation shows live progress (“3 of 10”) in the panel and window header, and can be cancelled at any time with ESC or right-click.
OBJECTS mode — models to INSERTS
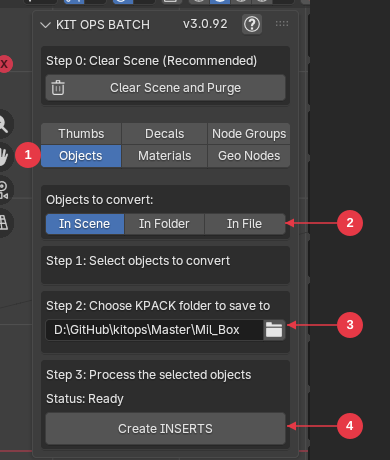
Converts mesh objects into INSERT files.
- OBJECTS tab — selects Objects mode.
-
Objects to convert — three sub-modes:
- In Scene — select mesh objects in the viewport. Each top-level object (with its children) becomes its own INSERT, named after the object.
- In Folder — point BATCH at a folder of .blend files. Every visible top-level mesh object in every file becomes an INSERT. This is the fastest way to convert a legacy asset library.
- In File — same as In Folder, but for a single source .blend file.
- KPACK destination folder — where the INSERT files are saved.
- Create INSERTS — runs the conversion; status is shown above the button.
DECALS mode — PNGs to decal INSERTS
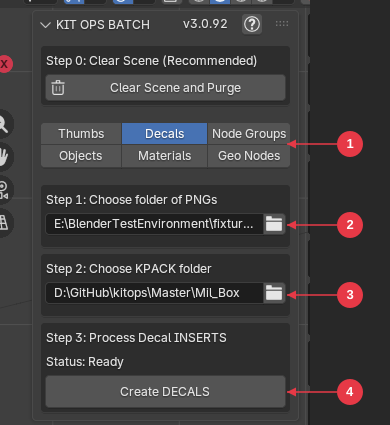
- DECALS tab — selects Decals mode.
- PNG folder — the folder of decal images to convert.
- KPACK destination folder — where the decal INSERTs are saved.
- Create DECALS — each PNG becomes a ready-to-use decal INSERT with the correct aspect ratio, material and settings.
Decal thumbnails are generated automatically from the source PNGs — no render pass needed. Use PNGs with alpha transparency for best results.
MATERIALS mode — extract a material library
Choose a source .blend file containing materials and a KPACK destination, press Create Material INSERTS. Every material in the file is saved as its own material INSERT, named after the material.
NODE GROUPS and GEO NODES modes
- NODE GROUPS — extracts every unique shader node group used by the materials in a source .blend file, each saved as its own INSERT.
- GEO NODES — extracts every geometry node group in a source .blend file, each saved as its own INSERT ready to apply as a modifier.
THUMBS mode — batch thumbnail rendering
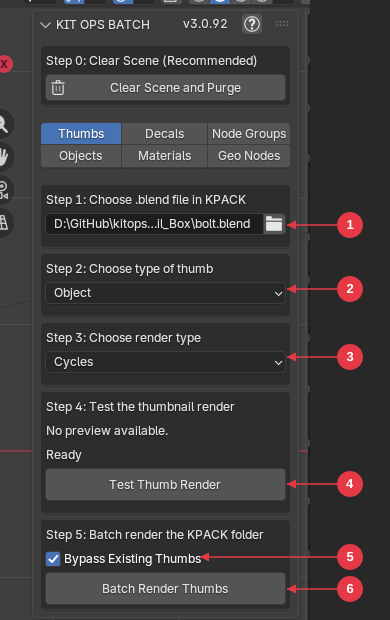
Renders the preview thumbnails for the INSERTS in a KPACK:
- .blend file — choose one INSERT .blend file in your KPACK.
- Thumbnail type — Object, Material, Shader Node, Geo Node, or Decal.
- Render type — EEVEE is fast, CYCLES is higher quality.
- Test Thumb Render — renders a single thumbnail; the result previews right in the panel.
- Bypass Existing Thumbs — skips INSERTS that already have thumbnails.
- Batch Render Thumbs — renders the whole KPACK folder. Rendering runs in background processes, so Blender stays responsive; progress shows as “Rendering X of Y”.
Test first, then batch — dial in the type and engine on one file before rendering the whole folder.
Thumbnails are saved next to each .blend with a type suffix — see Thumbnail naming in the FAQ.
Typical BATCH workflows
- Build an object KPACK: model or import your objects with clear names → OBJECTS > In Scene → Create INSERTS → THUMBS → batch render.
- Convert a legacy library: gather old .blend files in one folder → OBJECTS > In Folder → Create INSERTS → batch render thumbnails.
- Build a material library: collect materials in one .blend with descriptive names → MATERIALS → Create Material INSERTS → THUMBS (type: Material) → batch render.
- Build a decal KPACK: collect PNGs with descriptive filenames → DECALS → Create DECALS. Done — decal thumbnails are automatic.
KIT OPS EXTRA UTILITIES
KIT OPS EXTRA UTILITIES comes bundled with KIT OPS PRO. It is a separate companion add-on — install and enable it alongside KIT OPS and it docks under the same ♥♥♥ sidebar tab.
It is a purpose-built modeling and cleanup toolkit: 2D booleans (union, subtract and intersect on flat, coplanar shapes), the DeFillet suite (remove fillets and rounded corners in 2D and 3D), origin to bottom of the bounding box, image and material deduplication (remap duplicate textures and materials to one reference and clean out the rest), vertex align (flatten selected vertices to X, Y or Z — in the 3D viewport and the UV editor), and general mesh cleanup.
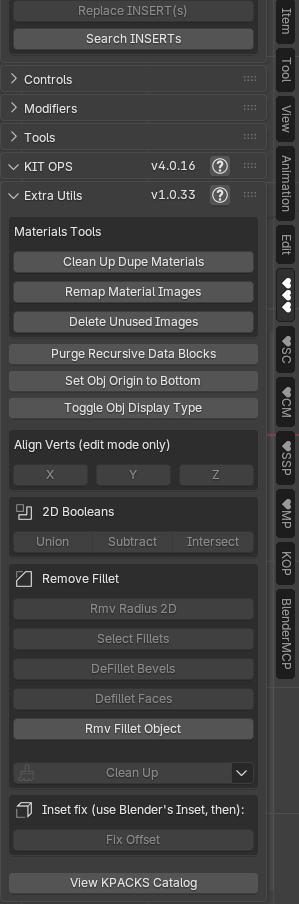
KIT OPS EXTRA UTILITIES has its own user manual: https://cw1.me/extra-utils
Common workflows
Five step-by-step recipes that string the tools together. Each links to the full reference for its steps.
Cut a hole and fill it in one drop (FREE + PRO)
- Select your target object.
- Browse to a boolean-cutting INSERT — any cutter part from a KPACK (the built-in Mil_Box screw-hole is a good test).
- Press Add INSERT, size it with the scrollwheel, tap F for face snapping, and click to drop. The hole is cut and the part sits in it — live.
- Fine-tune with the Modifiers and Controls panels: Mirror it, Array it, or Align it to the target’s bounds.
- When the design is final, use Convert to mesh — or leave it live and keep iterating.
Swap parts on hardpoints (FREE + PRO)
- Place an INSERT that has hardpoints (mech torsos, weapon mounts — see Hardpoints).
- Set Snap Mode to Hardpoints in the Controls panel before adding.
- Press Add INSERT with a compatible part — it clicks from socket to socket as you move. Click to lock it on.
- Repeat with different limbs/attachments. Only Snap to Empty Hardpoints stops double-booking; tag matching keeps arms out of leg sockets.
Make your own basic INSERT and reuse it (FREE + PRO)
- Model a part. Apply scale and rotation (Ctrl+A) and make sure it has no parent.
- Pick the KPACK it should live in (the one shown in the thumbnail browser).
- Right-click → KIT OPS → Create Object INSERT (bottom-origin variant for parts that sit on surfaces). The thumbnail renders automatically.
- Your part is now in the browser — place it like any other INSERT. Full rules: Creating INSERTS.
Author a boolean-cutting INSERT (PRO)
- Build the part plus its cutter geometry in a FACTORY scene (Edit INSERT on an existing INSERT, or save a .blend into a KPACK folder and reopen it).
- Select the cutter object and set Object type: Cutter, then its Cutter type (Difference / Union / Intersect — or Insert if it only cuts the INSERT itself, not the target).
- Designate the main object (never an empty — use a Wire cube if you need a neutral handle).
- Open the thumbnail scene, frame it, render the thumbnail.
- Press Save INSERT (never File > Save; Ctrl+click to save as a variant). Details: INSERT FACTORY.
Turn a folder of models into a browsable library (PRO)
- Enable Use KIT OPS BATCH in preferences — the ♥BA tab appears.
- OBJECTS > In Folder, point it at your folder of .blend files, set the KPACK destination, Create INSERTS.
- Switch to THUMBS, pick one .blend, Test Thumb Render to dial in the engine, then Batch Render Thumbs for the whole KPACK.
- Register the destination Masterfolder in Preferences — your library is live. Full detail: KIT OPS BATCH.
Tips
How to use a boolean object’s material in the target object
Here’s how you can change the material of your boolean cutter and have it shown on your target object.
Smoothing issues and how to fix them when using INSERTS
Sometimes you may encounter smoothing issues. Here are a few ways of troubleshooting.
Troubleshooting & FAQ
Can I sell models made with KIT OPS?
Yes. Models and renders you make with KIT OPS are yours — ship them, sell them, use them commercially without restriction. What you may not do is resell or redistribute the INSERTS and KPACKS themselves as assets; the INSERT files are licensed content. (INSERTS you author yourself are yours to sell, of course — that’s the KPACK ecosystem.)
Why can’t I create cutters or decals in FREE?
Boolean-cutting INSERTS and DECAL creation are KIT OPS PRO features. In KIT OPS FREE you can still quick-create additive Object, GEO NODES, SHADER NODES and MATERIAL INSERTS from the right-click menu — and you can place any boolean-cutting INSERT from any KPACK. To author your own cutters and decals (and get the full INSERT FACTORY), get KIT OPS PRO: https://chippwalters.com/kit-ops.html
To create your own material ball
Load Factory defaults in Blender. This disables both the KIT OPS and SYNTH addons. Edit the material.blend file found in your addons masterfolder, keep the same object name and save it. Then restart Blender.
KIT OPS keeps throwing an error
Make sure you are using Blender 4.2 or greater.
If you’re still having trouble with the addon, please check out http://cw1.me/trouble If that doesn’t fix it, then please check out http://cw1.me/helpyou
Create Decal fails with a “division by zero” error
If Create Decal From File (or BATCH DECALS mode) throws an error ending in ZeroDivisionError: division by zero, Blender could not read the pixel data of the PNG you picked. Blender loads the file without complaint, but it arrives empty — and decal creation then fails.
The usual causes:
-
The file is not really a PNG. Many images downloaded from the web are WebP or AVIF files renamed to
.png. The file browser filters by extension only, so they still show up. - The file is corrupt or truncated — an interrupted download or copy.
- The file is a cloud placeholder. OneDrive and Dropbox “online-only” files exist on disk but hold no data until downloaded.
The test: open the PNG directly in Blender’s Image Editor (Image > Open). If it shows up empty, black, or fails to open, the file is the problem — not KIT OPS.
The fix:
- Open the image in any image editor and re-export it as a real PNG.
- For OneDrive/Dropbox files, right-click the file and choose Always keep on this device, then wait for the download to finish.
One more thing: a failed attempt can still write a broken decal INSERT (a .blend with no visible geometry) into the target KPACK folder. Delete that .blend and its thumbnail before trying again.
Not seeing any thumbnails
This can happen if you’re not using the fast thumbnail cache. Sometimes it can take quite some time for thumbnails to display. The thumbnail rendering routine in KIT OPS is the same as in many other addons, and is an integral part of Blender.
Be sure to enable Thumbnail Caching Engine in Preferences.
Thumbnails are “multi-threaded” and have a lower priority than other threads in Blender. This means if you have something else going on (like EEVEE rendering) it can slow down the thumbnail display — especially if you have a slower computer.
Also check the thumbnail file names — see Thumbnail naming below.
Thumbnail naming
Each INSERT’s thumbnail is a PNG saved next to its .blend file, named after the .blend plus a type suffix:
| INSERT type | Thumbnail name |
|---|---|
| Object | name-0.png |
| Material | name-1.png |
| Geometry Nodes | name-2.png |
| Shader Nodes | name-3.png |
| Decal | name-4.png |
So for an object INSERT foo.blend, the thumbnail is foo-0.png. A plain foo.png (the old KIT OPS 3 convention) still loads as a legacy fallback, but new thumbnails are always written with the suffix. If an INSERT has no matching PNG at all, no thumbnail will display.
I enabled Use KIT OPS BATCH but no ♥BA tab appears
The old standalone KIT OPS BATCH addon is still installed, and it keeps ownership. Disable and remove the standalone KIT OPS BATCH addon in Edit > Preferences > Add-ons, restart Blender, and toggle the preference again.
Where does Blender actually install addons?
To find Blender’s add-on directory, switch to Blender’s Python Console window, type the following commands:
import bpy
bpy.utils.script_path_user()
Blender will tell you where the add-on directory is.
Note: when installed by drag-and-drop (Blender 4.2+), KIT OPS lives in Blender’s extensions folder instead, e.g. ...\Blender\<version>\extensions\user_default\kitops.
Why is my INSERT being added upside down?
This is because either your INSERT has flipped faces, or the object you’re adding to has flipped faces. See the diagram below to show the status of all faces (blue are correct and face outwards, red are reversed and face inwards — you want to add to blue faces).
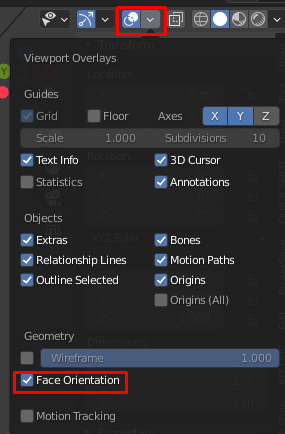
Why does my INSERT throw off the smoothing of the target object?
You may need to check your auto smooth settings or apply a Smooth by Angle modifier (Blender 4.1+) to the modifiers for the target object.
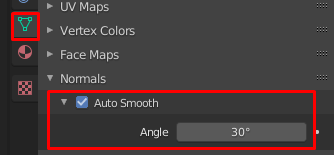
Or, you may have custom split normals on your cutter as shown below (If it says Clear Custom Split Normals Data — then you do have custom split normals.)

See for more details:
Why can’t I load KPACKS?
You need to unzip them first. See To install KPACKS
Uninstalling the Thumbnail Cache Engine ( Pillow )
Delete the PIL and Pillow-x.x.x.dist-info folders from your user Python site-packages folder, e.g. C:\Users\<username>\AppData\Roaming\Python\<PythonXX>\site-packages — where <PythonXX> matches the Python version bundled with your Blender (shown in Blender’s Python Console banner).

Why don’t my INSERTS display the correct texture maps?
There are a few reasons why this might be the case.
-
Firstly, make sure the material you use has a unique name. If KIT OPS adds an INSERT, and there are already materials in the scene with the same name, it will use the existing material that is already there. This way you don’t end up creating a huge material list which chews up all your graphics memory. (If you want an independent copy, hold Ctrl while adding the INSERT.)
-
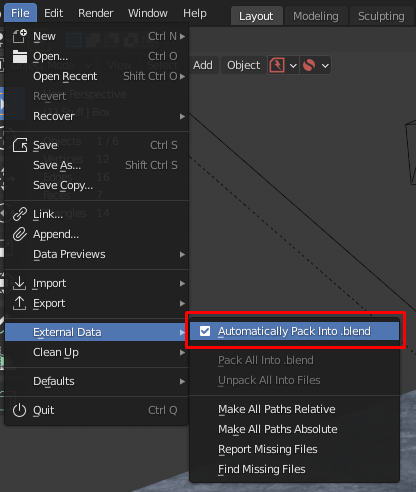
You may need to turn on Automatically Pack into .blend under File > External Data. See image below. FWIW, most people enable this feature in their startup file. This has been fixed in the RAVEN Edition. So, if you’re still seeing this problem, then the issue is that you are using CTRL + S to save your INSERT and not the Save INSERT button. Always use the Save INSERT button!
Visit Our KIT OPS Store
You can access tons of different KPACKS from Blender Market.
You can also visit the KPACK Repository at http://cw1.me/kpacks
Appendix
What was new in KIT OPS 3
KIT OPS 3 introduced the engine KIT OPS 4 still runs on: it removed the reliance on Blender’s Depsgraph (see below) for a tremendous improvement in speed — more open KPACKS and more INSERTS per scene without performance degradation, plus reliable network-drive access. It also replaced the old modal Group mode with dedicated Select INSERT / Select All INSERTS / Duplicate INSERT / Delete INSERT buttons (all shortcut-mappable), added the INSERT Search feature, and introduced the current Edit INSERT workflow that opens the INSERT in a separate Blender instance.
What is Depsgraph and why is it important to addons?
Using the Blender Dependency Graph within a Python add-on can provide powerful capabilities for developers to create advanced features and custom tools. However, integrating with the Depsgraph in a Python add-on also comes with potential challenges and issues. Here are some of the common difficulties that might arise:
- Performance Overheads: Python, being an interpreted language, typically runs slower than native C/C++ code, which is what Blender’s core is written in. When a Python add-on heavily interacts with the Depsgraph, particularly in complex scenes or frequent updates, it can introduce significant performance overheads. The speed at which the Depsgraph can be accessed and manipulated from Python might not be as fast as when done from Blender’s native code.
- Complexity in Handling Dependencies: Understanding and correctly managing dependencies between various elements in a scene can be complex. Python add-on developers need a deep understanding of Blender’s scene structure and the Depsgraph to avoid introducing bugs or unintended behaviors, especially when dealing with intricate dependency chains.
- Concurrency Issues: Blender’s Depsgraph is designed to handle concurrency to utilize multiple CPU cores. However, Python’s Global Interpreter Lock (GIL) can limit the effectiveness of multithreading within Python add-ons. This can lead to difficulties in achieving optimal performance improvements when trying to perform parallel operations through the Depsgraph in a Python context.
- API Limitations: While Blender’s Python API is extensive, it may not expose all the functionalities of the Depsgraph that are available to Blender’s internal operations. Some more intricate or deeper aspects of the Depsgraph might not be accessible, or their manipulation might be restricted, limiting what an add-on can achieve.
- Version Compatibility: Blender is actively developed, and with each release, significant changes can occur in its API and internal structures, including the Depsgraph. Python add-ons that interact with the Depsgraph need to be carefully maintained and updated to ensure compatibility with new Blender versions, which can be resource-intensive.
- Error Handling and Debugging: Debugging issues related to the Depsgraph can be challenging, especially when trying to trace through complex dependency chains or when dealing with asynchronous updates. Errors might not be straightforward to reproduce or isolate, complicating the debugging process.
- Impact on Scene Integrity: Incorrect manipulation of the Depsgraph via a Python add-on could potentially lead to data corruption or instability in the Blender scene. This makes it crucial to handle all interactions with the Depsgraph carefully and to thoroughly test the add-on under various conditions.
Default KPACK Location
When you first install the addon, it should already include a default KPACK called Mil_Box, which comes with a few INSERTs. This is typically saved in the default path of the addon.
When you navigate to the addon preferences, you’ll find three main tabs: General, File Path, and Search. We delve into these in the Preferences chapter, but for now, let’s focus on where the default KPACK lives.
In the File Path tab, you’ll see the linked folder. When installed by drag-and-drop (Blender 4.2+), the default Master folder lives inside Blender’s extensions tree, for example on a PC:
C:\Users\<username>\AppData\Roaming\Blender Foundation\Blender\<version>\extensions\user_default\kitops\Master
On a Mac:
/Users/$USER/Library/Application Support/Blender/<version>/extensions/user_default/kitops/Master
(Older non-extension installs use ...\<version>\scripts\addons\kitops\Master instead.)
Editing the thumbnail generator scene
A quick video tutorial on how to edit the thumbnail scene: